View in Alias VR
![]()
Opens the Alias VR environment where you can explore your models in virtual reality. The View in Alias VR Options window are only available if your VR device is connected.
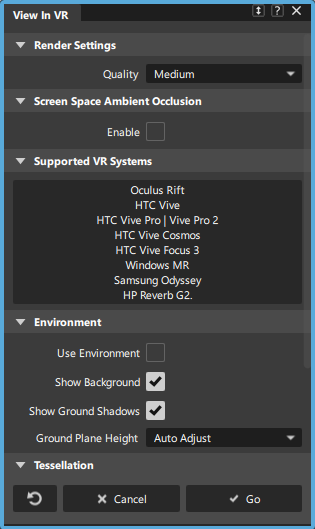
View in Alias VR Options
Render Settings
Select Low, Medium, or High according to your system capability. Higher settings result in better anti-aliasing but impact graphics performance.
Screen Space Ambient Occlusion
Turns on Screen Space Ambient Occlusion (SSAO). SSAO provides an efficient, realtime approximation of the baked ambient occlusion (AO). Although SSAO will never be as good as precomputed AO, or even baked lighting and shadows, SSAO is good for quick previews.
Radius - The radius of the virtual hemisphere outside which occlusion is ignored.
Intensity - The darkness of the occlusion. The higher the value, the darker the shadows.
Blur - The amount of blur to apply to the occlusion.
VR System
VR Device - Select the VR device that you are using, or use the Autodetect VR System option to automatically detect your VR device.
Environment
Specify the environment to use and the ground plane settings. Select from the following:
Use Environment - Uses the Alias environment to define the VR environment.
Show Background - Toggles the visibility of the environment background on and off in VR.
Show Ground Shadows - Toggles the visibility of ground shadows on and off in VR.
Ground Plane Height - Adjusts the ground plane alignment in VR.
Tessellation
Specify the settings for how the surfaces are tessellated. Select from the following:
Tessellator - Fast tessellates more quickly and less accurately. Accurate tessellates more accurately and more slowly.
Tolerance - Controls how accurately surfaces are tessellated.
VRED Material Matching
Lets you specify a material asset library that includes a schema for matching VRED material assets to Alias shaders. For example, you can specify the Automotive Asset library (located in the \Users\<user>\Documents\Autodesk\Automotive\VRED\Assets directory).
For more information about using VRED materials in Alias, see Export Alias data to VRED.
Type
Specifies the method fo matching VRED and Alias material assets.
None - Converts all Alias-based material to VRED materials. Any VRED Material Tags used to substitute an Alias shader are respected in View in VR.
Alias Shader Name - Matches materials based on the material name.
Standard Matching - Matches material based on the material ID.
View in VR requirements and supported devices
Alias VR lets explore models in virtual reality. Immerse yourself in the environment and experience your designs closer than ever before. Connect a virtual reality device and view your Alias scene in VR. Any changes to your scene in Alias appear in automatically View in VR. Alias VR features:
- Support for Alias variants, including camera, shading, geometry, and layer visibility masks.
- Viewing modes, including teleport and a 360 degree turntable animation.
- Different display modes including shading, wireframe, and zebra.
Supported VR Devices
![]()
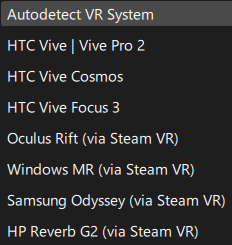
Alias VR supports:
HTC VIVE Pro 2, HTC VIVE Focus 3, HTC VIVE Cosmos, HTC VIVE
Note: You no longer need to install the Steam® Client to install Steam® VR, which provides the application drivers for displaying to a HTC Vive headset. See the HTC's support pages for information about installing Steam VR without creating a Steam Client accountOculus Rift S and Oculus Rift (Via Steam VR)
Note: Oculus Rift S and Oculus Rift headsets only support Windows 10 systems.Samsung Odyssey (Via Steam VR)
HP Reverb G2 (Via Steam VR)
Windows MR (Via Steam VR)
Video card/GPU
High performance is critical to a pleasant VR experience and is essential to reduce any discomfort. It is important to use an NVIDIA or AMD VR ready graphics card, with the amount of graphics power increased to meet your content demands.
PC
VR-ready PC that meets or exceeds device manufacturer's specifications.
OS
Windows only.
DirectX
Latest version of DirectX 11.
Physical Space
Desk or room scale.
Controller mapping
In the VR environment, the controllers display tooltips that show that function of each button. The tooltips dynamically change based on the active tool. You can toggle the controller tooltips on and off in the VR environment menu.
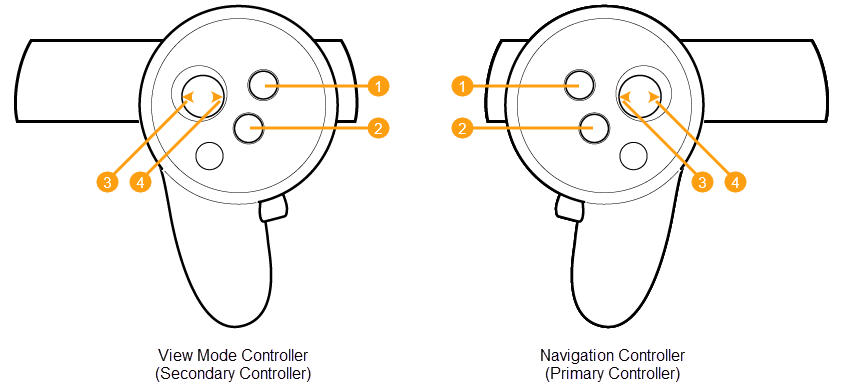
HTC VIVE Cosmos controllers
| View Mode Controller (Secondary Controller) | Navigation Controller (Primary Controller) |
|---|---|
| 1 Y Button: Toggle Menu visibility | 1 B Button: Toggle Menu visibility |
| 2 X Button:Display Mode cycle, Stop Turntable | 2 A Button: Teleport (with fade) |
| Joystick Left/Right (if your scene contains Variants): | Joystick Left/Right (if your scene contains Variants): |
| 3 Left (on click or hold) - Previous Variant, Turntable rotate clockwise - click to increase speed | 3 Rotate View left (on click 15 degrees, on hold smoothly but slowly) |
| 4 Right (on click or hold) - Next Variant, Turntable rotate counter-clickwise - click to increase speed | 4 Rotate View right (on click 15 degrees, on hold smoothly but slowly) |
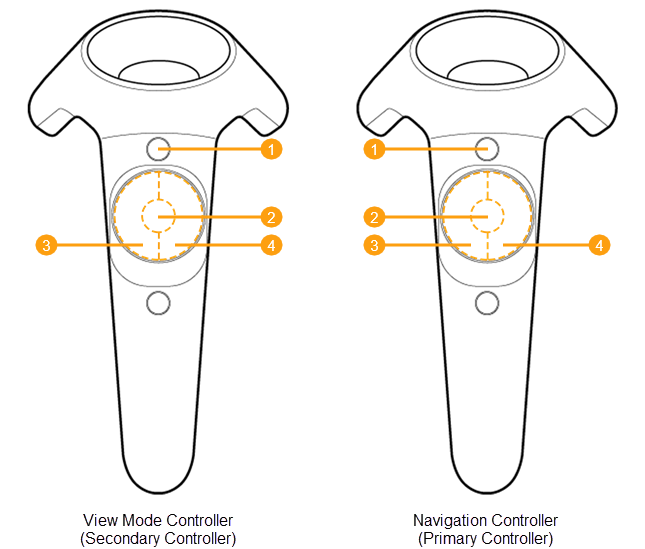
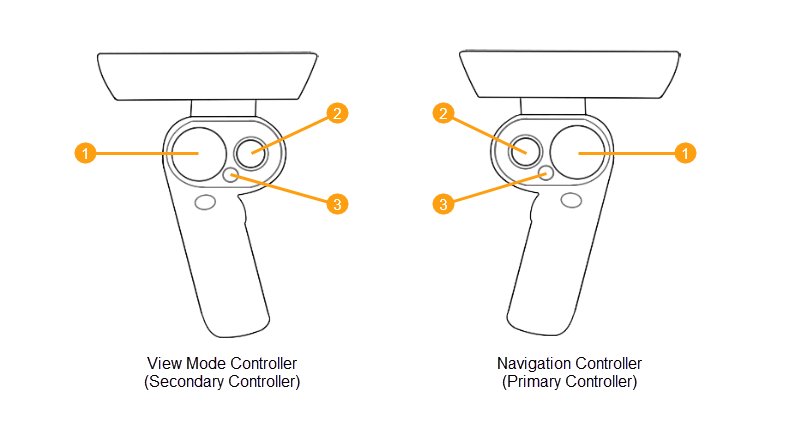
HTC VIVE controllers
| View Mode Controller (Secondary Controller) | Navigation Controller (Primary Controller) |
|---|---|
| 1 Menu Button: Toggle Menu visibility | 1 Menu Button: Toggle Menu visibility |
| 2 Touchpad Middle Button: Display Mode cycle, Stop Turntable | 2 Touchpad Middle Button: Teleport |
| Touchpad Left/Right Buttons: | Touchpad Left/Right Buttons: |
| 3 Left (on click or hold): Previous Variant, Turntable rotate clockwise - click to increase speed | 3 Rotate View left (on click 15 degrees, on hold smoothly, but slowly) |
| 4 Right (on click or hold): Next Variant, Turntable rotate counter-clickwise - click to increase speed | 4 Rotate View right (on click 15 degrees, on hold smoothly, but slowly) |
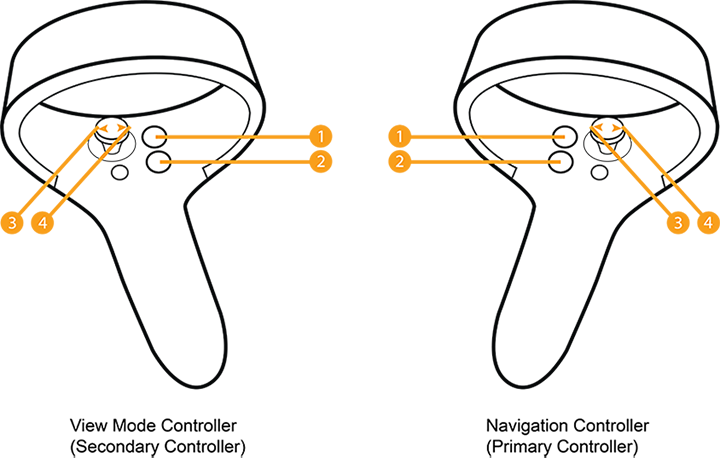
Oculus Rift controllers
| View Mode Controller (Secondary Controller) | Navigation Controller (Primary Controller) |
|---|---|
| 1 Y Button: Toggle Menu visibility | 1 B Button: Toggle Menu visibility |
| 2 X Button:Display Mode cycle, Stop Turntable | 2 A Button: Teleport (with fade) |
| Joystick Left/Right (if your scene contains Variants): | Joystick Left/Right (if your scene contains Variants): |
| 3 Left (on click or hold) - Previous Variant, Turntable rotate clockwise - click to increase speed | 3 Rotate View left (on click 15 degrees, on hold smoothly but slowly) |
| 4 Right (on click or hold) - Next Variant, Turntable rotate counter-clickwise - click to increase speed | 4 Rotate View right (on click 15 degrees, on hold smoothly but slowly) |
Windows Mixed Reality controllers
| View Mode Controller (Secondary Controller) | Navigation Controller (Primary Controller) |
|---|---|
| 1 Display Mode cycle, Stop Turntable | 1 Teleport |
| 2 Previous and Next Variant, Turntable clockwise and counter clockwise | 2 Turn Left and Right |
| 3 Toggle Menu visibility | 3 Toggle Menu visibility |
Safety Notice
- Always follow the health and safety (including any regulatory information) and operating directions from the device manufacturer.
- To help prevent any possible injury only use View in VR with the health and safety guidance and operating directions included with your supported VR device.
- Stop use if you experience any discomfort or health reactions.
View in VR workflows
This topic refers to the HTC VIVE controllers when describing how to use Alias VR tools. See Controller mapping for information about using these tool with HTC VIVE Cosmos, Oculus Rift and Windows Mixed Reality controllers.
Viewing a model in View in VR
To view a model in View in VR, follow these steps:
- Connect your VR device to your computer and turn on your controllers.
- Open your model in Alias.
- Shift-select View in Alias VR.
- In the View in Alias VR settings window, configure your settings, and then click Go. Alias VR opens displaying your model.
- Press the left and right touchpad buttons on the Navigation controller to rotate the view left or right. Each press rotates the view 15 degrees. Hold the button down for a slow rotation of the view.
For additional view and navigation options, press the Options button on either controller to access the VR environment menu.
Working with the VR environment menu
- Toggle the display of the VR environment menu on and off by pressing the Options button on either controller. The menu displays attached to the controller you opened it with. Moving the controller moves the menu within the space.
- To select a tool, aim a controller, then pull the trigger. The selected tool highlights in the menu indicating that it is selected.
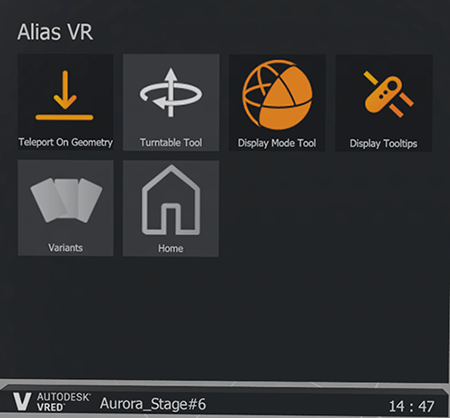
VR environment menu options
Teleport On Geometry - Extends Teleport feature so that you can teleport on top of a model. For example, turn this on if you want to teleport on to the roof of a car model. Keep it off to teleport to the interior of a car model.
Turntable Tool - Enables the use of the secondary controller for the tool. Use the left and right touchpad buttons to start the turntable animation in the clockwise and counter clockwise direction respectively. To increase the turntable speed, press either button repeatedly or hold the it down. Pressing the middle touchpad button on the View Mode controller stops the turntable rotation and returns to its start position.
Display Mode - Enables the secondary controller's middle touchpad button to control switching of display modes.
Display Tooltips - Toggles the controller tooltips on and off.
Note: When using HTC VIVE Cosmos controllers, turning on the tooltips modifies the appearance of the controller so that the tooltips display correctly.Variant - Opens the VR Variants lister.
Home - Returns the model view to the camera home position.
Navigate the environment using Teleport
You can use Teleport to navigate the space around your model. Use this to quickly view your model from different locations in the environment. If you want to teleport to a location that is on top of the model, enable Teleport On Geometry from the VR environment menu.
Press and hold the middle touchpad button on the Navigation control.
A green arc projects from the controller. The circle at the end of the arc indicates the location your view teleports to.
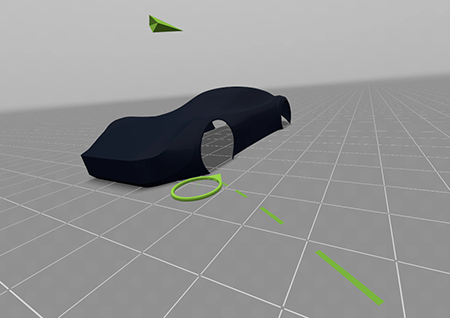
Move the Navigation controller to position the green circle to the desired location.
Release the button to complete the teleport. You now view the model from the new the location.
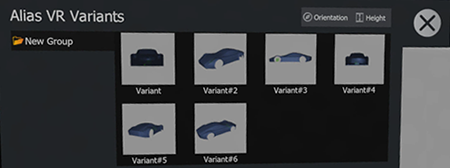
View variants of your model
In View in VR, you can view any variants of your model that you've created using the Variant Lister in Alias. The camera, shading, geometry, and layer visibility masks you applied to variants in Alias are respect when viewing the variants in View in VR.
In the VR environment menu, select Variants. The Variant lister opens.
Click
 to apply the direction of the camera variant. This is on by default.
To force the Z-axis height value, click
 .
For example, use this option if you configured a camera variant to view the interior of a car model. This is off by default.
.
For example, use this option if you configured a camera variant to view the interior of a car model. This is off by default.To view a variant, do one of the following:
- Aim the Navigation controller at a variant in the Variant menu, then pull and release the trigger.
- Use the View Mode controller to cycle through the variants in the selected variant group. Press the left touchpad button to view the previous variant and right touchpad button to view the next variant.
Switching model Display mode
You can view your models in these Display modes:
- Wireframe: Displays the wireframe model only.
- Shading: Displays the model with shading from the Multi-lister.
- Wireframe & Shading: Displays the wireframe model with shading from the Multi-lister.
- Zebra: Displays lines to indicate spots of the same brightness, similar to the Alias Isophote diagnostic shader. This is useful for checking continuity between surfaces.
- Multi Color: Assigns colors using the Alias Multi Color diagnostic shader. This is useful for detecting bumps, dents, or other surface irregularities. Note: The Multi Color display mode does not display edges in View in VR.
- Open the VR environment menu and select the Display Mode tool.
- Press the middle touchpad button on the View Mode controller to change the Display Mode.