Markup Lister
![]() +
+ ![]()
Opens the Markup Lister, which lets you create, manage and export Markups in a project. Markups let you draw directly onto the camera view, making it easy to share feedback on design projects.
By default, the size of the Markup created is based on the width and height of the window. This can be changed in the General Preferences under Markup.
Selecting a Markup will automatically display it and make it active for drawing. In tile view, hover on a Markup's thumbnail to access the opacity slider and visibility toggle.
Markup Lister icon bar
![]() Add Markup - Create a new markup based on the current view.
Add Markup - Create a new markup based on the current view.
![]() Delete Markup - Delete the selected markup(s).
Delete Markup - Delete the selected markup(s).
![]() Export Selected Markups /
Export Selected Markups / ![]() Export All Markups -
Export either the currently selected or all markup(s). Export Options can be customized in the Export Markup Options.
Export All Markups -
Export either the currently selected or all markup(s). Export Options can be customized in the Export Markup Options.
![]() Previous Markup - Display the previous markup.
Previous Markup - Display the previous markup.
![]() Next Markup - Display the next markup.
Next Markup - Display the next markup.
![]() Settings - Access the Settings menu:
Settings - Access the Settings menu:
- Preview Size - Adjust preview size of markup thumbnails.
![]() More menu - Access the More menu:
More menu - Access the More menu:
- Add - Add a new canvas by importing an image.
- Export - Exports all markups as .jpg images. Click the
 icon to access the Export Markup Options (also available in the context-menu).
 - Delete - Delete the selected markups (also available in the context-menu).
Markup Lister context menu
Visible
Toggles the Markup visibility.
Replace
Lets you replace the selected canvas with a new image file.
Export
Exports all markups as .jpg images. Click the icon to access the Export Markup Options (also available in the More menu).
Delete
Deletes the selected markups (also available in the More menu).
Export Markup Options
Export your Markups as images to share with others. Markup options let you define how your Markups should be exported.
Export Markups
You can choose to export all Markups or only the selected Markups in the lister.
Include Scene
If checked, the contents within the viewport, in addition to the Markup itself, will be shown in the export.
Image File Type
The following image formats are available:
- .jpeg
- .png with alpha
- .png
- .tiff with alpha
- .tiff
- .bmp
Quality Level
This option only appears when the File Type is .jpeg. Use the menu (Maximum, High, Medium or Low) or the slider (values from 1 to 100) to adjust the quality of the .jpeg image. A higher quality will result in a larger file size.
Specify Image Size
If checked, two sliders enable you to set (in pixels) the dimensions of the output image.
Maintain Aspect Ratio
If this option is checked, the Vertical Size value is first adjusted so that the aspect ratio corresponds to that of the current window. Changing the horizontal or vertical size will then automatically adjust the other slider so that the aspect ratio of the image is preserved. This option only appears when Specify Image Size in on.
Horizontal / Vertical Size
Size (in pixels) of the output image. These options only appear when Specify Image Size in on.
Markup workflows
Work with the Markup Brush
Choose a brush from the Markup section in the Tool Palette.
The first time you click on top of the current view will create a Markup based on that view. You can now begin drawing freely.
Tip: When creating your Markup, turn on Predictive Stroke to improve the quality of your strokes by making them more uniform and smooth. It's especially useful when drawing straight lines, circles, or ellipses, and when drawing quickly using a mouse.To exit the current Markup and finish drawing on that Markup, rotate the view.
Work with the Markup Lister
- Open the Markup Lister in Canvas > Markup Lister. Position the view to the area you want to annotate.
- Click the "+" icon. This will create a Markup based on the current view. You can now beging drawing freely.
- To exit the current Markup and finish drawing on that Markup, rotate the view.
- You can see the current active Markup and access all Markups and the Markup Lister from the viewport window pane header in the top right corner.
Images as Canvas
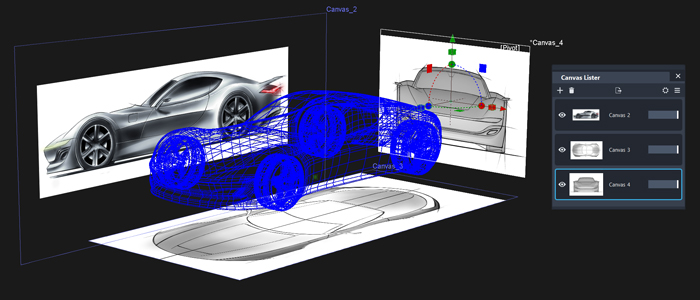
Images can be imported as a canvas which lets you place and transform them as planes. This is useful for setting up reference images that need to exist in the scene.
Import through file menu
- Select File > Import > Canvas
- Choose an image using the file browser.
- The image is placed facing the camera and can now be transformed.
Import through Canvas Lister
- Open the Canvas Lister in Canvas > Canvas Lister.
- Click the "+" icon to open the file browser and choose an image.
- The image is placed facing the camera and can now be transformed.