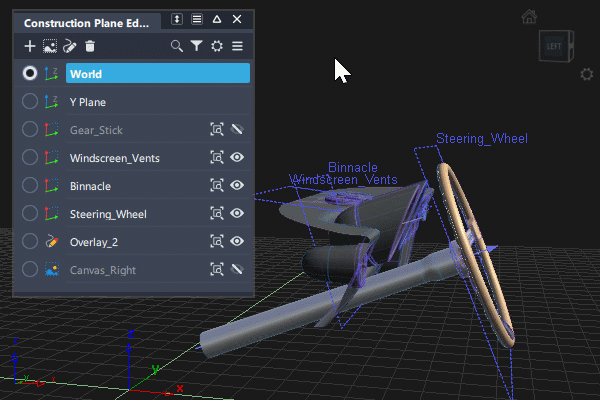
Construction Plane Editor
The Construction Plane Editor lists all construction planes in your file and provides quick-access tools for managing and using planes.
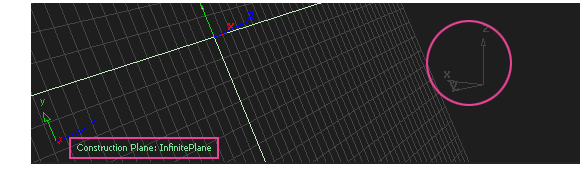
Construction planes allow you to temporarily use a separate coordinate system that can be arbitrarily oriented with respect to the world space coordinate system. This is particularly useful when you are modeling at different angles.
Canvas planes and markup planes are also listed in Construction Plane Editor as they use the same plane structure. Note that specific lister windows are also available for these two plane types : Canvas Lister, Markup Lister.
Editor Icon bar
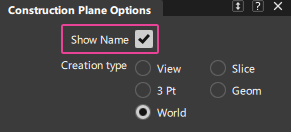
![]() - New Construction Plane - Create a new construction plane based on the default creation settings. Select a Creation Type by choosing, View, Slice, 3 Pt, Geom, or World, and then click on the viewport to place the construction plane (also available in the More menu).
- New Construction Plane - Create a new construction plane based on the default creation settings. Select a Creation Type by choosing, View, Slice, 3 Pt, Geom, or World, and then click on the viewport to place the construction plane (also available in the More menu).
For more information, see Construction Plane.
![]() - New Canvas Plane - Creates a new construction plane in the scene in the view plane, and loads the image selected using the file browser. For example, switch to a Top view, click New Canvas, and then select a plan view of your model.
- New Canvas Plane - Creates a new construction plane in the scene in the view plane, and loads the image selected using the file browser. For example, switch to a Top view, click New Canvas, and then select a plan view of your model.
For more information, see Canvas Lister
![]() - New Markup Plane - Create a new markup plane based on the current view (also available in the More menu).
- New Markup Plane - Create a new markup plane based on the current view (also available in the More menu).
For more information, see Markup Lister
![]() - Delete Picked Planes - Deletes the construction, canvas, or markup planes that are picked in the viewport or in the editor list (also available in the More menu).
- Delete Picked Planes - Deletes the construction, canvas, or markup planes that are picked in the viewport or in the editor list (also available in the More menu).
![]() - Search - Use keywords to search for planes by name.
- Search - Use keywords to search for planes by name.
![]() - Filter - Only show the specified type of plane in the editor. For example, selecting Only Currently Selected Planes only displays the selected plane and hides all others.
- Filter - Only show the specified type of plane in the editor. For example, selecting Only Currently Selected Planes only displays the selected plane and hides all others.
![]() - Display - Access the Display settings:
- Display - Access the Display settings:
- Draw Plane Name - Displays the names of planes in viewport.
- Draw Plane Borders - Displays the borders on all planes in the viewport.
- Show Canvas Planes - Displays canvas plane images in the viewport.
- Hide Default Planes - Hides the World and Y-up planes from the editor list.
![]() - More - Access the Construction Plane Editor More menu.
- More - Access the Construction Plane Editor More menu.
List Item tools
![]() - Set Current Construction Plane - Sets the selected plane as the current construction plane. The plane name highlights, and only one can be set at any time. Selecting the set icon a second time returns the current working axes to the World plane.
- Set Current Construction Plane - Sets the selected plane as the current construction plane. The plane name highlights, and only one can be set at any time. Selecting the set icon a second time returns the current working axes to the World plane.
![]() - Plane Type - Note that this is not a function only a display.
- Plane Type - Note that this is not a function only a display.
The default World and Y-up co-ordinate systems are always listed first followed by additional user-defined planes. Construction Planes that hold canvas or markup images are shown at the bottom of the list. The filter icon ![]() can be used to control which type of planes are listed.
can be used to control which type of planes are listed.
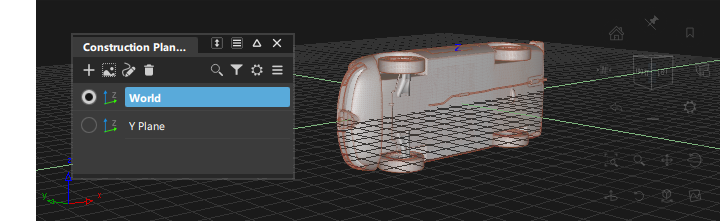
 Default Construction Planes - World and Y-up
 User-defined Construction Plane
 Plane with Canvas image
  Plane with Markup image
![]() - Look-At - Changes the view to being perpendicular to the plane. Note that the framing of the view is determined by the size of the construction plane in the scene. Use the transform scale tools to resize the construction plane outline.
- Look-At - Changes the view to being perpendicular to the plane. Note that the framing of the view is determined by the size of the construction plane in the scene. Use the transform scale tools to resize the construction plane outline.
![]() - Visibility - Turns the display of the construction plane in the scene on or off. Note that when the plane is on a layer that is not visible, the visibility cannot be turned on using the editor icon.
- Visibility - Turns the display of the construction plane in the scene on or off. Note that when the plane is on a layer that is not visible, the visibility cannot be turned on using the editor icon.
Editor More menu
Create Construction Plane
Creates a new construction plane based on the default creation settings. Shift-select Create Construction Plane or click the  icon to open the Construction Plane Options.
Import Canvas
Lets you import images files as a canvas, which you can then place and transform as planes. This is useful for setting up reference images that need to exist in the scene.
New Markup Plane
Create a new markup plane based on the current view (also available in the editor icon bar).
Delete Picked Planes
Deletes the construction planes that have been selected either in the viewport, or in the editor list. Note that there is no undo or warning for when deleting.
List item Context menu
The context menu is accessed using the right-mouse button on a plane in the editor list. Its available options varies on the plane type:
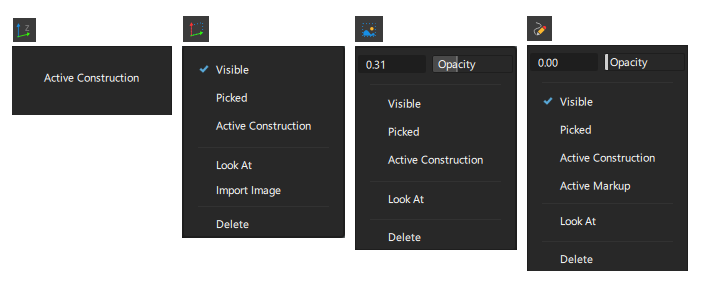
Opacity
Adjust the opacity of canvas or markup images.
Visible
Toggle the visibility of the selected plane on and off.
Picked
Displays a blue checkmark when a plane is selected either in the editor list or in the viewport. Can be used to select or deselect that plane.
Active Construction
Sets the selected construction plane as the active plane. Now, the grid and the coordinate system are relative to the angle of the plane.
Look At
Automatically centers the view on the plane currently selected in the editor.
Import Image
Opens the browser to select an image file to import onto the plane. The construction plane name is changed to the image name, and the plane type is changed to a Canvas Plane.
Delete
Deletes the plane currently selected in the editor.
Workflow - Using the Construction Plane Editor
Re-naming and selecting planes
The default World and Y-up co-ordinate systems are always listed first and cannot be selected, renamed, or deleted.
These are followed by additional user-defined planes and then construction planes that hold canvas or markup images. The filter icon ![]() can be used to control which type of planes are listed.
can be used to control which type of planes are listed.
- Double-click on the name field to rename.
- Single-click on the name field to select (use
Ctrlto select additional planes). The delete tools can be used to delete the selected planes. Note that there is no undo when deleting a plane.
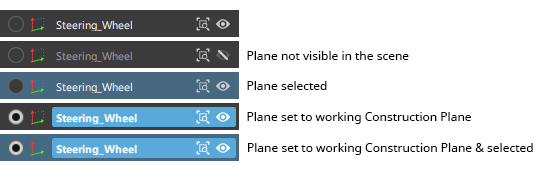
The name, look-at, and visibility area display with different highlights to indicate the state of the plane:
Switching between construction planes using the editor
Use the  icon to set a plane to being the active construction plane.
When working in a construction plane:
- The active construction plane is displayed at the grid axis gnomon in each viewport. The world axes stay visible but are displayed in the grid color.
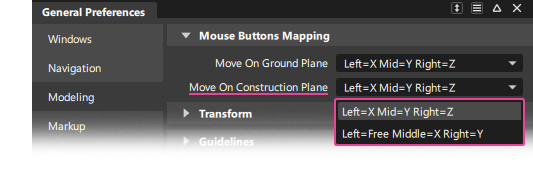
- Mouse behavior when using transform with a construction plane is specified in the General Preferences:
- Use the Default View icon on the ViewCube to reorient the view.
- Use Plane View on the Navbar to match the viewing tools to the construction plane for easier view manipulation. See NavBar tools.
Working with the Y-up plane
Alias defaults to a Z-up grid orientation whereas as some (typically animation modelling) systems use a Y-up orientation.
The Y-up construction plane is useful when working with files imported from a Y-up system, in particular when you need to exchange data between systems without the need to rotate the actual geometry each time. Note that although the name of the construction plane is Y-up, the scene is shown as Z-up so that the x,y,and z directions are the same as for native Alias models.
- Import the file from the Y-up system - it will typically be positioned on it's side:
Select the Y-up plane in the Construction Plane Editor to make it the active working plane.
Use the Default View icon on the ViewCube to reorient the view.
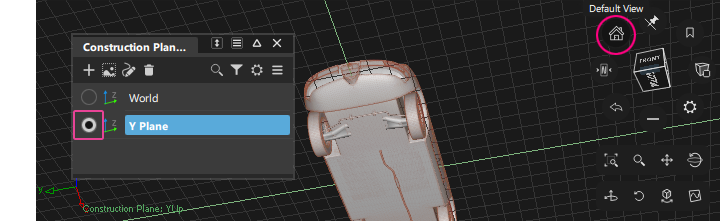
- Use Plane View on the NavBar to match the viewing tools to the Y-up ground plane for easier view manipulation.

Controlling plane display in the viewport
Use the ![]() - Display settings to control the display of planes in the viewport.
- Display settings to control the display of planes in the viewport.
- Draw Plane Name - Displays the names of planes in viewport.
- Draw Plane Borders - Displays the borders on all planes in the viewport.
Note that the display of plane names is also affected by the setting in the Construction > Plane tool for creating a new plane. Although this setting is within a tool option window, it also operates as a toggle and has the same effect as the editor display settings.
reference path