Use this procedure to adjust the placement of a wall modifier that you added to a wall. You can also add or remove wall modifiers using this procedure. You can also graphically adjust the placement of a wall modifier.
- Double-click the wall that has the modifier you want to change.
- On the Properties palette, click Advanced
 Worksheets.
 - Select the setting for Plan Modifiers.
- Under Style, select the wall modifier you want to change.
- If needed, select a different modifier style or component name, and specify which sides to apply the modifier to.
- Enter a value for Start Position Offset and specify whether the offset occurs from the wall start point, the wall endpoint, or the midpoint of the wall.
These settings specify the start point of the modifier along the length of the wall. You can enter a negative value to specify an offset in the reverse wall direction.
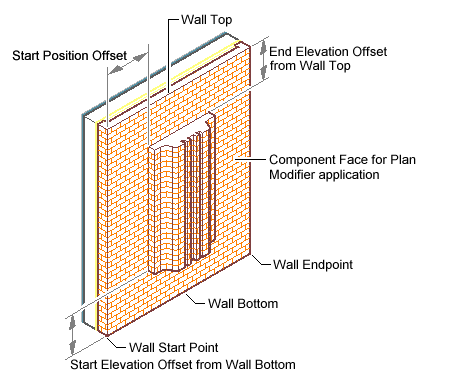
Wall plan modifier location parameters
- Edit the vertical position of the modifier on the wall component:
If you want to … Then … specify the beginning height of the wall modifier enter a value for Start Elevation Offset, and specify whether the offset occurs from the wall top, the wall base height, the wall justification line, or the wall bottom. specifying the ending height of the wall modifier enter a value for End Elevation Offset, and specify whether the offset occurs from the wall top, the wall base height, the wall justification line, or the wall bottom. Enter a negative offset value to specify a location toward the ground.
- Edit settings to control the size and placement of the modifier:
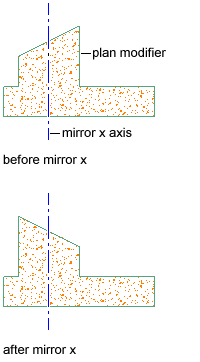
If you want to … Then … place the modifier at the size it was defined in the modifier style select Use Drawn Size. specify the length and the depth of the modifier on the wall clear Use Drawn Size, and enter values for Length and Depth. mirror the modifier in the X direction select Mirror X. mirror the modifier in the Y direction select Mirror Y. measure the modifier to the center of the wall select Measure to Center. - To mirror the modifier in the X direction, select Mirror X.
Wall plan modifier mirrored in the X direction
- To mirror the modifier in the Y direction, select Mirror Y.
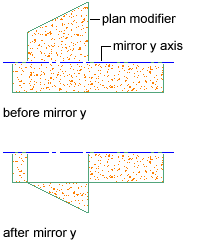
Wall plan modifier mirrored in the Y direction
- To remove a modifier, select the modifier, and click
 .
. - Click OK.