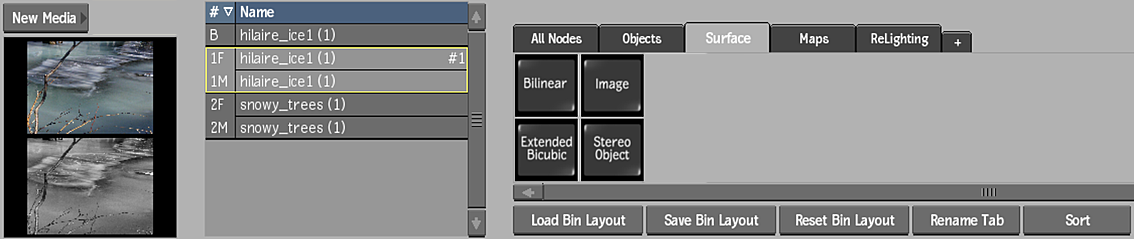
Using the Action Node Bin
The Action Node Bins menu contains nodes classified in different bins. The All Nodes bin contains all nodes available in Action. The other bins can be customized and custom bins can be created. The Node Bins menu also contains an image proxy that displays a preview of the currently selected media, as well as a Media list.
To access the node bin, click Node bins.
Some nodes are duplicated in multiple bins according to a classification. For example, the Light node is found in both the Objects and ReLighting bins.
Nodes are listed in alphabetical order from top to bottom of each row. You can customize any of the bins except the All Nodes, Matchbox, and Lightbox bins.
To add a node to the scene from a node bin:
- If applicable, select media from the Media list.
- Do one of the following:
- Drag the selected node (or image proxy) from the node bin and place it in the schematic. If the node is an image type node, an axis and an image are created and linked together.
- Drag the node (or image proxy) from the node bin and place it where you want it in Result view. For example, as you drag a Light node into Result view, it becomes active, so you can see its effect on the scene before placing it exactly where you want.
- Double-click a node (or image proxy). Depending on the node, it appears next to the last added object, or is attached to a selected node in the schematic. You do not need to be in Schematic view to add a node in this manner.
- In Front, Top, or Side views, also known as orthographic views, double-click a 3D Text, Light, or Surface node. The node appears between the last selected camera and the centre of the orthographic view.
Customizing the Node Bin
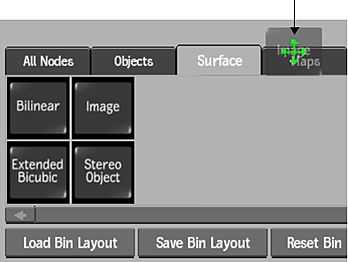
Create custom bins and populate them with your most commonly used nodes to optimize your workflow. As well, change the order of the bins along the top of the menu and rename them to reflect their content.
The All Nodes, Lightbox, and Matchbox tabs cannot be customized or deleted.
To create a bin:
Click the plus sign.

Name the bin using the on-screen keyboard.
Note: You can create a maximum of 4 new bins.
To copy a node to another bin:
Drag the node on top of the destination bin.
Release the cursor.
Click the destination bin.
The copied node appears in the new bin. Nodes are added to the end of a bin in the order copied (following the same alphabetical node order of the rows, from top to bottom of each row).
Note: Nodes cannot be duplicated within the same bin.
To move a node to another bin:
Press Alt+Win and drag the node on top of the destination bin.
Release the cursor.
Click the destination bin.
The node is moved from its original location to the destination bin. Nodes are placed at the end of a bin in the order moved (following the same alphabetical node order of the rows, from top to bottom of each row).
Note: Nodes cannot be duplicated within the same bin.
To reorder a node within a bin:
Click and hold a node, drag it down to detach it from the bin and then drag it to the left or right.
As the node follows the cursor, a blue line will indicate where the node will be inserted when you release it.
If you dragged the node on top of an existing node, the existing node shifts to the right and the moved node is inserted in its place.
To reset a bin to alphabetical layout:
With the applicable tab active, click Sort.
The nodes in the bin are reset to their alphabetical layout.
To delete a bin:
Press Alt+Win and drag the tab to the bottom of the screen.
Release the cursor when it changes to a delete cursor.
Warning: There is no undo capability when deleting a bin.The entire contents of the bin are deleted.
To delete a node from a bin:
Press Alt+Win and drag the node to the bottom of the screen.
Release the cursor when it changes to a delete cursor.
Warning: There is no undo capability when deleting a node.
To rename a bin:
- Click Rename in the Bin section located below the bin.
- Enter a new bin name using the on-screen keyboard.
To reorder a bin:
Click and hold a tab, then drag it to the left or right.
As the tab follows the cursor, a blue line will indicate where the bin will be inserted when you release it.
If you dragged the tab on top of an existing tab, the existing tab shifts to the right and the moved tab is inserted in its place.
To save a bin layout:
Click Save in the Bin section located below the bin.
Name the layout.
The layout of the entire node bin is saved, including all new and customized tabs. You cannot save only select tabs.
Layouts are saved per user, not by project.
To load a bin layout:
Click Load in the Bin section located below the bin.
Select the layout you want to load.
Note: If you load a bin layout containing unsupported nodes, the unsupported nodes do not appear.
Matchbox and Lightbox Node Bin Tabs
To help you quickly access Matchbox and Lightbox effects, dynamic node bins are available for each, that behave slightly differently from the other node bin tabs. Keep in mind the following:
The contents of the Matchbox and Lightbox node bin tabs are dynamically generated to display all shaders that are housed in a folder of your choice. You can set the folder locations in the sysconfig.cfg file located in
/opt/Autodesk/cfg/.<product version>. The Default folder selections are the folders where the presets are housed:- For Matchbox:
/opt/Autodesk/presets/<product version>/matchbox/shaders(.mx or .glsl shaders appear in the node bin). - For Lightbox:
/opt/Autodesk/presets/<product version>/action/lightbox(.lx shaders appear in the node bin).
- For Matchbox:
If new shaders are added to the selected file location, click Refresh under the node bin to refresh the dynamic display.
Similar to the All Nodes tab, the Lightbox and Matchbox tabs cannot be customized or deleted. Also, you cannot move a node from the Matchbox or Lightbox tab to another tab.