Resize & Crop
Use the Resize & Crop tool to change a clip's resolution, bit depth, and aspect ratio or to crop a part of it.

| Access | To access the Resize & Crop menu, use:
|
| Inputs |
|
| Outputs |
|
All connected inputs must have the same resolution.
Workflows
The Resize & Crop tool offers both the Resize and Crop options in Batch, Batch FX, Modular Keyer, and in the Tools tab.
The Crop option is not offered in the Resize Timeline FX as it is not possible to modify the resolution of a timeline segment. It must respect the resolution of its parent sequence.
Display in the Schematic view
To better identify what the tool is used for, the name of the node in a Schematic view displays only Resize or Crop depending on which menu is selected in the node.
Resizing
In Batch, Batch FX, Modular Keyer, and the Tools tab, use the parameters in the Resize menu to modify the resolution of a clip.
In the Timeline, a Resize Timeline FX is automatically applied when a clip from a different resolution is inserted into a sequence. Use the parameters in the Resize menu to adjust how the image in the source clip is resized to the sequence resolution.
Cropping
In Batch, Batch FX, Modular Keyer, and the Tools tab, use the parameters in the Crop menu to crop a clip and only output a portion of it.
Pan & Scan
The region of the Front and Matte clips output in the Result can be modified using the Crop parameters under the Source section. This allows you to zoom into a clip or create a pan & scan, enabling you to decide which part of a larger clip is output in a smaller one.
Using the Crop box widget
Use the parameters in the Source section to change the position and size values of the crop box. To manually adjust the crop box:
- Display the Front View in one of the viewports.
- Grab and drag a side or corner of the widget to change its size. Click inside the widget and drag to change its position.
Settings

Source Settings
Use the parameters in the Source section to set or animate the position and size of the Crop box.
X Position field
Sets the horizontal position of the crop box relative to the centre of the source clip, in pixels.
Y Position field
Sets the vertical position of the crop box relative to the centre of the source clip, in pixels.
X Scale field
Sets the horizontal scale of the crop box relative to the Crop Box Width value, as a percentage.
Y Scale field
Sets the vertical scale of the crop box relative to the Crop Box Height value, as a percentage.
Ratio field
Sets the aspect ratio of the crop box in the source frame.
Crop Box option
Select an option to determine the scaling behaviour of the crop box while repositioning or rescaling.
| Use: | To: |
|---|---|
| Free | Adjust the crop box freely. |
| Prop | Use the current Crop Box Width and Crop Box Height settings proportionally. |
| Source | Use the aspect ratio from the Front clip. |
| Destination | Use the aspect ratio set in the Destination section. |
Pixel Ratio
Enable for anamorphic media to use the pixel ratio of the source to calculate the aspect ratio of the crop box. Available when the Crop Box option is set to Free.
- With Pixel Ratio disabled, the ratio of the crop box is identical to the ratio used for the destination. Select this option when using a source with square pixels.
- With Pixel Ratio enabled, the value of the crop box is derived from the pixel ratio of the source. Select this option when using a source with anamorphic pixels.
Crop Options Settings
Crop Box Width field
Sets the width of the crop box, in pixels.
Crop Box Height field
Sets the height setting of the crop box, in pixels.
Source Width
Use the width value of the source clip for the Crop Box Width field.
Source Height
Use the height value of the source clip for the Crop Box Height field.
Source Width and Height
Use the width and height values of the source clip for the Crop Box Width and Crop Box Height fields, respectively.
Destination Width
Use the width value of the destination for the Crop Box Width field.
Destination Height
Use the height value of the destination for the Crop Box Height field.
Destination Width and Height
Use the width and height values of the destination for the Crop Box Width and Crop Box Height fields, respectively.
Crop Box Border colour
Sets the colour of the crop box border visible in the Front view.
Crop Box Line option
Select the line style for the crop box.
Pre Rendering Settings
Pre Rendering option
Select a conversion method to use for the resize.
| Use: | To: |
|---|---|
| Both Fields | Use both fields when both the source and destination formats are interlaced or progressive. |
| Field Merge | Combine the two fields of the source clip. |
| Deinterlace | Select one field, in which case the Source Pre Rendering Field box is enabled. |
Pre Rendering Field option
Select which field to use for the resize. Active when the Pre Rendering option is set to Deinterlace.
Resizing Settings
Use the parameters in the Resizing section to set how the pixels inside the Crop box will be treated in the Result output.
Resize Field Format option
Select whether the resize is performed on progressive or interlaced frames, if both source and destination clips are interlaced. If either clip is progressive, the resize operation is always progressive.
Fit Method option
Select a fit method to be applied to the Front clip.
| Select: | To Fit: |
|---|---|
| Centre | The source image, centred, over the destination resolution frame. If the source is larger than the destination, it is cropped. If the source is smaller than the destination, it is surrounded by a black border. |
| Crop Edges | One edge of the source into the destination resolution frame without stretching or squashing the frame. Excess parts of the source frame after resizing are cropped. If the source—after the one edge is resized—is wider than the destination, its overhanging left and right edges are cropped. If the source is taller than the destination, the upper and lower edges are cropped. |
| Fill | The source, width, and height, into the destination resolution frame. This process, if the source and destination resolutions do not have the same aspect ratio, can distort the image. |
| Letterbox | The source to the destination resolution frame without squashing or stretching it, and without cropping the source. If the source is wider than the destination, black bars fill the top and bottom of the destination frame. If the source is narrower than the destination, black bars fill the right and left sides of the frame. In all cases, the entire source frame is fit into the destination frame. |
Keep Aspect
Enable to use non-square pixel formats. Active when Fit Method is set to Crop Edges or Letterbox.
Padding colour
Set the colour used for padding the destination frame when the source image is smaller than the destination.
Filter option
Select the filter option to determine the quality of the interpolated result.
| Select: | To get: |
|---|---|
| Lanczos | Excellent quality, recommended for upscaling and downscaling. Slower to calculate. |
| Shannon | Excellent quality, sharper than Lanczos in small details. Recommended for upscaling and downscaling. Slower to calculate. |
| Gaussian | Medium quality and softer results. |
| Quadratic | Medium quality and softer results. |
| Bicubic | High quality, but not as sharp as Shannon. Use for both upscaling and downscaling. |
| Mitchell | High quality, but not as sharp as Shannon. Use for both upscaling and downscaling. |
| Triangle | Low quality, fast to calculate. Use for downscaling. |
| Impulse | Very low quality, fast to calculate. Use for downscaling. |
Precision field
Sets the frequency cut-off point used during resize.
Crisp/Soft field
Sets the amount of blurring used during resize.
Default values for the Fit Method option, Filter option, Precision, and Crisp/Soft parameters can be set in the Tools & TL FX Preferences.
Different values can be set for a Resize Timeline FX or for a Resize & Crop tool.
Adaptive Deinterlacing
Enable to use data from the adjoining interlaced field to improve the results of the resizing algorithm. This is most effective for clips containing stationary objects. Available when Interlaced Resizing is selected.
Adaptive Deinterlacing field
Sets the amount of data used from the adjoining field for adaptive interlacing during resize. Active when Adaptive is enabled.
Destination Settings
Use the Destination settings to define the format of the resized clip.
Resolution Mode option
Select which mode to use to define the Width, Height, and Ratio values.
| Select: | To: |
|---|---|
| Resolution List | Select a resolution from a drop-down or manually set the values. |
| Adaptive | Set the Width or Height based on the Frame Aspect Ratio. |
| Scaling Presets | Set a resizing factor, as a percentage. |
| Machine Learning Upscale | Increase the resolution of a clip using machine learning upscaling trained models. |
Improve the Playback & Scrub Performance for Machine Learning Upscale (Rocky Linux only)
Since a new inference of the Machine Learning Upscale model must be performed at each frame, the playback and scrubbing in Batch, Batch FX, and Modular Keyer are impacted.
Therefore, the application applies a simple Linear filter by default while playing back and scrubbing. Use the Viewport option of the Machine Learning Upscale preferences to modify the behaviour.
Resolution List
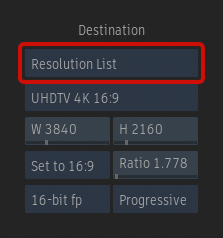
Resolution option
Select a resolution from the available presets or select Custom Resolution to specify a non-standard resolution.
Adaptive
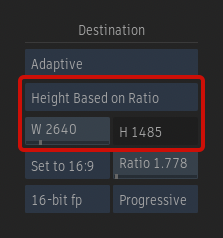
Adaptive Resolution option
Select whether the Width or Height value is calculated based on the Ratio.
- Width Based on Ratio: The Width value is calculated by multiplying the Height by the Ratio.
- Height Based on Ratio: The Height value is calculated by dividing the Width by the Ratio.
Scaling Presets
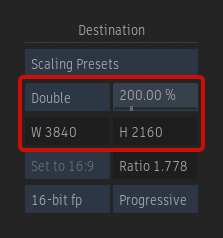
Scaling Presets option
Select one of the scaling presets or enter a custom factor, as a percentage.
Machine Learning Upscale (Rocky Linux only) 

Scaling Presets option
Double, triple, or quadruple the resolution of a clip by choosing the desired factor in the Scaling Presets drop-down.
Rendering Platform option
Select whether the Machine Learning inference runs on the CPU or GPU.
An inference can be run using either the CPU or GPU. Running the inference is faster on the GPU, but larger frames that cannot be rendered using it can be rendered using the CPU.

ML Engine Cache
Contrary to the Timewarp and Morph models, Machine Learning Upscale requires using NVIDIA's TensorRT and for this reason ML Engine Cache is always enabled. Since the cache requires a new TensorRT engine for each combination of GPU and image size, a new engine is generated each time the option is used on a new combination. Each engine is stored in a cache in /opt/Autodesk/cache/tensorgraph/models and is used the next time the same GPU and image size combination is required, making it much faster to use the model on a combination for which you already have the cache.
Bit Depth option
Select whether the model is run in 16-bit fp or 32-bit fp on the GPU platform.
Selecting 16-bit fp offers the following advantages:
- It allows running a model on higher resolution images, since running in 16-bit fp requires less memory.
- It provides better performance.
Scrubbing and Playback
The scrubbing and playback of a Batch, Batch FX, or Modular Keyer setup containing a Resize & Crop node set to Machine Learning is improved by automatically applying a Linear filter instead of the output of Machine Learning model. This behaviour can be modified from the Tools & TL FX user preferences.
Common Settings
Width field
Sets the width resolution of the clip.
Height field
Sets the height resolution of the clip.
Aspect Ratio option
Select a standard frame aspect ratio. Select the Set to w:h option to set the clip to use square pixels. Select Custom to define a custom frame aspect ratio in the Aspect Ratio field.
| Select: | To: |
|---|---|
| Set to 16:9 | Set the Ratio to 1.778 |
| Set to 4:3 | Set the Ratio to 1.333 |
| Set to w:h | Set the Ratio based on the Width and Height values. |
| Default | Set the Ratio to the project's default value. |
| Custom | Set a custom value using the Ratio field. |
Aspect Ratio field
Sets the aspect ratio of the clip.
Bit Depth option
Select the bit depth of the clip.
Scan Mode option
Select the scan mode of the clip.