Applying Colour Management on Import
From the General tab of the MediaHub, you can automatically convert different media types to an appropriate working space on import, or manually apply a LUT or Colour Transform.
All imported media is also tagged with a colour space identifier. See also: Tagging Clips with a Colour Space.
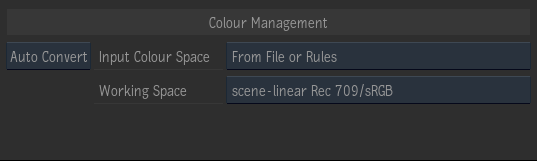
Start by selecting the appropriate option from the Colour Management mode box. Available modes are:
- Auto Convert: Auto Convert mode will convert media in various input spaces to a common working space and tag them.
- Tag Only: Tags the media with a colour space but does not modify the pixels.
- View Transform: Use a view transform to convert scene-referred media to a video colour space.
- Use LUT: Use the Colour Management tools to manually import or create a LUT or colour transform to apply. Then tag the result with a colour space.
The "From File or Rules" option will attempt to automatically determine the colour space of the source by looking at the file header and using the colour management Input Rules.
Auto mode is also supported in MediaReactor, so you can add Rules for file types that are imported in that way.
The Auto Convert mode is equivalent to the Input Transform mode in the Colour Management Timeline effect and Batch node.
See also: Applying Colour Management to Clips.
Camera Raw File Formats
For ARRIRAW, Blackmagic Raw, REDCODE RAW, and Sony RAW formats, using the Auto Convert or View Transform modes with the "From File or Rules" option is recommended since it converts to the chosen Working or Display colour space using the highest quality path (i.e., you do not have to worry about which camera-specific transfer function and colour primaries to specify in each format's SDK options, they are overridden).
Otherwise, care must be taken to ensure that the colour processing you specify in the Format Specific tab is synchronized with whatever colour management you specify in the General tab. First, the camera manufacturer's SDK will be used to apply a conversion based on the specified colour primaries and transfer function (i.e., gamma) options in the Format Specific tab. Then the application will apply whatever colour management is specified in the General tab.
If the General tab is set to Tag Only, and the Tagged Colour Space is "From File or Rules", only the camera SDK processing will be applied and the clip will be tagged appropriately if a colour space is available that corresponds to the combination of colour primaries and transfer function options selected in the Format Specific tab. A table of the supported combinations is provided in the specific page for the relevant camera raw formats.
Otherwise, if no corresponding colour space can be found, the Input Rules will be applied to assign a colour space based on the path and extension of the media. In this case, the MediaHub Preview panel Clip Info will show "Unknown" as the File Colour Space and the assigned colour space from the Input Rules as the Input Colour Space and Clip Colour Space.
Colour Management Information in the Media List
The Media List view optionally shows various colour space metadata relevant to import. (Columns may be enabled by right clicking in the table header.)
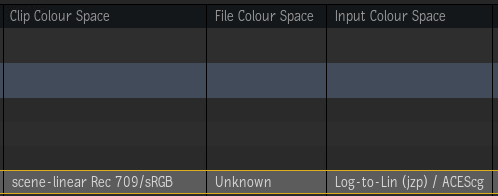
The interpretation of the columns is as follows:
- Clip Colour Space: This is the colour space the clip will be tagged with after import. When in Tag Only or Use LUT mode, it is the Tagged Colour Space. When in Auto Convert mode, it is the Working Colour Space. When in View Transform mode, it is determined based on the Display menu.
- File Colour Space: This is the colour space identified from the file's metadata. In the case of camera raw formats, this may vary based on the colour settings in the Format Specific tab. It will show "Unknown" either if no metadata is available, or it's not possible to map it to one of the colour spaces in the OCIO config.
- Input Colour Space: This shows the colour space set as the Input Colour Space in Auto Convert mode or the Tagged Colour Space in Tag Only or View Transform mode. Setting either of those menus to "From File or Rules" will show you the colour space the application has determined based on the file metadata and the Input Rules for that clip. In Tag Only mode, the "From File or Rules" value may vary based on the colour settings of the Format Specific tab. This value is ignored in Use LUT mode.
The File, Input, and Clip Colour Space are also shown in the MediaHub Preview panel Clip Info.
You may also search for a colour space using the Media Panel search feature.
Multi-Channel Clips
When you import multi-channel clips, such as an OpenEXR file with multiple passes or AOVs for compositing, the colour management is determined by the Multi-Channel settings in the System Preferences. These preferences assign a type to each channel in the file based on the channel name. Channels that are assigned the type Beauty receive whatever colour management is specified in the General Colour Management settings in the MediaHub. All other types are data channels. Data channels will get tagged with a data colour space such as "Matte" or "Normals" for better handling in the viewport, however, no colour management is applied on import.
If the multi-channel naming rules are unable to assign a type based on the channel name, the colour management will be determined by the "Default Colour Tagging" setting that is available in Format Specific Options  Image. With the
 Beauty option, unknown channels receive colour management, whereas with the Matte option they do not.