Project Management
![]() Indicates a feature suggested and voted up by users on the Flame Feedback portal.
Indicates a feature suggested and voted up by users on the Flame Feedback portal.
Multiple improvements have been added to the Project Management window.
Description
Set a description for a project using the Description field in the New Project and Manage Project panels. The description can be viewed in the Description column of the Projects List view and in a project's Information Window, which can be opened using Alt + Click, in the Projects Tiles view.
Project Conversion
![]() The Project Home, Setups Directory, and Media Cache paths can be edited when copying a legacy project to the new version.
The Project Home, Setups Directory, and Media Cache paths can be edited when copying a legacy project to the new version.
Colour Coding
![]() Apply colour coding to projects to better identify them and communicate their status.
Apply colour coding to projects to better identify them and communicate their status.
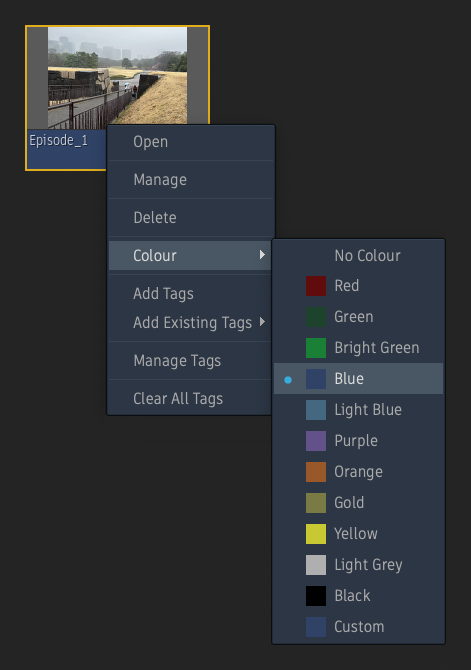
To apply a colour coding to a project from the List or Tiles view:
- Open the project's context menu.
- Open the Colour submenu.
- Select a colour preset.
The colour presets can be defined using the Project Management list in the Colour Coding tab of the System Preferences. Changes made to the list are saved in the /opt/Autodesk/cfg/colour_coding.cfg file, which can be centralised using the Centralised Components workflow.
Tags
![]() Apply tags to projects to better identify them, communicate their status, and help find them using the Search function.
Apply tags to projects to better identify them, communicate their status, and help find them using the Search function.
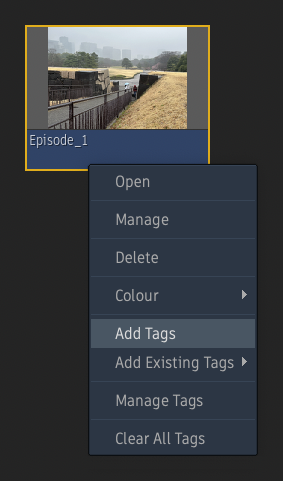
To apply a tag to a project from the List or Tiles view:
- Open the project's context menu.
- Select Add Tags to create a new Tag or select an existing tag from the Existing Tag submenu.
The tags can be defined and managed using the Project Management list in the Tags tab of the System Preferences. Changes made to the list are saved in the /opt/Autodesk/cfg/tags.cfg file, which can be centralised using the Centralised Components workflow.
Tags can be viewed in the Tags column of the List view and in a project's Information Window in the Tiles view.
To search for projects based on tags:
- Click in the Search field.
- Type a tag.
- Press Enter.
The projects list is filtered, and only projects tagged with the defined string appear.
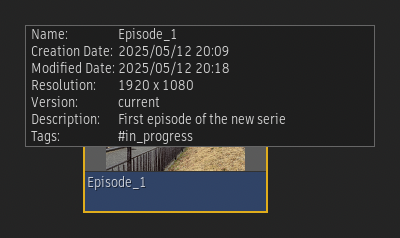
Information Window
![]() The detailed information of the project under the cursor in the Tiles view can be viewed in the Information Window opened using the Alt + Click keyboard shortcut.
The detailed information of the project under the cursor in the Tiles view can be viewed in the Information Window opened using the Alt + Click keyboard shortcut.
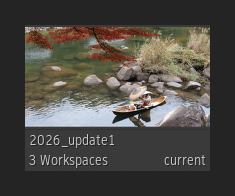
Workspaces Indication
![]() The number of workspaces present in a project can be seen in the Workspaces column of the List view and in a project's thumbnails in the Tiles view.
The number of workspaces present in a project can be seen in the Workspaces column of the List view and in a project's thumbnails in the Tiles view.
Keyboard Shortcut
![]() Use the Project Management keyboard shortcut to open and close the Project Management window inside the application. By default, the keyboard shortcut is assigned to Ctrl + Alt + F4 in all keyboard shortcuts profiles.
Use the Project Management keyboard shortcut to open and close the Project Management window inside the application. By default, the keyboard shortcut is assigned to Ctrl + Alt + F4 in all keyboard shortcuts profiles.
Notifications Panel
The Welcome Screen, previously used to highlight the new features of a release, has been deprecated and replaced by a panel integrated on the right side of the Project Management window.
Two types of notifications are displayed inside the panel:
- Highlights of a new release.
- Notification of a new release becoming available.
The Notification panel is automatically opened the first time a new version of the Flame Family applications is launched. Click the "X" button at the top right of the panel to close it. To reopen the panel, click the orange button.