This dialog is displayed when the Agent option button is selected in the Manage Job Agents dialog. It is used to set various options, including housekeeping, permissions, performance and logging details, for the agent or agent coordinator currently selected in the Connected job agents list on the Manage Job Agents dialog.
- Although you do not need administrator privileges to access this dialog, any changes made to it may have serious repercussions in the handling of scheduled jobs and the performance of the system. Therefore it is advisable that you do not make any changes to this dialog without consulting your system administrator or someone with system administrator privileges.
- Agent options includes a setting which restricts who can save changes the agent configuration. Therefore please contact your system administrator if need to change any of the options but cannot save the changes.
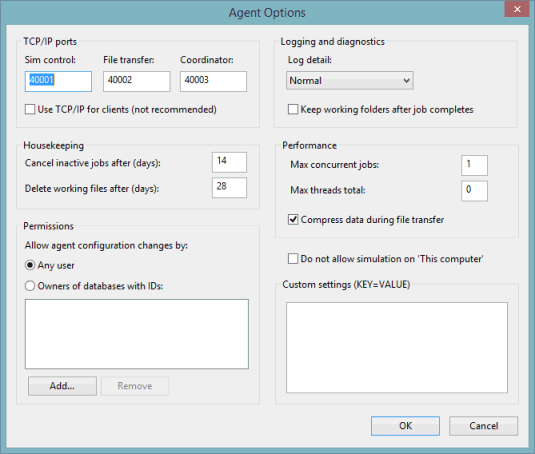
The items which comprise the Agent Options dialog are described below.
|
Item |
Description |
|---|---|
| TCP/IP ports |
The TCP/IP port settings are set as default and would not normally need to be changed unless, for example, there is conflict with another networked application. Note that these ports must be open for all computers in a workgoup environment. Note: Changing these default settings could cause the entire workgroup to stop working.
Port numbers from 1 to 65535 can be assigned to any of the TCP/IP ports, however, numbers 1 to 1024 are reserved and therefore should be avoided. In addition, the port numbers assigned to the Sim control, File transfer and Coordinator ports must be unique. Note: When OK button is clicked, error messages will be displayed if a specified port number is outside the valid range or a duplicate port number is used.
|
| Use TCP/IP for clients (not recommended) |
A check box which indicates whether or not TCP/IP should be used for clients. Unchecked (not used) by default. TCP/IP for clients is not recommended because it means the local agent might not then be able to access mapped drives and network shares that the user has permission to access. When connecting using a local pipe (the default option) the local agent can 'impersonate' the user to access these resources, which might be needed to, for example, access GIS data files for a meshing job. The only scenario for which TCP/IP is recommended is when running clients on a cluster of machines (e.g. a Citrix farm) and a user who disconnects and reconnects may find themselves using a client on a different machine. In this scenario, all clients could connect via TCP/IP to a single 'local' agent running on a separate server and so see the same job queue regardless of the machine their client is running on. |
| Cancel inactive jobs after (days) |
A housekeeping function which allows you to specify the number of days which must elapse before an inactive job is cancelled from this agent. |
| Delete working files after (days) | A housekeeping function which allows you to specify the number of days which must elapse before the working files are deleted. Setting this appropriately will prevent large numbers of files from being stored in the agent working folder. |
| Allow agent configuration changes by |
A permissions function which allows you to choose who can save any modifications to the agent configuration. Select:
|
| Add |
Enables a database to be added to the Allow agent configuration changes list, allowing the owner(s) of that database to be able to save changes to the agent. An Add database dialog is displayed when the button is selected. As default, the ID of the current database is displayed, which can be changed if required. |
| Remove | Removes the database selected in the Allow agent configuration changes list from the list. Owners of the selected database will no longer be able to save changes to the agent. |
| Log detail |
Sets how detailed the log files, which are generated by the agent and can be used for troubleshooting purposes, are to be. The options are:
Note: Log file generation is only available if enabled via the InfoWorks Agent Manager Service Options.
|
| Keep working folders after job completes |
This option is unchecked by default. If checked, it will cause the disks to become full if running large numbers of simulations. Note: This option should only be checked at the request of the
Innovyze Support Team as it is ONLY used by
Innovyze for debugging purposes.
|
| Max concurrent jobs |
The maximum number of simulation jobs that can be run at the same time on this agent. Default is 1. This is recommended even on multi-core or multi-processor machines, as the simulation engine is itself multi-threaded and hence runs fastest when all cores are available to it. |
| Max threads total |
The maximum total number of threads to be used by all active simulation jobs running on this agent. If set to 0 (default), the actual limit is set to the number of cores on the computer. The total thread limit is shared equally amongst active jobs. Each active job is allocated at least one thread (even if this takes the total threads above the limit). Per-job limits (specified on the Schedule Job(s) Dialog) are not exceeded. A priority job (started using the Run immediately button in the Job Control Window) is allocated the total number of threads and runs at a higher priority than the already active jobs, each of which is allocated a single thread. |
| Compress data during file transfer | This controls whether or not files should be compressed before transferring between remote agents and / or the coordinator agent. For efficient interoperability this option should always be checked (default). |
| Do not allow simulation on 'This computer' | Check this box to ensure that a computer running the agent does also not run simulations, such as in a CITRIX environment. Unchecked by default. |
| Custom settings (KEY=VALUE) | Additional options that may be applied to the agent. These are rarely required and should normally only be applied on the advice of the Autodesk Support Team. Descriptions of customs settings that you may be advised to use are described in the Custom settings section below. |
Custom settings
The Custom Setting pane may be used to carry out a large variety of tasks such as:
Multi GPU configuration for 2D engine
The 2D engine may run using multiple GPU cards in parallel. Multiple simulations can be run simultaneously with a limit specified for the maximum number that can be run on a single card.
The engine selects which card is to be used for a simulation based on the following criteria:
- If GPUSIMSPERCARD is specified, the engine selects a card from the list of cards specified by the GPUUSE keyword which has not exceeded the maximum number of simulations that can be run on it. The selected card will be the one which has the least number of simulations currently assigned to it.
- If GPUSIMSPERCARD is not specified, the engine loops through the cards in the order specified by GPUUSE and selects the one with the most free memory.
Configuration of the GPU card usage by the 2D engine is implemented in this dialog.
The list of available GPUs can be obtained by running one of the following commands:
- Nvidia-smi --query-gpu=pci.bus --format=csv, which provides the PCIBus in the format OxHH
- Nvidia-smi --query-gpu=pci.bus_id --format=csv, which provides the full PCIBusId in the format Domain:Bus:Device.Function HHHH:HH:HH.H where H is an hexadecimal value.
(To see the name and display mode of the cards associated with a pci.bus or pci.bus_id, use the following query - Nvidia-smi –-query-gpu=name,pci.bus,pci.bus_id,display_mode –-format=csv)
The pci.bus or pci.bus_id values can then be copied into the Custom Settings box, using the following keywords and syntax:
GPUSIMSPERCARD=n
GPUUSE=string,string,…
GPUAVOID=string,string,…
GPUANY=b
where:
n is the maximum number of simulations that can be run on a single GPU card
string is the PCIBus (format 0xHH) or PCIBusId (format HHHH:HH:HH.H) of a GPU card (IDs as identified using the command line queries above)
b is 1 or 0
The following rules apply:
- The number of simulation slots specified in the Max concurrent jobs field must be less or equal to the number of simulations (specified using the GPUSIMSPERCARD keyword) multiplied by the number of cards (specified using the GPUUSE keyword). If it is not, then any simulations (requiring a GPU card) above this number will not be assigned to a card but will instead use the default behaviour for GPUUSE, which is to find the card with the most free memory.
- The GPUSIMSPERCARD keyword can be used in conjunction with the GPUUSE option but only if GPUANY keyword is set to 0 or absent.
- If the
GPUANY keyword is 0 or absent, then:
- Only those cards listed after GPUUSE will be used.
- If GPUUSE is absent, the GPU with the highest specification will be used.
- The list after GPUAVOID will be ignored.
- If the
GPUANY keyword is set to 1:
- Any card except those listed after GPUAVOID will be used.
- If GPUAVOID is absent, any card will be used.
- The list after GPUUSE will be ignored.
-
PCIBus and PCIBusId ids can be used at the same time in the GPUUSE or GPUAVOID keywords. For GPU cards connected to the same Bus, the use of the PCIBusId is required to identify the card.
Removal of daily log files
The keyword, LOGEXPIRYDAYS, can be used to specify the number of days that must elapse before the agent daily log files are deleted. For example, LOGEXPIRYDAYS=30, would mean that the log files are automatically deleted after 30 days. Default is 21 days.Please contact us for further details on how to configure custom settings.