To Reposition Rigid Route Points and Segments Dynamically
The directions and distances allowed for dynamic edits follow the conditions established by the current style and connection data. When edits are made on an auto route region, system automatically recalculates new auto route solutions. Use the following commands to edit auto route points and segments where appropriate:
- Move Segment, for segments when adjacent segments are coplanar.
- Edit Position, for both intermediate route points that are associated with a default coupling fitting and intermediate segments.
- Move Node, for intermediate route points that are associated with a default coupling fitting.
- Trim/Extend Pipe, for free terminal route points.
Sketched route points and segments are typically edited by placing geometric constraints and dimension constraints. The involved route geometry may dynamically update to a new orientation and dimension when they are not fully constrained. In addition, you can use 3D Move/Rotate to redefine intermediate route points and free terminal route points.
 Options panel Document Settings Units tab, and select an option from the Linear Dim Display Precision list.
Move intermediate default coupling route points approximately (Move Node)
- Activate the tube route or pipe route containing the auto route region.
 On the ribbon, click Route tab Create panel Move Node and drag the appropriate route point that is associated with a default coupling fitting, or right-click the route point, and select Move Node.
- Release the mouse to end the drag.
- In the graphics window, right-click and select Done.
- Right-click again and select Finish Edit.
Move intermediate default coupling route points precisely (Edit Position)
Activate the tube route or pipe route.
 In the Model browser or graphics window, right-click the appropriate route point, and select Edit Position.
The valid length for new positions on the route changes to red. The valid length for new positions is determined by the minimum and maximum segment lengths in the active style.
Click to set the new position of the route point, or right-click within the valid length on the route, and select Enter Distance:
- To trim the segment, pause the cursor within the current route length and enter a valid positive offset.
- To extend the segment, pause the cursor outside the current route length and enter a valid positive offset.
Right-click and select Finish Edit.
Move intermediate auto route segments approximately (Move Segment)
Activate the tube route or pipe route containing the auto route region.
 On the ribbon, click Route tab Create panel Move Segment and drag the appropriate segment in the auto route region, or right-click the segment and select Move Segment.
The arrow changes to red to indicate the direction being dragged.
Release the mouse to end the drag.
In the graphics window, right-click and select Done.
Right-click again and select Finish Edit.
Move intermediate auto route segments precisely (Edit Position)
Activate the tube route or pipe route containing the auto route region.
- Right-click the appropriate intermediate segment in the auto route region and select Edit Position.
The 3D Orthogonal Route tool is displayed on the selected segment as shown in the following image:
To specify a precise distance, do any of the following:
- Right-click the axis and select Enter Distance to set a value.
- Pause your cursor over the axis and directly type the value on your keyboard when the green preview route point displays. The Enter Distance dialog box automatically prompts and displays the value.
- Move your cursor over the axis, notice the distance tooltip, and then click to set the new position.
If more than one solution is available, the Select Other tool appears for you to cycle through the solutions. Click the middle area to make your selection. You can also change to an alternative auto route solution at a later time.
Right-click in the graphics window and select Finish Edit.
Redefine intermediate sketched route points and free terminal route points (3D Move/Rotate)
By default, the triad axes relate to the world coordinate system coherently but may vary from the route direction. To define the X, Y, Z distances relative to the route direction correctly, you can redefine the axis alignment to the route segment.
Activate the tube route or pipe route.
In the Model browser or graphics window, right-click the appropriate route point, and select 3D Move/Rotate.
 Optionally, click the Redefine alignment or position command, click a triad axis, and then pick up a route segment.
The triad axes of the 3D Move/Rotate tool adjust to the route direction accordingly.
Use the free drag or enter the precise value to reposition the route point approximately or precisely.
Click Apply or OK.
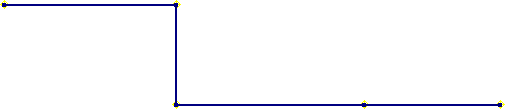
Use Move Segment to remove unwanted segments in an auto route region
In an auto route region, when adjacent segments are coplanar and perpendicular to each other, you can use Move Segment to remove the unwanted segment in between. Ensure that the segment being moved does not attempt to overlap any other existing segment. Otherwise, system will automatically calculate a route shape.
- To remove an unwanted segment in the auto route region, use Route tab Create panel Move Segment to drag the segment until the route points are coincident with adjacent route points.
If the minimum length setting for the style is violated during a drag, the segment or segments in violation turn red. A tooltip also displays the segment length and the message *
* in red text. 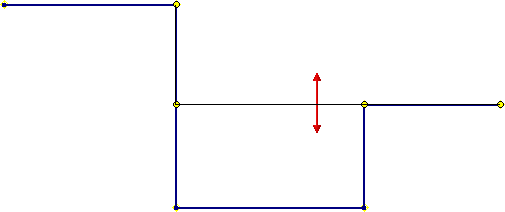
Release the cursor to end the drag.
Do either of the following to delete the extra route point:
- Right-click the route point and select Delete.
- Use Route tab Create panel Move Node to drag the route point until it is coincident with an adjacent one.