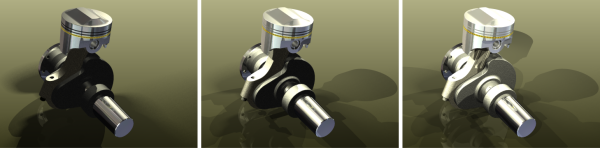
Produce animations
Animate mechanistic actions in assemblies or subassemblies, incorporating the scene introduction, transition, and conclusion.
- Define your purpose and outline the main aspects of your animation. Plan the elements, including a rendered scene, lights, cameras, and actions appropriate for your purpose.
- Use any of the animation commands (in any order) to build the animation.
- Add actions to the timeline one at a time.
Before you begin the animation procedures:
Open an Autodesk Inventor assembly.
Establish the component positions so they are where you want to start with in the animation. In some instances, you must suppress constraints. The same steps can be performed after entering the Studio environment. They are done in the Model State.
Rotate or move the view to the position you want to start with in the animation.
Enter the Studio environment. On the ribbon, click Environments tab
 Begin panel Inventor Studio .
Activate an animation. In the browser, expand the Animations node, and double-click the icon in front of Animation1, or any animation listed. To start a new animation, right-click the Animations node, and then click New Animation.
Alternatively, open the Animation Timeline. The last animation is activated.
When an animation is activated, the animation commands are available, and the Animation Timeline is displayed.
Detailed animation workflow
Create animation
In the Animation Timeline, drag the slider to the position where you want to end the first action.
In the browser, right-click a constraint to animate, and then click Animate Constraint.
In the Animate Constraint dialog box, enter a value to define the action for the time position, and then click OK.
In the graphics area, the component is repositioned. In the browser, the constraints you animate are automatically stored in the Animation Favorites folder for future use.
In any of the Animate dialog boxes, on the Acceleration tab, set the velocity, or select Constant speed so that there is constant speed throughout the animation action.
At any point, you can move the time position slider to see the animation.
Repeat the steps to animate another constraint.
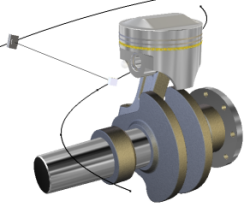
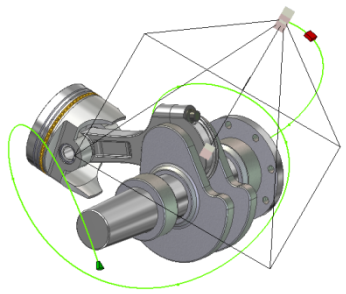
To create a camera for animation, set the view to the position you want the camera to start from. Right-click, and click Create Camera from View.
You can create as many cameras as you want.
To animate the camera, expand the Cameras node in the browser, right-click the desired camera, and click Animate Camera.
In the timeline, camera selection list, click the active camera in the animation.
 In the graphics area, change the view to the next position for the camera, and in the Timeline, click the Add Camera Action icon.
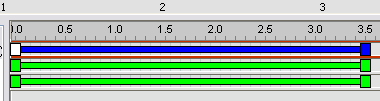
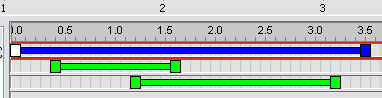
 In the Timeline window, click Expand Action Editor to see the action bars for all of the separate actions in the animation, and the browser tree of all of the items represented by the action bars.
To modify the start and end of an action, drag the start and end of any of the action bars.
To reposition an action within the row, click and drag the mid-section of the bar. There is no change to the duration. You can double-click an action to display its dialog box for editing.
When you are satisfied with your edits to the animation setup, click Collapse Action Editor, and then click Go to Start. Click Play Animation to see the animation with the edited start times.
You can edit the action bars again if necessary.
With the current time set at the end of the animation, start the next action sequence, repeating the steps to define the action.
When finished, click Go to Start and play the animation through. You can use the Action Editor to make final adjustments.
The animation is automatically saved in the Animations folder in the browser. You can save multiple animations for one assembly.
 Use Render Animation to create an .avi file. You can render the animation as is, or use the styles commands to enhance it. For more information about using the Lighting Styles, and Scene Styles commands, see Create a rendered image.
Workflows for animation commands
Multiple constraint selection
There are two constraint selection commands that facilitate easy selection of constraints for the purpose of adding them to the Animation Favorites folder or for suppressing them in one step. The two selection commands are Select Top Constraints and Select All Constraints. To use either command you must:
- Right-click the scene browser component node and select the appropriate command.
- With one or more constraints selected right-click and select Suppress.
- Another option is to, right-click, and select Add to Favorites.This action places all selected constraints in the Animation Favorites in one step.
Animation Timeline
 Control the timing of all actions in the animation, and play the animation.
Move the slider to the time position in the timeline for the action.
In the graphics area, define the animation action using the various Studio commands.
For multiple actions in the animation, repeat steps 1 and 2 until the animation looks the way you want it.
- Click Expand Action Editor to see the action bars for all of the separate actions in the animation. The timeline browser contains a tree of all of the items represented by the action bars.
The current time indicator is the topmost item. You can drag it to a new position, and the animation updates accordingly.
To change the start time for an action, select the action bar and drag the start or end handle to the desired time position. The position does not have to coincide with the current time indicator.
You can copy and paste actions in the same row or of the same type into the timeline at another time location. The actions are pasted back to back. Drag the action bar to create gaps between actions.
When you are satisfied with your edits to the animation setup, click Collapse Action Editor, and then click Go to Start. Click Play Animation to see the animation with the edited start times.
You can edit the action bars again if necessary.
Animate Components
 Animate the position of one or more components. Before using Animate Components, it is helpful to analyze the assembly constraints that may be keeping the component in place. More than likely, those same constraints will prevent movement by the Animate Components command. It is necessary, on these occasions, to suppress the constraints before attempting to animate the component. You can suppress constraints using an animation action.
If the Animation Timeline is not already displayed, on the Render tab, Animate panel, click Animate Timeline.
In the Animation Timeline, drag the slider to the position where you want to end the first action.
In the browser, or in the graphics area, select the components to animate.
On the ribbon, click Render tab
Animate panel Components .In the Animate Components dialog box, click the triad button to define the direction of the transformation. In the 3D Move or Rotate dialog box, you can specify the transform amount or drag the component to an approximate distance or rotation.
Note: Use the triad arrow tip for distance and the arrow shaft for rotation.On the Acceleration tab, set the velocity, or select Constant speed so that there is constant speed throughout the animation action.
Click OK.
An action is created, starting from the previous action.
If appropriate, render the animation, specifying the light style, scene style, and camera to use.
Fast Action alternative method:
Move the timeline slider.
Double-click a component in the browser to activate the animate component command set to the default, from previous action.
In the 3D Move/Rotate dialog box, enter either transform or rotational animation input.
An action is created, starting from the previous action.
- Use Animate Components to implement a model turntable, where the model rotates in front of a stationary camera. It requires that you place your top-level assembly in a wrapper assembly so you can animate the top-level assembly in Studio.
- Use Animate Camera to implement a turntable effect as a function of a camera, where the camera rotates around a stationary model.
Animate Fade
 Control the visibility of a component during a given time frame. Fade can run simultaneously with other actions.
In the Animation Timeline, move the slider to the time position where you want the fade action to end.
On the ribbon, click Render tab
Animate panel Fade .In the Animate Fade dialog box, the current value is used for start, and you specify the end value and define the time.
When fade-in or fade-out transition is set, the bar background is graduated indicating the fade setting. The darker the bar is, the more transparent the object is.
Click OK.
Animate Constraints
 Animate linear or angular values for one or more constraints.
If the Animation Timeline is not already displayed, on the Render tab, Animate panel, click Animate Timeline.
In the Animation Timeline, drag the slider to the position where you want to end the first action.
In the browser, right-click a constraint to animate, and then click Animate Constraint. Constraints that were previously animated are stored in the Animation favorites folder.
In the Animate Constraint dialog box, enter a value for the end of the action.
On the Acceleration tab, set the velocity, or select Constant speed so that there is constant speed throughout the animation action.
Click OK.
If appropriate, render the animation, specifying the light style, scene style, and camera to use.
Fast Action alternative method:
Move the timeline slider.
Double-click a constraint.
In the Constraint edit control dialog box, enter a new constraint value.
An action is created, starting from the previous action.
- Define angle constraints as Directed if there is component flipping during interactive playback or in a rendered animation.
- To specify one constraint, you can select it in the graphics area and click Constraints in the Animate panel of the Render tab. To specify multiple constraints, you must select the constraints in the browser, and then right-click and select Animate Constraints.
Animate Parameters
 Animate the values of one or more user parameters. Available only in files that contain user parameters.
On the ribbon, click Render tab
Manage panel Parameter Favorites and mark any parameters you want to animate as favorites. They are added to the Animation Favorites folder.- If the Animation Timeline is not already displayed, on the Render tab, Animate panel, click Animate Timeline. Drag the slider to the position where you want to end the first action.
In the browser, click the Animation Favorites folder to expand it.
Right-click the parameter you want to animate, and then select Animate Parameter. All of the user-defined parameters in the active file are listed. User parameters that were previously animated are stored in the Animation Favorites folder.
In the Animate Parameters dialog box, enter a value for the end time.
On the Acceleration tab, set the velocity, or select Constant speed so that there is constant speed throughout the animation action.
Click OK.
If desired, render the animation, specifying the light style, scene style, and camera to use.
Fast Action alternative method:
Move the timeline slider.
- Expand the Animation Favorites folder, and double-click a parameter node.
- It creates an action for the parameter, from the last action, and displays the current parameter value.
- In the Parameter edit control dialog box, enter a new constraint value, and then click the check mark to accept the input.
Animate Camera
 Specify an existing camera or create a new one, and define the playback path and time.
If the Animation Timeline is not already displayed, on the Render tab, Animate panel, click Animate Timeline.
In the graphics area, rotate or move the model to the position you want to start with in the animation. You can use the zoom and pan commands.
To create a camera:
- Use the Rotate View command to set the view for the start of the animation.
- Right-click in the graphics area, and then click Create Camera from View or right-click the browser icon next to Cameras and click Create Camera from View.
To use an existing camera:
- In the browser, expand Cameras and right-click on an existing camera and click Animate Camera.
- In the Animation Timeline dialog box, select a camera from the list. Use the Rotate View command to change the view.
- Click Add Camera Action to set the camera to the current view and add an action bar for that position.
Move the slider to the next position where you want to end the action.
On the ribbon, click Render tab
Animate panel Camera and define the camera action.If you want a turntable effect, select the Turntable option on the Turntable tab.
On the Acceleration tab, select Constant Speed.
When you complete animating the camera, you can view the animation with that cameras perspective or from another perspective. Select the camera from the Animation timeline list to view the animation through a specific camera. Select Current Camera to watch the animation and camera movement from another perspective.
Animate camera along path**
You can create product walk-throughs or fly-bys. To animate a camera along a path you must:
Create a part containing a 2D or 3D sketch. The path sketch geometry must be contiguous, no gaps.
Add the part to the assembly and position it where you want the camera to go. Place it anywhere and ground it, or use the part origin planes and axes to constraint it in position.
Switch to the Inventor Studio environment.
Activate the Animation Timeline command.
In the timeline, move the Timeline slider to the time position where the camera path animation concludes.
In the scene browser, right-click the camera you want to animate and click Animate Camera.
In the Animate Camera dialog, click Definition.
In the Camera dialog, specify whether the camera Target is fixed, floating, or travels along a path. If the target follows a path, use the selection command to specify the path sketch.
In the Camera dialog, specify whether the camera Position is fixed, floating, or travels along a path. If the camera position follows a path, use the selection command to specify the path sketch.
Note: The target and position path geometry must be different entities.Having selected a path, you have the option to specify the start and end positions along the path for either the camera or the target. After selecting the path, the end handles, triangle (starting point) and square (ending point), can be dragged along the path limiting the camera or target travel.
Specify the other settings as needed.
Render the animation using the preview render option. You can see the results of your animation quickly without the lighting affects. Make any necessary adjustments, and then do a shaded rendering.
Animate Positional Representations
 Use the positional representations you save in the assembly environment to create an animation. If a PR is changed, when you return to the studio environment, the animation is updated accordingly.
If a model enters the Studio environment set to a particular representation, then that representation acts as the base state and is restored upon returning to the Assembly environment. It is not required to start the animation in the base state.
In the Animation Timeline, drag the slider to the position where you want to end the first action.
On the ribbon, click Render tab
Animate panel Pos Reps.or
In the browser, click the Representations folder to expand it. All the positional representations in the active file are listed.
Right-click a PR to animate, and then select Animate.
In the Animate Positional Representation dialog box, specify the start and end PRs, and then specify the duration. For an instant action, Start remains in the current state, and the model transforms from the current state to a specified end state before the animation proceeds.
On the Acceleration tab, set the velocity, or select Constant speed so that there is constant speed throughout the animation action.
Note: For an instant action, Start remains in the current state, and the model transforms from the current state to a specified end state. The instantaneous action is displayed on a separate line in the timeline window. Only the Pos1 is available for edit to avoid creating another PR animation.Click OK.
If appropriate, render the animation, specifying the light style, scene style, and camera to use.
In cases of concurrent actions on a component, PR animations take precedence over other types of actions.
The Animate Positional Representations command does not support pattern overrides.
Positional representations act as containers for their children. You can animate the PR as a container, or make adjustments to the children within the bounds of the container action. Use the Timeline Editor to edit children within the span of the parent. If you drag a child beyond the PR start or finish, you drag the parent with the child, and both are edited.
Positional Representation being edited. Child actions (green) are same length as parent (blue).
Positional Representation after child actions have been modified.
You can use a positional representation to animate a single occurrence of an object.
You can nest positional representations to any level and animate them , and assembly levels between the nested PR and the top-level assembly are flexible.
Nested positional representations must be active in the top-level assembly.
In the Animation browser, the node for the nested PR represents only the necessary information. A tooltip displays the name of the assembly that contains a nested PR.
Any interim PRs that make reference to the nested PR is shown in the Animation browser.
In the Animation browser hierarchy, influence is controlled by the PR nearer the top level.
Note: If you reference nested positional representations, animated positional representation performance might degrade slightly. The rendered output is not affected.
Animate Light
Lighting Styles, individual lights in styles, and local lights can be animated. Animated lights are displayed in the animation browser. When animating lights certain parameters are available for use, such as position, target (spot only), color, and so on. As with other animated objects, the animated light action can be edited in the timeline either through the context menu or by double-clicking the action bar in the timeline.
 Animating a lighting style
- If the Animation Timeline is not already displayed, on the Render tab, Animate panel, click Animate Timeline.
- Set the timeline slider to the end time position for the animated lighting style.
- Right-click the Lighting Style and click Animate Light. The Animate Light dialog box displays.
- Click Definition. Edit the lighting style position. The position represents where the animation action ends. For example, if a lighting style is moving from point A to point B, edit the position so that the light is at point B.
- Modify settings for the animation time in the dialog box as needed.
- On the Acceleration tab, select Constant Speed or an appropriate setting for the animation action.
- Click OK and the action populates the timeline.
- When you complete animating the lighting style you can view the animation using the timeline playback controls or by Preview rendering the animation.
Animate light in style
- If the Animation Timeline is not already displayed, on the Render tab, Animate panel, click Animate Timeline.
- Set the timeline slider to the end time position for the animated light.
- In the scene browser, right-click the light and click Animate Light. The Animate Light dialog box displays.
- Click Definition. Edit the light position. The position represents where the animation action ends. For example, if a light is moving from point A to point B, edit the position so that the light is at point B.
- Modify settings for the animation time in the dialog box as needed.
- On the Acceleration tab, select Constant Speed or an appropriate setting for the animation action.
- Click OK and the action populates the timeline.
- When you complete animating the light, you can view the animation using the timeline playback controls or by Preview rendering the animation.
Animate local light
- If the Animation Timeline is not already displayed, on the Render tab, Animate panel, click Animate Timeline.
- Set the timeline slider to the end time position for the animated local light.
- In the scene browser, in the Local Lights folder, right-click the local light and click Animate Light. The Animate Light dialog box displays.
- Click Definition. Edit the local light position. The position represents where the animation action ends. For example, if a light is moving from point A to point B, edit the position so that the light is at point B.
- Modify settings for the animation time in the dialog box as needed.
- On the Acceleration tab, select Constant Speed or an appropriate setting for the animation action.
- Click OK and the action populates the timeline.
- When you complete animating the local light, you can view the animation using the timeline playback controls or by Preview rendering the animation.