To Create Ribs
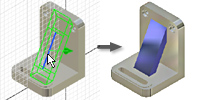
Ribs that are parallel to the sketch plane use an open profile to create a single support shape. The specified thickness is normal to the sketch plane and the material is extruded planar to the sketch:
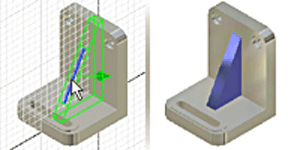
Ribs that are normal to the sketch plane, also called webs, use an open or closed profile to create a support shape. The specified thickness is planar to the sketch plane and the material is extruded normal to the sketch:
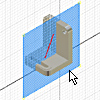
Before defining the rib, set the sketch plane and create the profile geometry. If desired, use a work plane as the sketch plane. Click 2D Sketch and then click the work plane or a planar face to set the sketch plane. Use commands on the Sketch tab to create the profile to represent the rib shape.
On the ribbon, click 3D Model tab
 Create panel Rib
  .
.If the profile is not selected, select it.
Set the direction of the extrusion:
- Normal to Sketch Plane
 . Extrudes geometry normal to the sketch plane. The Thickness is parallel to the sketch plane.
 - Parallel to Sketch Plane
 . Extrudes geometry parallel to the sketch plane. The Thickness is normal to the sketch plane.
- Normal to Sketch Plane
Click a Direction

 to specify which way the rib is extruded.
If there are multiple bodies in the part file, select the Solids selector to choose the participating body.
The Extend Profile check box displays if the ends of the profile do not intersect the part. The ends of the profile extend automatically. Clear the check box to create a rib or web the exact length of your profile.
In the Thickness box, enter a value for the width of the rib or web. Click a Flip icon
 to apply the thickness to one side of the profile or extend it equally on both sides of the profile.
Set the depth of the rib:
- To Next
 . Terminates the rib or web on the next face.
 - Finite
 . Sets a specific distance for the rib or web termination. Enter a value.
- To Next
(Optional) In the Taper box, enter a taper or draft value for the rib or web. To apply a taper value, the direction must be perpendicular to the sketch plane.
(Optional) For ribs that are normal to the sketch plane, specify additional parameters in the Draft and Boss tabs of the Rib dialog box:
Draft tab
- Hold Thickness At Top. The specified thickness is controlled at the sketch plane.
- Hold Thickness At Root. The specified thickness is controlled at the intersection of the rib feature and the next face.
- Draft Angle. Enter a value to add draft to the rib feature.
Boss tab
- Centers. Selects sketch points that lie on rib profile geometry.
- Select All. Selects all sketch points that intersect rib profile geometry.
- Diameter. Specifies the diameter of the boss feature.
- Offset. Specifies the distance above or below the sketch plane to start the boss feature.
- Draft Angle. Adds draft to the boss features.
Click OK.
 Show Me How to Create a Rib Parallel to the Sketch Plane
Show Me How to Create a Rib Normal to the Sketch Plane
Show Me How to Create a Rib With a Boss and Draft