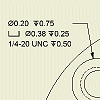
To Specify the Hole Note Format
The format for hole notes is controlled by the hole note's associated dimension style.

Before you begin a drawing, define a dimension style with a hole note definition for each hole type.
Set up hole note format in the dimension style
Select Manage tab
 Styles and Standards panel
  Styles Editor to open the Style and Standard Editor. Expand the Dimension style category, and then double-click a dimension style.
In the Dimension Style window, click New to create a style, if needed.
- In the New Style Name dialog box, accept the default "Copy of Default (xxx)" or enter a new name.
- Select the Add to Standard check box so the new style is available to all documents that use the standard. Click OK.
Click the Notes and Leaders tab. Hole Note Settings option is selected by default.
In Note Format, select a hole and thread type.
In the Options box:
- Clear the check mark from Use Default to edit settings.
- If available, select Tap Drill to apply settings to selected hole and thread types.
- Select Part Units to use model units for hole notes.
- Click Precision and Tolerance to specify preferences for precision and tolerance parameters in the Precision and Tolerance dialog box.
- Click Apply to All to apply selected settings to all hole and thread types, including settings in the Precision and Tolerance dialog box.
Click Values and Symbols buttons to add their variable names in the edit box.
In the General Settings box:
- Click Edit Quantity Note to set contents of quantity notes in the dialog box.
- Click the arrow to select a Leader Style. If appropriate, click Edit Leader Style to close the dimension style and change leader style characteristics.
- Select the check box to set text justification.
- Click the arrow to select leader text orientation.
- Click the arrow to select leader text alignment relative to the landing line.
In Thread Note Settings, select Custom Designation to apply the custom thread designation field from the Thread.xls spreadsheet instead of the default note.
Select another hole and thread type and define its settings. Repeat for each hole type in the drawing.
To customize appearance for dual hole notes, open the Alternate Units tab. Then click Hole Note Dual Format, and select a format from the list. Select the Group Dual Values Together option to use adjacent placement of dual dimensions within hole notes.
Edit format for a selected hole note
In the drawing view, right-click a hole note, and select Edit Hole Note or double-click a hole note. In the Edit Hole Note dialog box, Hole Type, and Thread Type cannot be edited.
In the Options box:
- Clear the check mark from Use Default to edit settings.
- If available, select Tap Drill to apply settings to the selected hole and thread type.
- Select Part Units to use model units for the hole note.
- Click Precision and Tolerance to specify preferences for precision and tolerance parameters in the Precision and Tolerance dialog box.
- Click Edit Quantity Note to change settings in the Quantity Note dialog box.
In the edit box, click and Backspace to remove existing values.
Click Values and Symbols buttons to add their variable names in the edit box.
Click OK to apply the new settings to the selected hole note.