To Work with Hatch Styles
You can edit a hatch style, set default rotation angles, map materials to hatch patterns, and break hatching around annotations.
The Standard and the Hatch style control hatching in drawings.
Hatch styles specify hatch attributes, for example, pattern or scale. If you edit a hatch style, all existing hatch objects that use the style change (only your overrides are kept).
You assign a Hatch style to the Section Hatch object and to the Sketch Hatch object in Object Defaults. The Hatch style is then used when you create a cut view or sketch hatch.
The Standard defines Material Hatch Pattern Defaults and Preset Values for the Section Hatch Angle. Both these properties control hatching in section views and other types of cut views.
Edit a Hatch Style
Edit the Hatch style to set the default hatch attributes for section and sketch hatches.
Select Manage tab
 Styles and Standards panel Styles Editor to open the Style and Standard Editor.
In the styles list, expand Hatch, and then click one of the listed Hatch styles.
Tip: To create a Hatch style, click New, and specify the name of the new style.On the Hatch Style panel, set hatch attributes:
- Select a pattern from the Pattern list.
- Set the pattern Angle, Scale, and Shift.
- Select Double to create a copy of the hatch rotated by 90 degrees.
- If appropriate, add a comment
To add a hatch pattern to the list:
- Select Other from the Pattern list.
- In the Select Hatch Pattern dialog box, select Offered for the hatch pattern to add in the Pattern list.
- Select a hatch pattern to use it as the default pattern in the Hatch style.
- Click OK to close the Select Hatch Pattern dialog box.
To load hatch patterns from an external PAT file:
- Select Other from the Pattern list.
- In the Select Hatch Pattern dialog box, click Load.
- In the Load Hatch Pattern dialog box, click the Explore Directories button to display the Select Hatch Pattern File dialog box.
- In the Select Hatch Pattern File dialog box, locate a PAT file, select it, and click Open. Valid hatch patterns from the selected PAT file display in the Load Hatch Patterns dialog box.
- Select one or more hatch patterns to load and click OK.
- In the Select Hatch Pattern File dialog box, select Offered for hatch patterns to add in the Pattern list of hatch-related dialog boxes.
- Select a hatch pattern to use it as the default pattern in the Hatch style.
- Click OK to close the Select Hatch Pattern dialog box.
Click Save to save the changes to the current document, and then click Done to close the dialog box.
Set Default Rotation Angles for Hatch Patterns in Section Views
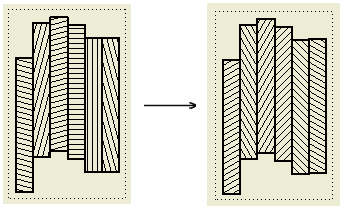
Default Section Hatch Angles for cut views are specified on the General tab of the Standard style pane. The final hatch rotation in cut views includes the default section hatch angle and the rotation angle defined in the Hatch style.
Select Manage tab
Styles and Standards panel Styles Editor to open the Style and Standard Editor.In the styles list, expand Hatch, and then click one of the listed Hatch styles.
On the General tab in the Standard window, select Section Hatch Angle from the Preset Values list.
Edit the list of rotation angles. Click New to add a rotation angle to the list. Click Delete to remove a rotation angle from the list.
Note: Angles in the Preset Values list use the angle degree unit. You can enter deg or rad to specify the unit in the Add New Hatch Angle dialog box. Values in radians are automatically converted to degrees after you click OK or Apply in the Add New Hatch Angle dialog box.Click Save to save the edits and click Done to close the Style and Standard Editor.
Map Materials to Hatch Patterns
Mapping between materials and hatch patterns determines hatch patterns in cut views. If no hatch pattern is specified for a material, the hatch pattern from the current Hatch style is used.
Select Manage tab
Styles and Standards panel Styles Editor to open the Style and Standard Editor.In the styles list, expand Standard, and then click one of the listed standards.
Click the Material Hatch Pattern Defaults tab in the Standard window.
In the Default Hatch Pattern list, select the default hatch pattern for a new material added in the mapping.
Create a list of materials in the mapping table:
Import materials from part files (click From File...), or from the material library (click From Library).
Tip: Change the Default Hatch Pattern to correspond to the hatch pattern desired for the imported materials.Add materials to the list manually: Click at the last row in the table and enter the material name.
To rename a material, select the corresponding row, and enter the new material name.
To delete a material from the mapping table, select the material, right-click in the window, and click Delete.
Map materials to hatch patterns:
- To change the mapping for a material, click the Hatch Pattern field and select a new hatch pattern from the list.
- To change the mapping for several materials at the same time, use Ctrl or Shift to create a multiple selection. Then click the Hatch Pattern field corresponding to one of the selected materials, and select a new hatch pattern from the list.
Click Save to save the changes to the current document, and then click Done to close the dialog box.
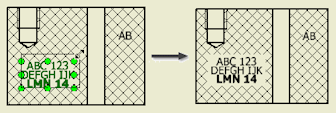
Break Hatching around Drawing Annotations
Select the Cross Hatch Clipping option on the Drawing tab of the Document Settings dialog box to break hatching around drawing annotations in cut views.
Notes:
- To enable clipping around user-defined symbols, select the Symbol Clipping option for individual symbol instances.
- The cross hatch clipping is not supported for datum targets and in isometric views.