Rasterization Settings
Find these options under Visualization > Rasterization Settings and use them with the OpenGL and Vulkan rasterizers when evaluating shadows, geometry light sources, reflections, and refractions. Enable or disable these, as well as culling, depth passes, and transparency modes.
Baked Shadows
Activates/deactivates precomputed shadows on vertices and textures in the viewport and bakes shadows from the environment.
Realtime Environment Shadows
Video captions: We also introduced two new methods for calculating real time shadows using ray tracing: Raytraced Ambient Occlusion and Raytraced Environment Shadows. These methods are a more accurate and realistic alternatives to the still existing Screen Space Ambient Occlusion. Raytraced Ambient Occlusion functions similarly to SSAO, as it calculates shadows in all directions. Raytraced Environment Shadows, on the other hand, considers the lighting from the environment map to create soft shadows cast by brighter spots.
Click ![]() to the right of Realtime Environment Shadows to access the Realtime Environment Shadows Settings for enabling/disabling realtime environment shadows, and selecting the method used for calculating them for diffuse lighting, using raytracing.
to the right of Realtime Environment Shadows to access the Realtime Environment Shadows Settings for enabling/disabling realtime environment shadows, and selecting the method used for calculating them for diffuse lighting, using raytracing.
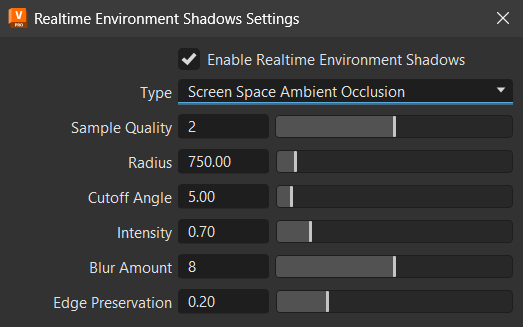
Realtime Environment Shadows Settings
Use the Realtime Environment Shadows Settings for determining the shadow type used, as well as whether baked shadows are used for shadow materials, the distance of the shadows, their intensity, and the number of rays per pixel. For details on these settings, see Realtime Environment Shadows.
Enable Realtime Environment Shadows - Activates/deactivates realtime environment shadows, which can be quite performance intensive in the viewport. When checked, the Rasterization > Realtime Environment Shadows menu option is enabled.
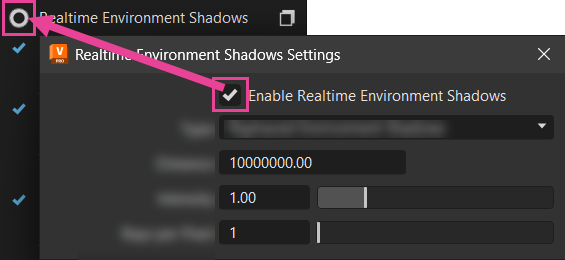
Type - Choose from Off, Screen Space Ambient Occlusion, Raytraced Ambient Occlusion, and Raytraced Environment Shadows.
Off - Baked, SSAO, and raytraced environment shadows are all turned off and not shown in the viewport.
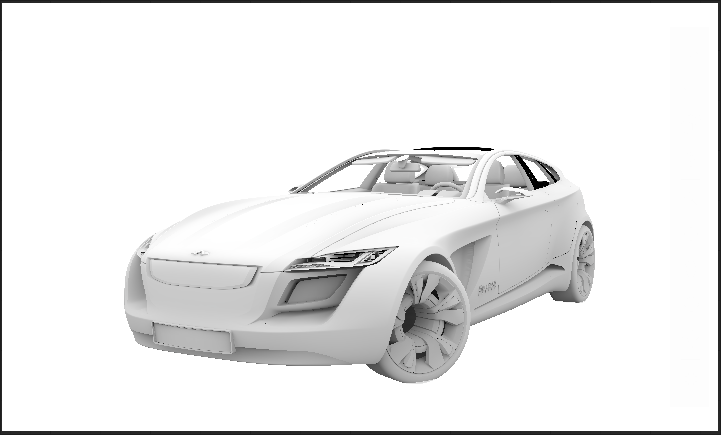
Realtime Environment Shadows ON Realtime Environment Shadows OFF 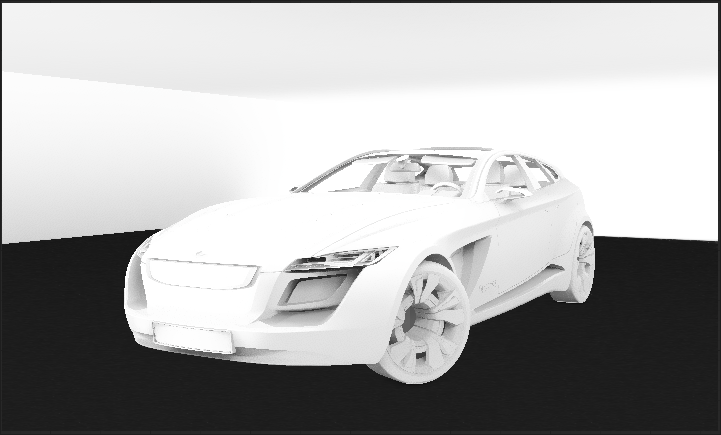
Screen Space Ambient Occlusion - Activates ambient occlusion calculations using screen space unit in the viewport. This improves distant shadow detail and can make meterials look more compelling. However, this can reduce performance and requires more memory. Use the following options for changing the current SSAO settings:
Raytraced Ambient Occlusion - Only available for Vulkan, as a raytracing-compatible graphics card is required. Use this alternative to SSAO for more accurate realtime computations of shadowed areas for diffuse lighting. It calculates shadows in all directions, making a scene illustration more realistic, while addressing some of SSAO's limitations. See the Raytraced Ambient Occlusion section for further information.
Raytraced Environment Shadows - Only available for Vulkan, as a raytracing-compatible graphics card is required. It uses raytracing and calculates approximate shadows for diffuse lighting, considering the lighting from the environment map, so that brighter areas have more importance, producing more defined, yet soft, shadows. See the Raytraced Environment Shadows section for further information.
Sample Quality - Sets the sample quality of the screen space ambient occlusion calculation.
Radius - Sets the radius of the screen space ambient occlusion effect in scene space units. Geometry beyond this distance does not occlude the illumination.
Important:Since this is a screen space effect, there are some limitations. for Example, if the radius gets too large, the effect stops working.
Cutoff Angle - Prevents self-shadowing on a flat surface, since the depth channel is not accurate. Use a cutoff angle to avoid shadowing on surfaces with a smooth curvature. If the angle between the surface plane and vector to the sample point is less than the cutoff angle, therefore, outside of the cutoff angle, the sample will be ignored.
Intensity - Sets the darkness of the occlusion. The greater the value, the darker the shadows.
Blur Amount - Sets how much blur is applied to the occlusion. The higher the value, the more blur passes, resulting in a softer output, but with increased execution time.
SSAO provides an efficient, realtime approximation of the baked ambient occlusion (AO). Although SSAO will never be as good as precomputed AO, or even baked lighting and shadows, SSAO is good for quick previews.
Edge Preservation - Sets the edge preservation factor for the blur filter passes. It is based on the continuity of the depth of adjacent pixels.
- A value of 0 ignores any discontinuities in the depth channel and filters everything.
- A value of 1 only filters pixel at exactly the same depth.
Raytraced Ambient Occlusion
Only available for Vulkan, as a raytracing-compatible graphics card is required. Activates ambient occlusion calculation, also known as soft global illumination. It calculates realtime shadows in all directions using raytracing, offering more accurate realtime computation of shadowed areas for diffuse lighting, such as shadows on gaps and in corners. It makes a scene illustration more realistic, while addressing some SSAO limitations.
Currently, there are a couple limitations:
- Does not support tessellation.
- Does not support skinning; therefore, a mesh without bone transforms will be used.
Do this calculation as a pre-process during data preparation. Since the calculated ambient occlusion results are baked on the geometry's vertices, the smoothness of the calculated shadow depends on the polygon mesh resolution. Therefore, VRED offers several ways to increase the quality on low quality models, like subdividing and predefined quality presets, in other parts of the software.
Use the following options, found in the Realtime Environment Shadows Settings, for changes to the current raytraced ambient occlusion:
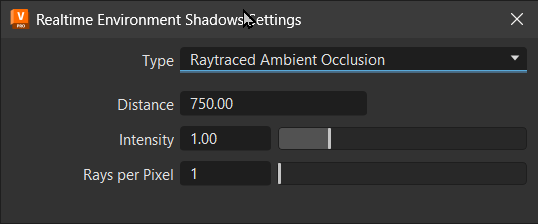
- Distance - Sets the maximum distance for the geometry to be considered as an occluder.
- Intensity - Sets the shadow intensity. The creater the value, the darker the shadows.
- Rays per Pixel - Sets the number of rays to trace per pixel.
Raytraced Environment Shadows
Only available for Vulkan, as a raytracing-compatible graphics card is required. Activates and calculates realtime shadows for diffuse lighting, considering the lighting from the environment map to create soft shadows cast by brighter spots. Use it as an alternative to SSAO.
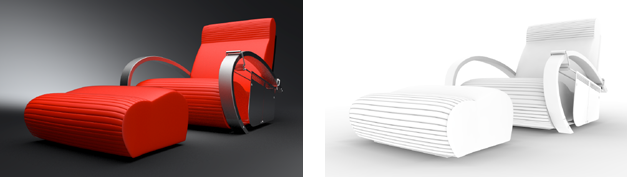
For example, this scene is illuminated using calculations from the HDR file's environment node; it works without any other light source within the scene. All objects that are hidden in the moment of calculation are darkened.
- Distance - Sets the maximum distance for the geometry to be considered as an occluder.
- Intensity - Sets the shadow intensity. The creater the value, the darker the shadows.
- Rays per Pixel - Sets the number of rays to trace per pixel.
Realtime Light Source Shadow
Activates/deactivates shadows that move with the object casting the shadow. Use them for casting shadows on objects that move. Realtime shadows can be quite performance intensive, so we recommend using them sparingly. Realtime shadow maps work with delta, area, and object lights.
Geometry Light Sources
Only available in OpenGL render mode and with Realtime Light Source Shadow selected. Treats self-illuminated geometries as light source.
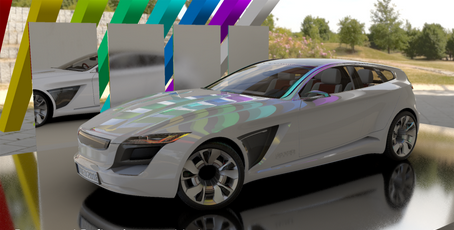
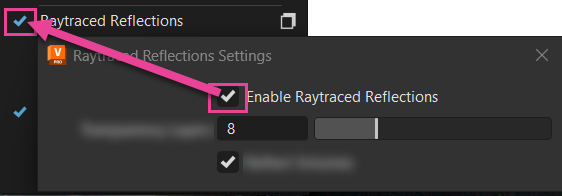
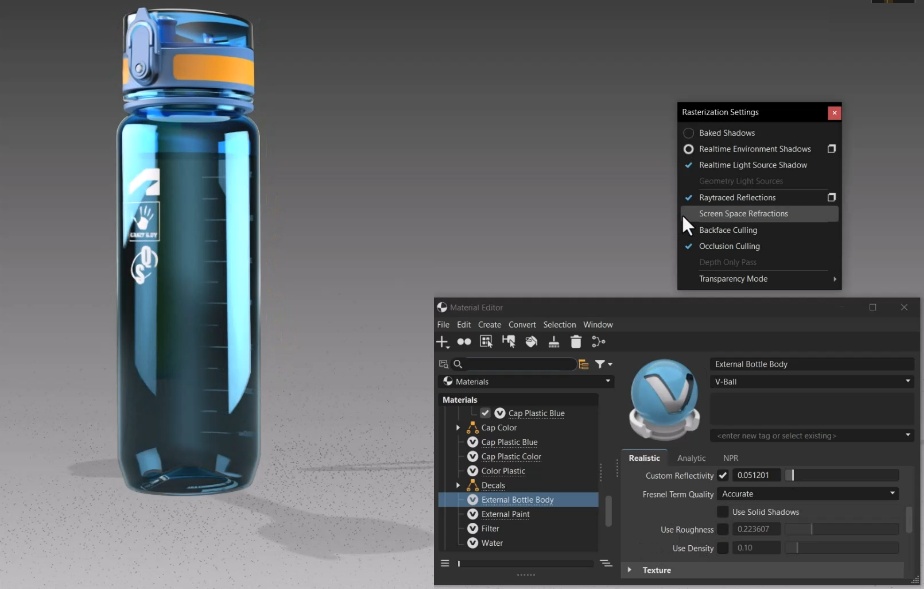
Raytraced Reflections
Video captions: VRED now can overlay raytraced reflections onto the rasterization image. Just go the file menu and select raytraced reflections under visualization and you will see reflections on the corresponding objects like the door in this example.
Only available for Vulkan, as a raytracing-compatible graphics card is required. Raytraced reflections are supported for transparent material types, such as plastic, brushed metals, carpaint, carbon fiber, and MDL, as well as glass. Skinned meshes, DLSS-Ray Reconstruction, and Transparent/Multi Material reflection skinned meshes are also supported for raytraced reflections.
Raytracing support in Vulkan enables the computation of realistic reflections, significantly enhancing the visual quality of your realtime scene in the viewport. This brings your scene closer to results achievable with our CPU and GPU raytracers.
| Raytraced Reflections OFF | Raytraced Reflections ON |
|---|---|
 |
 |
Use these Python functions for realistic reflections in Vulkan render mode:
vrRenderSettingsService.getSettings().setUseRaytracedReflections(True)vrRenderSettingsService.getSettings().getUseRaytracedReflections()
The following are specific things that are supported and visible in raytraced reflections:
- Reflections on glass and transparent materials
- Multipass and layered materials
- Skinned meshes
- Opaque materials
- Area lights are accurately reflected
- Nvidia realtime denoisers or DLSS-RR, when DLSS is enabled
Limitations: Currently, since this is a realtime implementation, there are some limitations compared to VRED's full CPU and GPU raytracing:
Line and wireframe materials - These are excluded from Opaque materials.
Area lights without raytracing - These generate approximated light occlusion.
Reflections on glass and transparent materials - Only the front layer of a transparent object can have raytraced reflections.
Reflections - These are calculated only for the top-most layer of a material, such as the clearcoat, if present, or base layer, and the front-most sample of transparent objects. Only one bounce of reflection (one ray per pixel) is computed, so only direct reflections are visible. However, raytraced reflections for opaque and transparent objects are independent steps. This means a pixel can launch two rays, one for the opaque pass and another for the transparent pass.
For example, an object with an opaque material (e.g., a plastic without transparency) and no clearcoat will have glossy reflections raytraced. If the material contains a clearcoat, only the clearcoat reflections would be raytraced. The base layer (the actual plastic in this example) would use normal environment sampling.
For another example, with a transparent object (e.g. a plane) in front of an opaque object, both would have raytraced reflections, as they are calculated on different passes. If a transparent object is in front of another transparent object, only the samples closest to the camera would be raytraced, while the samples behind would fallback to environment sampling.
Tessellation (displacement maps) - These are not yet supported; therefore, an untessellated version of the meshes will be used.
When a mesh with displacement is visible on the reflections, the "flat" version is shown. This situation can produce artefacts when the information from rasterization and raytracing don't match.
For example, when calculating Raytraced Ambient Occlusion for a mesh with displacement, as the rays are generated from the displaced mesh, rays collide against the non-displaced mesh. This is more pronounced with concave geometry or displacements that move the geometry inwards, as these produce self-shadowing. Self-shadowing can show on Substance materials, which use displacement maps with height values of 0.5 as "no displacement". These surfaces are indented for values < 0.5. A workaround is to change the Displacement Offset in the VRED Substance material from 0.5 to 0.0.
Click ![]() to access the Raytraced Reflections Settings.
to access the Raytraced Reflections Settings.
Raytraced Reflections Settings
Set the number of layers of transparent surfaces visible in the reflections, from front to back. Any surfaces behind the specified number will not be visible in the reflections.
Enable Raytraced Reflections - Only available for Vulkan. Enables raytraced reflections. When enabled, the Raytraced Reflections menu option appears checked.
Transparent Layers sets the number of layers of transparent surfaces visible in the reflections, from front to back. Any surfaces behind the specified number will not be visible in the reflections.
Reflect Volumes enables or disables volumetrics raytraced reflections. Since these can have a slight effect on performance, they can be disabled.
Note:As of 2026.1, volumetrics raytraced reflections are supported in Vulkan.
 Tip:
Tip:When playing back an animated volumetric reflection, enable DLSS to correct any lag in the reflected playback.
Screen Space Refractions
Video captions: Another visual enhancement while not being ray tracing is Screen Space Refractions. This visual effect in Vulkan offers a more realistic visualization of translucent materials, including surface roughness, by simulating light refraction in real time.
Only available for Vulkan. Adds realism to glass and transmissive MDL and MaterialX materials, including surface roughness, by simulating light refraction in realtime. This feature is limited to the transparent layer closest to the camera and any additional transparent materials behind it will be ignored.
Refractions can also be enabled/disabled for each material individually through the Material Editor.
| OpenGL | Vulkan |
|---|---|
 |
 |
Limitations: Currently, since this is a realtime implementation, there are some limitations:
- Transparency - This feature is limited to the transparent layer closest to the camera and any additional transparent materials behind it will be ignored.
- DLSS-RR - This produces artifacts when Screen Space Refractions are used. To avoid this, use the default denoiser when Screen Space Refractions are in use. A drop in quality is expected in this situation, as the default denoiser tends to produce worse results and introduces more lag.
- DLSS - If DLSS is enabled when Screen Space Refractions is in use, a lower resolution is rendered initially, denoised with the default denoiser, and then it is upscaled by DLSS. For this reason, Screen Space Refractions + DLSS tends to produce a lower quality result than Screen Space Refractions without DLSS.
Try these Python functions in Vulkan render mode:
vrRenderSettingsService.getSettings().setUseScreenSpaceRefractions(True)vrRenderSettingsService.getSettings().getUseScreenSpaceRefractions()
Backface Culling
Activates/deactivates backface culling, which determines if a polygon should be drawn by checking if it faces away from the camera. When Backface Culling is activated, it renders only the faces with normals pointing toward the camera, optimizing performance by not drawing polygons that aren't visible.
In OpenGL, a selection made through a culled backface in the viewport will affect the Autofocus when a camera's Depth of Field is enabled. This sets the focus to the object behind the geometry when viewed through a culled geometry.
Occlusion Culling
Avoids rendering objects that are hidden by other objects, thereby improving performance by rendering only visible geometries. The render engine excludes polygons/patches hidden by other objects on rendering.
This is enabled by default; however, to disable it, uncheck this option.
Depth Only Pass
Only available in OpenGL render mode. Renders the scene once, using only the depth values. It can be used for optimization with complex shaders.
Transparency Mode
Renders the scene applying one of these transparency modes: Object Sorting or Depth Peeling. In OpenGL, Object Sorting is the default. Vulkan always uses Depth Peeling. When Depth Peeling is selected, select Transparency Settings to determine the number of layers to peel.
Video captions: For a pixel correct result with self-intersecting transparent objects in OpenGL, we’ve added additionally to the Object Sorting, the so-called Depth Peeling. This can also solve the issue of wrongly sorted transparent materials. Use the slider to adjust the number of layers that should be taken into the calculation.
Object Sorting
Only available for OpenGL. If you value performance more than correct results or don't have intersecting transparent objects or transparent objects that intersect themselves, choose object sorting. It enables object sorting transparency, where every object in the scene is rendered one at a time, from back to front. Self-occluding transparent geometry might not be accurately rendered.The ordering can be overridden per material, via the Sort Key option in the Material Editor > Common (tab).
Depth Peeling
If your scene has intersecting transparent objects or transparent objects that intersect themselves, use depth peeling.
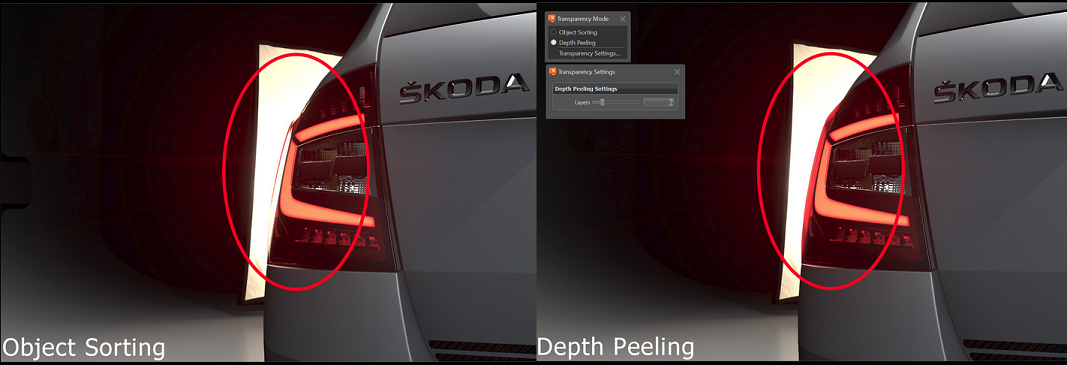
Depth peeling is for order-independent transparency and per-pixel correct blending of transparent surfaces without sorting. Render images with complex intersecting transparent objects, such as a headlight, with pixel-perfect accuracy.
| Without Depth Peeling | With Depth Peeling |
|---|---|
 |
 |
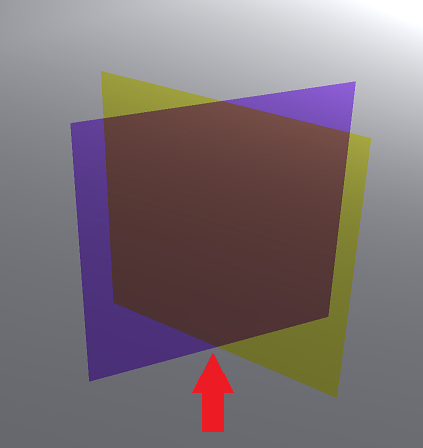
How Does Depth Peeling Work?
Depth peeling transparency renders per-pixel transparency via multiple passes. At each pass, the next transparent layer is peeled and blended with previous layers. VRED peels the layers from back to front to get the correct result. Therefore, if you have three layers of glass, like for a headlight, and depth peeling is only set to two, you only see the two layers furthest from the camera. All remaining layers are not rendered.
The advantages offered by depth peeling, however, have a performance cost. Try to select the minimum number of layers to peel to fully capture the scene. For many scenes, performance can be greatly improved by enabling occlusion culling: Visualization > Rasterization Settings > Occlusion Culling.
Where Are My Transparent Materials?
Since the environment’s shadow plane is a transparent material, it is also rendered by the depth pass. Therefore, if Depth Peeling is enabled, but set to a single layer, all transparent materials in the scene will disappear whenever viewed from an angle placing the shadow plane behind them. If you run into this issue, set the number of layers to a higher value, such as 8.
When To Use Depth Peeling
When ordering will not produce the correct transparency, as in the following cases, Depth Peeling is recommended.
- When transparent geometry is self-occluding
- When two or more transparent objects intersect, where parts of one object are in front of another and other parts are behind
Depth Peeling Settings
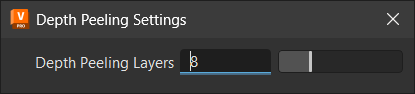
For setting the number of layers peeled, select Visualization > Rasterization Settings > Transparency Mode > Depth Peeling ![]() to access the Depth Peeling Settings dialog. The default number of passes (i.e., the number of layers to peel) is 8, which are performed from back to front. Either enter a value or use the slider to set values from 0 to 32. Note that in OpenGL, a value beyond this range can be manually entered in the slider field, if needed.
to access the Depth Peeling Settings dialog. The default number of passes (i.e., the number of layers to peel) is 8, which are performed from back to front. Either enter a value or use the slider to set values from 0 to 32. Note that in OpenGL, a value beyond this range can be manually entered in the slider field, if needed.