HTC VIVE
VRED supports the HTC VIVE, VIVE Pro, VIVE Pro Eye, VIVE Focus Series, VIVE Flow, VIVE Cosmos, VIVE Cosmos Elite, and VIVE XR Elite Series.
We recommend using native runtimes over compatibility ones to achieve the best performance.
When a VIVE controller is detected, a hand is rendered at its tracked pose. See Hands in VR. When a VIVE tracker is detected, a simple static geometric representation is rendered at its tracked pose.
| VIVE | VIVE Cosmo |
|---|---|
 |
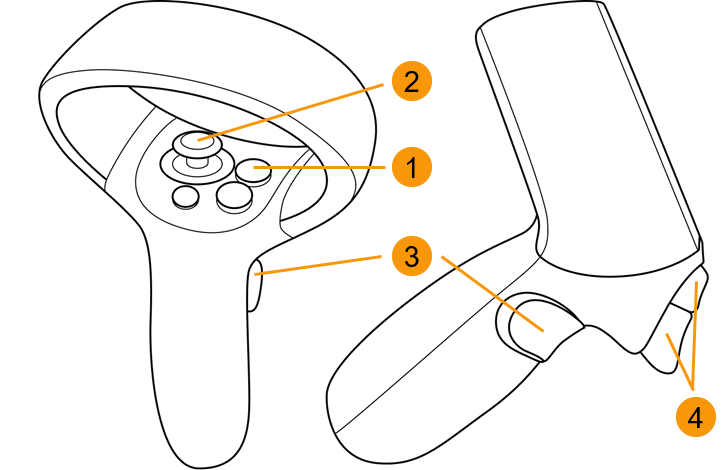 |
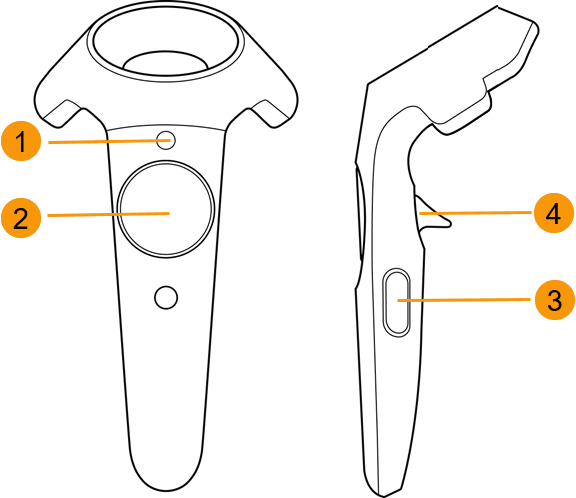
 VR Menu (Menu button)
 Teleport (Trackpad)
 Tooltips (Grip)
 Pointer (Trigger)
Use a Python script to add behavior to controllers and trackers, for example, to react to button clicks or movement of the tracked device. See the example file, OpenVRExample.vpb, and Adding interaction in VRED for the HTC VIVE.
For HTC headsets running OpenXR, we support the following features:
- Foveated rendering
- HTC passthrough extension
- OpenXR HTC VIVE Tracker
- Image Depth Submission Extension
How to Set Up and Activating Your VIVE with VRED
VRED supports the use of the HTC VIVE hardware, such as the VIVE Cosmos, via the OpenXR and OpenVR (which goes through SteamVR). For users with a VIVE Pro Eye, VRED supports eye tracking for foveated rendering.
Load a scene.
Select View > Display and choose an HMD mode.
For XR experiences, select OpenXR HMD.
For VR experiences, select OpenVR HMD. If SteamVR is not running yet, wait a moment, as it will start automatically.
Important:Before using OpenVR HMD mode, you must install the SteamVR software. If you haven't installed it, go to https://store.steampowered.com/steamvr and click Install Steam. Once installed, click the VR button, at the top of the screen, to install SteamVR.
HTC Passthrough Extension
As of 2025.2, we have implemented the HTC passthrough extension for the HTC VIVE XR Elite.
The VIVE XR Elite requires the installation of VIVE business streaming. It's important to first register the OpenXR extensions in the VIVE Business Streaming app. Once completed, in VRED, enable the passthrough feature by activating Mixed Reality in the VR Menu.
Passthrough is a feature that allows you to step outside your view in VR to see a real-time view of your surroundings. It uses the sensors on your headset to approximate what would be seen if looking directly through the front of your headset and into the real world around you.
Setting Eye Separation
Use the hardware slider on the VIVE headset to set the distance between your eyes. This value can be overwritten in VRED by selecting Visualization > Stereo > Stereo Settings > Eye Separation.
Controllers and VIVE Trackers
When a VIVE controller is detected, a hand is rendered at its tracked pose. See Hands in VR. When a VIVE tracker is detected, a simple static geometric representation is rendered at its tracked pose.
Use a Python script to add behavior to controllers and trackers, for example, to react to button clicks or movement of the tracked device.
See the example file, OpenVRExample.vpb, and Adding interaction in VRED for the HTC VIVE.
Image Depth Submission Extension
As of 2024.1, a VIVE tracker extension was added to OpenXR for adding controller bindings and making them accessible to users. The runtime uses this extension,XR_KHR_composition_layer_depth, for a better positional timewarp of the image and is a requirement for depth testing with XR_VARJO_composition_layer_depth_test.
OpenXR HTC VIVE Tracker
The position of trackers can be requested and used via Python like in OpenVR. Trackers can be assigned to objects, like seat bucks or a steering wheel. See the example in C:\ProgramData\Autodesk\VREDPro-<internalVersion>\examples\vr\attachToTracker.py and the Python vrDeviceService documentation.
Video captions: In VRED 2024.1, we added more features for OpenXR. We have added a Vive tracker extension, so you can add the Vive trackers. Now, we can also add the Vive trackers in OpenXR like you are used to in OpenVR. However, please be aware that OpenXR requires every tracker to have a different role assigned, which you do directly in the SteamVR settings.
The OpenXR tracker looks like this and OpenXR requires that every tracker has a different role assigned. Use it to track movement and bring objects from the real work into VR.
![]()
Use the StreamVR Settings to do this and select Controllers > Manage Trackers.
![]()
In VR, once roles are assigned, when trackers are on, they will appear in your view and the StreamVR display.
| Tracker Off | Tracker On |
|---|---|
Since Handheld Object are currently not supported, custom controllers can be used to define them. If the same role is assigned to multiple trackers, the OpenXR runtime will choose one and this will be the only one available in VRED.
How to Start the VR Experience at a Certain Point in a Scene
If you need to start the VR experience at a certain point in your scene, such as 1 meter in front of an object, do the following:
Create a viewpoint (Scene > Camera Editor, right-click and select Create > Viewpoint) on the floor of the scene, where you want to stand in VR.
Note:To create this viewpoint, see How to Create Viewpoints .
Select View > Display > OpenVR HMD.
Activate the pre-defined viewpoint.
For more of a detailed explanation on the coordinate systems, see Cameras.
Tracking Origin Type
A SteamVR update changed the VIVE Tracker's default behavior, causing an issue with the tracker rotation in VRED. For a resolution, see the reply at the bottom of this forum post, Re: Vive Tracker orientation issue VRED 2019. See this article, Recent VIVE Tracker Changes for more details regarding the SteamVR update.
The only difference between the Room Scale and Seated mode is the assumed tracking origin. Tracking values are reported relative to this origin.
Room Scale (Default)
The Room Scale assumed tracking origin is in the center of the play area on the floor. Tracking values are relative to that central position. The play area is configured in SteamVR.
Seated
The Seated tracking origin is at the user's head. Tracking values are relative to a Seated Zero Pose (the preferred sitting position), which the user has setup. This mode is probably only suitable for scenarios where you don't need actual correspondence between the real and virtual world.
Note:To enable with the Seated mode using Python commands, see Seated Mode.
Cameras
The VRED default scene setup is Z-up. In OpenVR mode, VRED uses Room Scale tracking per default. In the following, we assume the scene is set to Z-up and you are using the Room Scale tracking mode.


Camera Transformation and Tracking Space
The transformation (translation and rotation) of the VRED active camera defines the origin/location of the tracking space of a scene and how it is oriented.
The camera position represents the preferred standing point (~center) in the play area on the floor. The default camera position in VR is (0, 0, 0).
The camera's Z-value position represents the floor height. The default camera height in VR is 0.
The camera viewing direction represents the preferred forward facing direction. The default camera orientation in VR is positive Y-axis in VRED's world coordinate system.
The preferred forward facing direction is the direction in which the user prefers to look in the real world, while wearing the HMD. It is setup in SteamVR, when installing the tracking system.
The camera up-vector should always be set to (0, 0, 1). This is the Z-axis in VRED's world coordinate system.
The VRED SteamVR tracking values for the HMD are applied on top of the camera transformation.
Each time the OpenVR HMD mode is activated, the active camera in the VRED scene is set to world position (0, 0, 0) and looks along the positive Y-axis. After deactivating OpenVR again, the camera is reset to its previous position/orientation.
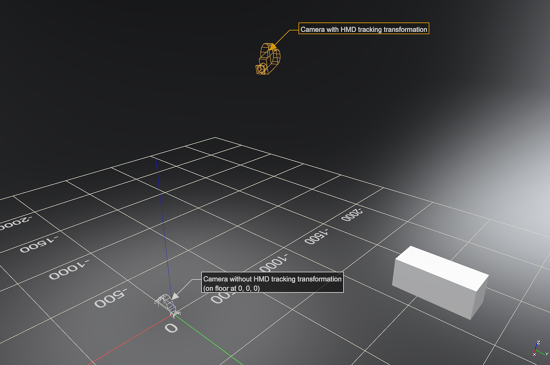
In these images, you will see a simple example setup from the outside:
This image shows how the VRED camera sits on the floor in the origin (without HMD tracking values), and where the camera is located when the tracking values are applied (shown in orange):
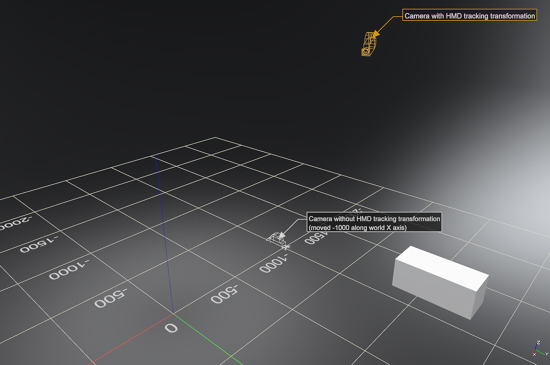
In this image, the VRED camera has been moved -1000 units along the X axis. Therefore, the camera with tracking applied is also moved 1000 units:
Why Not to Use a Mouse to Navigate
Navigating with a mouse in the Render Window changes the transformation of the active camera. It is possible to transform the active camera while VR is running, but this could result in the camera no longer sitting at floor level or being rotated incorrectly. This is why navigation with a mouse, while in VR, is not recommended.
Floor Level and Initial Position (Room Scale Mode)
In Room Scale mode, a camera's Z-translation value defines the floor level. This means the Z-value in the scene corresponds to the physical floor in the tracked space. Therefore, if the floor in your scene is NOT at Z = 0, adjust the camera's Z-value, accordingly.
Alternatively, you can leave the camera at (0, 0, 0) and use the Python function setOpenVRTrackingOrigin(Pnt3f(x,y,z)).
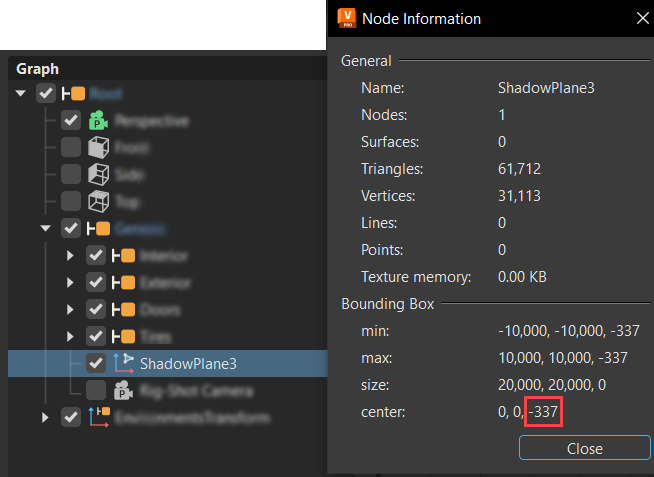
Example: Floor Level for Automotive_Genesis.vpb
In the scene below, the scene origin (0, 0, 0) is at the center of the front axle, so the floor level is not set at Z = 0, but Z = -337.
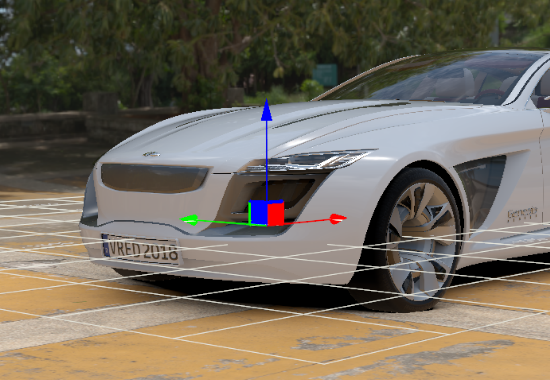
Finding the Z-value of the Ground Plane - To find the Z-value of the ground plane, select the ShadowPlane node in the Scenegraph, right-click and select Information... from the menu. In the Node Information dialog, look at the 3rd value of Bounding box center, which is the world Z-value (the ground plane).
If this method does not work for the specific geometry in your scene, create a temporary point to point measurement, using the Measurement module.
How to Create a Point to Point Measurement
- From the menu bar, select Interaction > Measurement.
- Right-click within the top section of the Measurement module and select Add Point to Point Measurement.
- Shift-pick two points along the floor, then in the Properties section, look at the Z-value for one of the picked points.
How to Set Floor Level by Changing Camera Translation
To set the floor level by changing camera translation, you will need to activate OpenVR. This automatically sets the camera translation to (0, 0, 0). From there, use one of several methods to get the camera set to floor level and change the translation.
Activate OpenVR.
Change the camera translation to (0, 0, -337). You can do this in the Camera Editor (Scene > Camera Editor).
If your camera node is transformed by any parent transformation node in the Scenegraph, use the Transform Editor. In its Translation section, change Coordinate System to World to ensure the translation is using world coordinates.
After setting the correct camera position, create a new viewpoint.
Tip:To use these values in the future, store them in a viewpoint, which can be activated once you are in OpenVR. Activate the viewpoint either with the Camera Editor or Python. For the Python function to activate the viewpoint, see Shortcuts for Activating OpenVR and the Viewpoint.
Foveated Rendering
With VRED Pro and Design 2020.2, use the HTC VIVE Pro Eye headset for eye-tracked foveated rendering in OpenGL. This requires a graphics card, such as an NVIDIA graphics card with Turing architecture, supporting the OpenGL extension, Shading Rate Image.
This option is currently not supported for Varjo and StarVR headsets. For other headsets that don't have eye tracking, you can enable the Foveated Rendering preference option for VR. However, since your eyes cannot be tracked, the foveal region will not move. It will remain fixed to the center of the image.
Dynamic forveated rendering tracks the direction of the VIVE Pro Eye user's gaze. It renders the currently focused area of the image, using higher shading quality than the periphery. Use options in the HMD virtual reality preferences to speed up rendering and/or increase visual quality.
Foveated rendering can improve performance in scenes using compute-intensive materials and real-time antialiasing.
How to Create Viewpoints
Viewpoints are created within the Camera Editor and are the stored parameters for a camera. When you transform a camera, it defines the location of the scene's tracking space and how it is oriented. This means for VR, you cannot re-use existing viewpoint setups in normal Desktop Viewing mode, but must create special VR viewpoints.
When setting up the transformation for a viewpoint, it is easier to view an actual camera with a secondary camera from the outside (View > Show Cameras). Once this is done, move the displayed camera to the desired position, using the Transform manipulator in the scene.
To create a viewpoint from the "floor" camera, first activate the "floor" camera, create the viewpoint, then activate the other camera again to setup the next viewpoint in a similar fashion.
You need to activate the camera before creating the viewpoint because a new viewpoint is always created from the active camera's transformations.
Translation - The camera translation must be on the floor.
Rotation - The camera viewing direction is the preferred forward-facing direction and the up-vector must be 0, 0, 1 (VRED world z-axis). To check it, select Scene > Camera Editor > Advanced tab > From/At/Up.
Activation - For instant teleportation, activate the viewpoint without animation. The viewpoint animation in VRED has an acceleration at the beginning and end, which is likely to cause discomfort in VR. Therefore, deactivate animation in the Camera Editor settings by selecting Scene > Camera Editor > Camera Settings > Animation.
VIVE: How to Check Tracking Calibration
To check whether the calibration of your VIVE is correct, so the measurements in the virtual scene correspond 1:1 to the real world, do the following:
- Create a 1x1 meter box in VRED.
- In VR, place the controllers so the Menu button is perfectly on the edge of the box.
- Measure the distance between these buttons in the real world. If this does not match, you probably need to recalibrate your VIVE setup.