Vault Gateway
Learn how to connect remotely to Vault with Vault Gateway.
What is Autodesk Vault Gateway?
In this era of remote work, we all need faster and better ways to access data from anywhere, on any device. Vault Gateway makes collaboration easier than ever by continuing to deliver a more modern, connected, and insightful experience. It provides secure remote access to users working remotely. As a result, remote users can create and manage design data in Vault and enjoy the same experience as in the office without needing VPN access.
How does it work?
Vault Gateway technology securely connects remote devices to Vault servers through a cloud service. The Vault Gateway service generates a URL in place of the Vault server name when logging into the Vault client software (e.g., Vault Client, Add-ins, etc). The cloud service interfaces with the Vault server, exchanging data between the client and server in real time. Vault data is not stored in the Vault Gateway; the data passes through the gateway.
Vault Gateway services locations originate in the continental United States and Europe (Ireland) and now expanded to the Asia-Pacific (APAC) region to connect those geographically distant from the gateway data centre.
Configuring and using Vault Gateway doesn't require any of the following network resources:
- Connection to an on-premise network
- Connection to a VPN
- Opened inbound network ports
The gateway connection is easy to set up, taking minutes from within the Autodesk Data management console. Let's get started.
Configuring Vault Gateway
Vault Gateway is configured on top of your Vault Server, allowing you to connect external parties into your Vault Server inside your firewall without having to give access through VPN or giving external access to your server through HTTPS.
Pre-requisites
Setting up Vault Gateway requires the following Vault installation and configuration:
- A subscription to Vault Professional with all components installed. Vault 2022.1 is the minimum version required to use Vault Gateway.
- A fully migrated KnowledgeVaultMaster database.
- An Autodesk account that is also an Autodesk Account team administrator.
- The Vault Server's default website needs a site binding configured to allow local HTTP requests on port 80. The localhost address maybe 127.0.0.1 (IPv4) or ::1 (IPv6), depending on your TCP/IP protocol version.
Managing Vault Gateway
Administrators configure gateways for individual Autodesk Account teams. A Vault administrator must manage at least one Autodesk Account team to configure a gateway.
To manage your team's gateway:
In the ADMS Console, select Tools in the menu bar.
Select Manage Vault Gateway. If you're not signed in, you are prompted to sign into an administrator account.
The Autodesk Account Teams window displays if you manage multiple teams. Select a team and click OK. The Vault Gateways window displays.
Note: The Vault Gateways window is the primary dashboard for your team's gateways. It shows information for the local gateway that you manage and other gateways for your team. Click Refresh to update the status of the local gateway and the list of other gateways.In the Vault Gateway window,
Click Configure to add a Vault Gateway.
Fill in the following fields in the Configure Local Gateway window:
Region: Select the region closest to the physical location of your Vault server.
Note: A gateway's region can't be edited after the gateway is configured.Service Account: The Autodesk ID associated with the gateway. Click Service Account to sign into an account.
Note: The service account must have a Vault Professional license and be part of the team selected in step 3 above. Additionally, a service account can only be associated with a single gateway.
Click Delete to delete the local gateway. To delete a gateway in the Other Gateways section, select the X icon in the Action column to delete the corresponding gateway.
Click Proxy Server to set a proxy for the local gateway.
In the Configure Proxy Server dialog,
- Select the Enable Proxy check box.
- Enter the address of the proxy server.
- If the proxy server requires authentication, select Enable Proxy Authentication check box and enter the username and password the proxy server requires for authentication.
Click Pause to stop access to the gateway URL.
Click Resume to restore access to the gateway URL.
Once your administrator configures the Vault Gateway, team members can use the gateway URL to connect to their vault remotely.
Connecting to a Vault Gateway
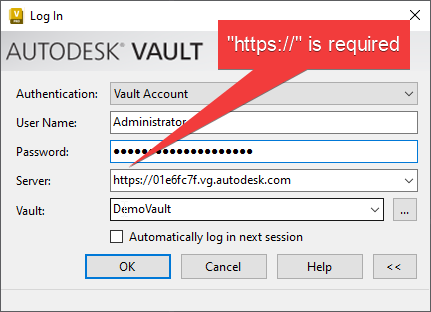
Logging into a gateway follows the same procedure as logging into a vault through a direct server connection. The Server field takes an HTTPS URL to the gateway (a gateway's hostname, displayed when an administrator manages a gateway) instead of a server name.
Your account password must satisfy Vault Gateway's password complexity requirements to sign in. Passwords must contain eight or more characters, with at least one number and letter. Blank passwords are blocked from using the Vault Gateway. The valid special characters include !"#$%&'()*+,-./:;<=>?@[\]^_`{|}~
Refer to Frequently Asked Questions (FAQ) to understand better how the Vault Gateway works.