Viewing / Managing variants
In Maya, variants are represented in the Outliner with a small v icon next to the associated prim. You can right-click that prim and select Variant Sets to change the active variant being composed. For a more robust view of variants, you can use Windows > USD Tools > USD Variant Manager (or by right-clicking a prim with variants in the Outliner and selecting USD Variant Manager).
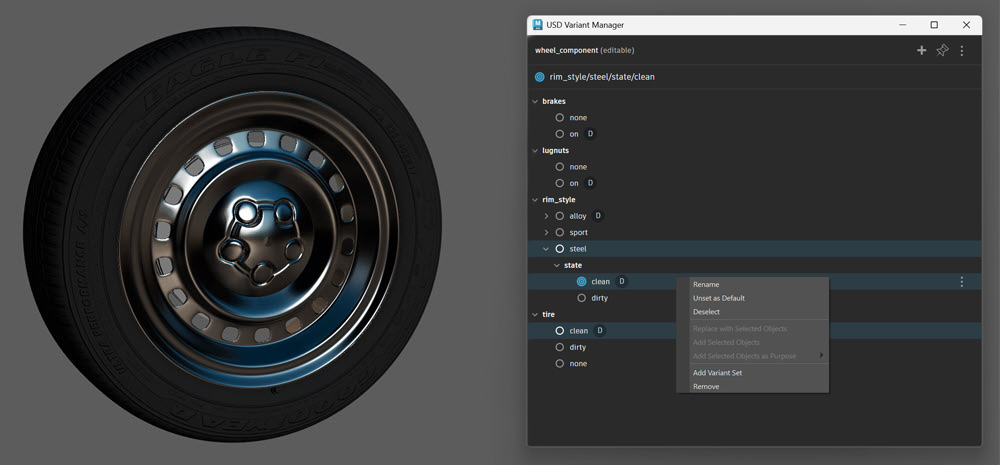
This view allows you to see all your variants at once in a nested interface. You can switch the active variant by selecting it in the USD Variant Manager, or right-click (or use ⋮) to add or remove variants.
By default, the Variant Manager will update whenever you change selection in the scene (such as when selecting different components in the Outliner). You can use the Pin button lock it to its current state.
Creating new variant sets
You can convert selected objects in the Viewport into a single USD variant set at the time of stage creation. You can also add new variant sets on a stage that already exists.
To create a new USD stage with selected objects as variants:
- Select the objects in the Viewport or Outliner.
- Right-click and select USD > Create Component with Variants.
Maya creates a new USD stage with each of the selected objects as members of a single variant set under the root prim.
Maya will still create a default variant set even when you create a stage from a single selected object using USD > Create Component.
To create a new variant set on an existing stage:
- Open the USD Variant Manager.
- Select any prim in the USD hierarchy to display the existing variant sets in that stage.
- Do one of the following:
- Click the + button in the top-right to add a new variant set at the root level.
- Right-click an existing variant set and select Add Variant Set to add a nested variant set under an existing one.
Adding to / removing from existing variant sets
If a component is open as the root of the stage (in other words, not referenced as part of a larger composition), you can use the USD Variant Manager to add / remove variants to it.
To add a new empty variant to a variant set:
- Open the USD Variant Manager.
- Select any prim in the USD hierarchy to display the existing variant sets in the desired stage.
- Do one of the following:
- Hover over an existing variant set and click the + button.
- Right-click an existing variant set and click Add Variant.
Maya adds an empty variant to the variant set.
To add Maya objects to an existing variant:
- Select one or more Maya objects in the scene.
- Open the USD Variant Manager.
- Select any prim in the USD hierarchy to display the existing variant sets in the desired stage.
- Right-click the variant and choose one of the following:
- Replace with Selected Objects: Adds the selected objects to the variant and removes any other objects in it.
- Add Selected Objects: Adds the selected objects to the variant while keeping an existing objects already in it.
You must add Maya objects to an existing variant.
To remove a variant / variant set:
- Select one or more Maya objects in the scene.
- Open the USD Variant Manager.
- Select any prim in the USD hierarchy to display the existing variant sets in the desired stage.
- Right-click the variant and click "Remove".
Maya removes the variant / variant set and all its contents from the stage.
Modifying variants
If a component is open as the root of the stage (in other words, not referenced as part of a larger composition), you can target specific variants in the USD Variant Manager to receive edits (such as changes to geometry, materials, and so on).
To target a variant:
- Select a USD component in the Outliner.
- Open the USD Variant Manager.
- Click the empty circle icon next to the variant you want to modify. The circle will become filled by a blue target icon (
 ) and the prim path will appear in the target path above. Only one variant can be targetted at a time.
Any subsequent changes you make to the USD component will now be applied to that variant until you change the target.
If you apply an override in a nested variant and don't see the changes composed in the scene, check the USD Layer Editor to see if there is a stronger local opinion overriding it.
Assign Purpose to USD Data in the Variant Editor
A Purpose can be assigned to existing USD prims directly within the Variant Editor using the "Add Selected as Purpose" context menu.
How it works
- In the Variant Editor, select one or more USD prims from the same stage.
- Right-click and choose Add Selected as Purpose from the context menu.
- Select the desired purpose (e.g., render, proxy, guide).
The selected USD data is automatically moved under the appropriate purpose scope. If the scope doesn't already exist, it will be created for you.
This workflow applies to both Maya data and USD data, giving you a consistent way to organize variants by purpose without manually reparenting or moving prims.
The context menu option is disabled when a purpose scope itself is selected, since scopes cannot be nested inside other scopes.