Introduction to Sub-Object Selection
This is a general introduction to sub-object selection. For specific information, see Editable Mesh, Editable Patch, Editable Poly, and Editable Spline; for a discussion of NURBS sub-object selection, see Sub-Object Selection.
When you model an object, often you edit a portion of its underlying geometry, such as a set of its faces or vertices. Or when you are working with a model, you may want to apply mapping coordinates to a portion of its underlying geometry. Use the methods described in this topic to make sub-object selections.
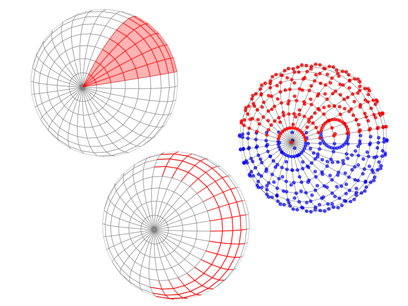
Left: A selection of face sub-objects
Middle: A selection of edge sub-objects
Right: A selection of vertex sub-objects
You can access sub-object geometry through a variety of methods. The most common technique is to convert an object into "editable" geometry such as a mesh, spline, patch, NURBS, or poly object. These object types let you select and edit geometry at the sub-object level.
If you have a primitive object and want to retain control of its creation parameters, you can apply a modifier such as Edit Mesh, Edit Poly, Edit Spline, Edit Patch, or Mesh Select.
The Line spline and NURBS curves and surfaces are the exception: you can edit their sub-objects as soon as you create these kinds of objects.
 You choose a sub-object level in the stack display. Click the plus sign that appears next to the name of an object that has sub-objects. This expands the hierarchy, showing the available sub-object levels. Click a level to choose it. The name of the sub-object level highlights (the highlight is blue or yellow, depending on the active color scheme), and the icon for that sub-object level appears to the right of both its name and the name of the top-level object.
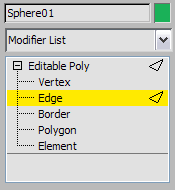
Stack display shows the sub-object hierarchy, letting you choose a sub-object level.
Editing at the Sub-Object Level
When you edit an object at the sub-object level, you can select only components at that level: vertices, edges, polygons, and so on. You can’t deselect the current object, nor can you select other objects. To leave sub-object editing and return to object-level editing, click the top-level name of the object in the modifier stack, or click the highlighted sub-object level.
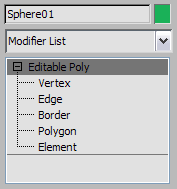
Click the top-level object name to exit sub-object editing.
Procedures
To make a sub-object selection:
These methods assume the object has sub-object levels. If the object has no sub-object levels (for example, a primitive such as a sphere), the + icon is not present. In that case, you need to collapse the object or apply an Edit modifier before you can edit its sub-object geometry.
Select the object you want to edit.
If the object doesn’t already have sub-object levels, apply an Edit ... modifier such as Edit Mesh.
Open the
 Modify panel.
In the modifier stack, click
(the + icon) to expand the object's hierarchy.On the stack display, click a sub-object level such as Vertex, Edge, or Face.
Tip: For a detailed selection, you might want to zoom in on the object.Click one of the toolbar selection buttons, and then use the same selection methods you’d use on objects to select the sub-object components. Or from the quad menu > Transform quadrant, choose one of the selection methods and select the sub-object components.
There are two alternative ways to go to a sub-object level:
- Select the object and go to the Modify panel. Then right-click the object, and use the quad menu > Tools 1 (upper-left) quadrant > Sub-objects submenu.
- Choose the selection level using buttons on the Modify panel's Selection rollout, if one is present for the type of object you're editing.
Insert key cycles through the levels of other kinds of sub-objects.To exit a sub-object level, do one of the following:
- In the stack display, click the highlighted sub-object name or the top-level name of the object.
- If the object has a Selection rollout, click the button of the active sub-object level to turn it off.
- Right-click the object, and then in the Tools 1 (upper-left) quadrant of the quad menu, choose Top-level.
- Access a different command panel. This turns off sub-object editing.
If you think you’ve turned off sub-object editing but top-level object selection is still not restored, it might be due to the following reasons:
 Your selection is locked. Click the Lock Selection Set button on the prompt line to turn it off.
- You’ve set the Selection Filter on the main toolbar to a specific category of object, so you can’t select any of the other categories. To fix this, select All in the Selection Filter list.