Rendering Method Panel (Legacy Drivers)
For legacy display drivers (Direct3D and OpenGL), the Rendering Method panel of the Viewport Configuration dialog sets the rendering method for either the current viewport or all viewports.
- Click or right-click the General viewport label (“[ + ]”) . > General Viewport Label Menu > Configure Viewports > Rendering Method tab
- Default menu: Views menu > Viewport Configuration > Viewport Configuration dialog > Rendering Method panel
- Alt menu: Scene menu > Configure Views > Viewport Configuration > Viewport Configuration dialog > Rendering Method panel
Procedures
To set the viewport rendering method:
Open the Viewport Configuration dialog to the Rendering Method panel.
In the Rendering Level group, choose the desired rendering level and any options available for that level.
In the Apply To group, choose how to apply the rendering level to viewports:
Active Viewport Only applies the rendering method to the active viewport. This choice is the default.
All Viewports applies the rendering method to all configured viewports.
All But Active applies the rendering method to all viewports except the active one.
Tip: This option lets you work in full detail in the current view and easily set other views to Wireframe or Bounding Box for quicker interactive display.
To enter an FOV value in a Perspective viewport:
Right-click a Perspective viewport label and choose Configure. It isn’t necessary to activate the viewport first.
This opens the Viewport Configuration dialog. If necessary, click the Rendering Method tab.
In the Perspective User View group > Field Of View field, enter an angle.
Interface
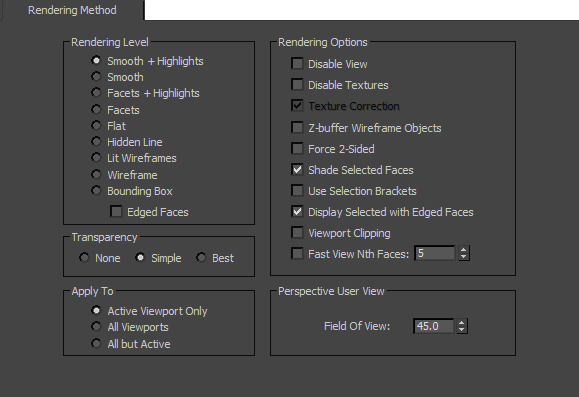
When you open this dialog, the settings reflect the current viewport settings.
Rendering Level group
Determines how 3ds Max displays objects.
Smooth+Highlights Renders objects with smooth shading and displays specular highlights. To toggle quickly between Smooth+Highlights and Wireframe, press
F3.Smooth Renders objects with smooth shading only.
Facets+Highlights Renders objects with flat shading and displays specular highlights.
Facets Renders polygons as flat surfaces, shaded but with no smoothing or highlights.
Flat Renders each polygon in its raw, unshaded diffuse color, disregarding any contribution from ambient lighting or light sources. This rendering method is useful when it's more important to see each polygon than to see its shading. It's also a good way to check the results of bitmaps created with Render To Texture.
Hidden Line A wireframe mode that hides faces and vertices with normals pointing away from the viewpoint, as well as any parts of objects that are obscured by closer objects. In this display mode only, the wireframe color is determined by the Viewports > Hidden Line Unselected color, not the object or material color.
Lit Wireframes Renders objects as wireframes with flat shading.
Wireframe Draws objects as wireframes with no shading applied. To toggle quickly between Wireframe and Smooth+Highlights, press
F3.Bounding Box Draws objects as bounding boxes with no shading applied. A bounding box is defined as the smallest box that completely encloses an object.
Edged Faces Available only when the current viewport is in a shaded mode, such as Smooth, Smooth+Highlights, Facets+Highlights, or Facets. When Edged Faces is on in these modes, the wireframe edges of objects appear along with the shaded surfaces. This is helpful for editing meshes in a shaded display. To toggle Edged Faces display, press
F4.Edges are displayed using the object wireframe color, while surfaces use material colors (if a material is assigned). This lets you create contrasting colors between the shaded surfaces and the wireframe edges. You can switch these around with the Display Color rollout settings on the Display panel.
Transparency group
None Objects with transparency assigned appear completely opaque, regardless of the transparency settings.
Simple Objects with transparency assigned are displayed with a “screen door” transparency effect.
Best Objects with transparency assigned are displayed with a two-pass transparency effect.
This option is smoother and closer to rendered transparency effects.
Apply To group
Applies the current settings to the active viewport only, to all viewports, or to all the viewports except the active one.
Rendering Options group
These checkboxes modify either the shading modes or the wireframe modes. They refer to the viewport renderer only, not to the scanline renderer or any other renderer.
Disable View
Disables the Apply To viewport selection. A disabled viewport behaves like any other viewport while active. However, when you change the scene in another viewport, the view in the disabled viewport does not change until you next activate it. Use this function to speed up screen redraws when you are working on complex geometry. Default=off.
Disable Textures
Select to turn off display of texture maps assigned to objects. Turn off to show the maps assigned to objects. Default=off.
Texture Correction
This option is enabled only when you are using the Legacy OpenGL driver. When on, 3ds Max redraws the viewport using pixel interpolation (perspective-corrected). The redrawn image remains until you force the viewport to redraw for any reason. This option has an effect only when the viewport is shaded and at least one object's map is displayed. Default=on.
Z-Buffer Wireframe Objects
Draws the wires ordered according to depth in the scene. Otherwise wires may be drawn out of order to speed the viewport display. This option is generally needed only when sub-object selections are "hidden" by lines drawn out of order. For example, you select the front edges of a box, but they don’t appear highlighted in red, because the white lines from the rear may get drawn last. Activate this only if you find that selections are obscured or if you need the viewport redrawn from back to front. Default=off.
Force 2-Sided
Set to render both sides of faces. Turn off to render only faces with normals toward the viewer. Usually, you'll want to keep this option off to speed redraw time. You might want to turn it on if you need to see the inside as well as the outside of objects, or if you've imported complex geometry in which the face normals are not properly unified. Default=off.
Shade Selected Faces
When on, selected faces viewport display in a red semitransparent state. This makes it easier to see selected faces in shaded viewports. Default=on.
Keyboard shortcut= F2.
Use Selection Brackets
Toggles the display of white selection brackets in the viewport display. Turn this off in complex scenes when the display of multiple selection brackets obscures the required view of selected objects. Default=off.
Display Selected with Edged Faces
Toggles the display of highlighted edges for selected objects when the viewport is in a shaded mode, such as Smooth, Smooth+Highlights, Facets+Highlights, or Facets. When on in these modes, the wireframe edges of selected objects appear along with the shaded surfaces. This is helpful when selecting multiple objects or small objects. Default=on.
Viewport Clipping
When on, interactively sets a near and far range for viewport display. Two arrows at the edge of the viewport allow you to determine where the clipping occurs. Tick marks correspond to the extents of the viewport, the lower tick is the near clipping plane, and the upper tick sets the far clipping plane. This does not affect the rendering to output, only the viewport display. Default=off.
Fast View Nth Faces
When on, speeds screen redraw by displaying fewer faces. The Nth Faces spinner sets the number of faces that are displayed when the Fast View mode is active. For example, a setting of 3 displays every third face. Default=off.
Perspective User View group
Field Of View
Sets the field of view angle for a Perspective viewport. This spinner is not available when any other viewport type is active. You can change the Camera field of view in the Modify panel. Default = 45.0 degrees.