Use tool palettes to organize blocks, hatches, and custom tools in a tabbed window. You can build tool palettes using several methods.
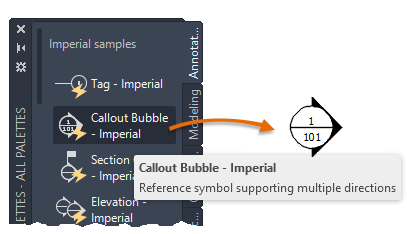
Here's an example of dragging or clicking and placing a callout bubble from the Annotation tab.
Methods for Creating Tool Palettes
You can easily create a new tool palette:
- Use the tool palette shortcut menu to create a new, empty palette.
- Use a DesignCenter shortcut menu to create a tool palette tab with selected content.
Tool Palette Content
Tool palettes can contain a variety of types of tools. These tools are ideal for adding objects such as the following:
- Blocks
- Hatches and fills
- Tables
Other types of supported content include geometric objects, dimensions, xrefs, and raster images. You can also add lights, cameras, visual styles, and materials (not available in AutoCAD LT).
Methods for Adding Tools to Tool Palettes
You can add tools to a new or existing tool palette using several methods.
- Drag objects from your drawing onto the palette.
- Drag drawings, blocks, and hatches from DesignCenter. Drawings that are added to a tool palette are inserted as blocks when dragged into the drawing.
- Drag toolbar buttons from the Customize dialog box.
- Drag commands from the Command List pane on the Customize User Interface (CUI) Editor.
- Paste tools from one tool palette to another.
Customize Tool Palettes
Once you've created a palette, you can modify it to suit your needs. Several options are available from shortcut menus:
- Rearrange the tools on a palette with a sort option. You can also drag tools directly on the palette.
- Add text and separator lines.
- Move a tool palette tab up and down the list of tabs by using the shortcut menu or the Customize dialog box.
- Delete any tool palettes that you no longer need.
- Set the path to your tool palettes on the Files tab in the Options dialog box. This path can be to a shared network location or as part of a connected the support files for an Autodesk project stored in Forma Data Management.
- Associate a customizable tool palette group with each panel on the ribbon.
- Change the palette's read-only status in the Palettes folder. If a tool palette is set to be read-only, a lock icon is displayed in a lower corner of the tool palette. This indicates that you cannot modify the tool palette beyond changing its display settings and rearranging the icons.
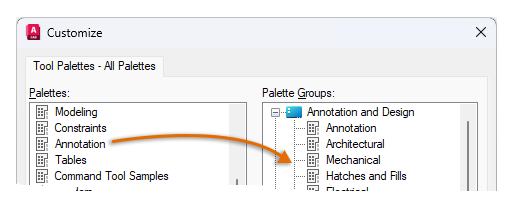
Palette Groups
To organize tool palettes and reduce the number displayed in the Tool Palettes window, you can create and display tool palette groups. A tool palette group limits the palettes shown in the Tool Palettes window. The Customize dialog box provides options for creating and organizing tool palette groups.
Starting with AutoCAD 2027, a special tool palette named Current Project is available. This palette represents the tool palettes loaded from an Autodesk project in Forma Data Management when the project is configured to use Connected Support Files.
For example, you can drag a palette from the list in the left pane to a group in the right pane.