Custom user interface (UI) elements can be shared with others and loaded into the AutoCAD desktop app when working on a drawing opened from an Autodesk project on Forma Data Management.
When configuring an Autodesk project on Forma Data Management, you can specify which partial customization (CUIx) files that contain custom tools to be automatically loaded when a drawing from that project is opened. As you switch between drawings, any configured CUIx files for an Autodesk project are automatically loaded when their associated drawing is current, and unloaded when a different drawing not associated with that Autodesk project becomes current. For more information on setting up an Autodesk project for use with Connected Support Files, see To Set Up an Autodesk Project to Use Connected Support Files.
If you are new to partial customization (CUIx) files, the following resources provide helpful introductions:
Creating a Partial CUIx File
Customization (CUIx) files store the definitions of custom command macros and user interface (UI) elements. These UI elements can include ribbon tabs, ribbon panels, toolbars, and more. Before you create custom command macros or UI elements, you must first create a CUIx file.
Follow these steps to create a partial CUIx file that can be loaded with other CUIx files:
- Click
 .
Find
.
Find
- In the Customize User Interface (CUI) Editor, click the Transfer tab.
- In the right pane, click Create a New Customization File.
- In the Save As dialog box, browse to the location where you want to save the new CUIx file.
- In the File Name text box, enter a file name and click Save.
After creating the CUIx file, you must load it into the Customize User Interface (CUI) Editor to define the custom command macros and UI elements you want to make available when a drawing file from an Autodesk project is opened.
Loading and Editing a Partial CUIx File
Follow these steps to load and edit a partial CUIx file in the CUI Editor:
- In the Customize User Interface (CUI) Editor, click the Customize tab.
- In the Customizations In pane, click Load Partial Customization File.
- In the Open dialog box, browse to and select the CUIx file to load and click Open.
- In the Customizations In pane, click the Loaded CUI file drop-down list and select All Customization Files.
- Scroll down and expand the Partial Customization Files node.
- Expand the node for the CUIx file that you loaded in Step 3.
- Create new command macros in the Command List pane and add new UI elements that reference your custom command macros under the appropriate nodes.
For information, see About Command Customization and About User Interface Elements.
- Click Apply to save the changes.
- After adding the new UI elements and saving the changes, right-click the CUIx file under Partial Customization Files and choose Unload.
- Click OK to close the CUI Editor.
Adding a Partial Customization (CUIx) File to an Autodesk Project's Settings
After setting up Connected Support Files for an Autodesk project and creating a CUIx file, follow these steps to configure your partial customization (CUIx) files for a project:
- Upload your project-related partial customization (CUIx) files to the Autodesk project.
For information on uploading files to an Autodesk project, see the Autodesk Desktop Connector help documentation.
- In AutoCAD, open a drawing from the Autodesk project of which you want to configure tool palettes and authoring palettes.
- In the drawing area, right-click and choose Options. Find
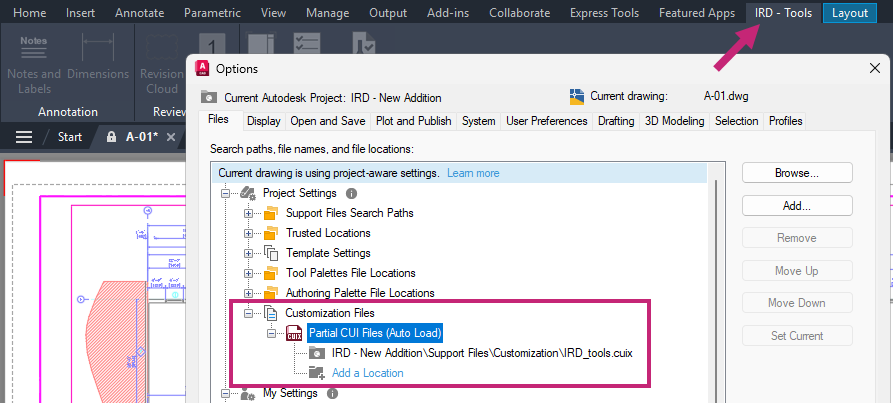
- In the Options dialog box, click the Files tab and expand the Project Settings node.
- Expand Customization Files Partial CUI Files (Auto Load) and then click Add a Location under the node.
- In the Browse for Folder dialog box, browse to and select the CUIx file you want to load when a drawing from the Autodesk project is opened and set current. Then click Open.
Note: When selecting a CUIx file to load with the Autodesk project, make sure to not select the product's main customization file.
- If you uploaded multiple CUIx files, repeat steps 5 and 6 for each file.
- Click OK to save the changes.