Tools
Action
Atomize
Improvements have been made to the Atomize object, introducing more flexibility to the new parameters introduced in the 2027 version of the Flame Family applications.
Variation
 Use the Variation parameters to help break the uniform look created by modifying the main parameters of the Atomize object. A variation is applied as a percentage relative to its associated parameter.
The following parameters can be altered using a variation:
- Size
- Rotation
- Decimation Horizontal and Decimation Vertical
- Masking
Scatter
Use the X, Y, and Z parameters under the Scatter section to offset the points along the three axes. Modifying these parameters produces a result similar to what can be achieved with a Displace Map.
Enable / Disable the Effect
Use the Active function to animate the atomize effect going on and off. This is useful to create animations where an image or geometry goes from its initial state to an exploded one, or vice-versa.
As with the Motion Blur function, the Active button has a context menu that can be used to manage its keyframes. This can also be achieved using the enable channel in the Animation editor.
Seed
Use the Seed parameter to alter the randomness of the parameters. This parameter can be animated to create effects.
Displace Map
Scatter
Use the X, Y, and Z parameters under the Scatter section to further offset the movement applied using the Direction fields along the three axes.
Seed
Use the Seed parameter to alter the randomness of the Scatter parameters. This parameter can be animated to create effects.
Import
FBX has been updated to version 2020.3.9.
When a 3D scene containing a light is imported, the Active option is enabled and Scene Ambient is disabled in the Shading section of the Rendering tab in the Node Prefs menu.
Action / Image / Isolate
Garbage Mask
The maximum value of the Blur parameter has been increased from 200.00 to 1000.00.
Selective
Pasting ML Attributes
Attributes can be pasted from one ML layer to another. To copy the attributes from the selected ML layer, select Copy from either the Gear menu or context menu.
To paste the attributes to other selected ML layers, choose one of the options in the Paste submenu in the same location. The paste options are:
| Select: | To: |
|---|---|
| Paste All Common Attributes | Paste values for options in the ROI, Post Process, Smoothing, and Range sections. |
| Paste ROI | Paste only values for options in the ROI section. |
| Paste Post Process | Paste only values for options in the Post Process section, excluding the Smoothing options. |
| Paste Smoothing | Paste only values for options in the Smoothing section. |
| Paste Frame Range | Paste only values for options in the Range section. |
Activating/Deactivating the Output of a Menu
Click the LED indicators on the ML, Keyers, and 3D AOV submenu buttons to activate or deactivate the output of each menu.
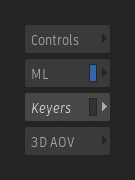
| LED | Description |
|---|---|
| Blue | Modifications made in this menu are processed. |
| Dark Grey | Modifications made in this menu are not processed. |
| Absent | No modifications have been made in this menu. |
GMask Connection
The axis of a new Garbage Mask is connected to the selected object instead of the Selective object. The Garbage Mask is still connected to the Selective through a GMask link, so they continue to affect it.
Input Matte Selection
The Media layer selection in the Input Matte section of the Controls menu is selected using a drop-down instead of a numeric field.
Two shortcuts are available on the keyboard and Tangent panels to cycle the list of media layers up and down:
- Selective: Cycle Input Matte Media Up
- Selective: Cycle Input Matte Media Down
The shortcuts are not assigned to a keystroke by default, but can be mapped using the Keyboard Shortcuts Editor or the Tangent Mapper application.
Action / GMask Tracer / Image / Isolate
The Clean-Up Branch and Clean-Up Schematic functions have been improved.
Blur
The Lock to Front function is disabled by default. This change affects the Use Matte function which now uses a matte corresponding to the clip connected to the Matte input socket by default instead of a blurred matte.
Colour Source
Front Input
The Colour Source node has a Front input socket. Connecting a clip or node to this socket is optional; the node still outputs a coloured frame when no clip or node is connected, similar to the Gradient node.
The benefit of connecting a clip to the node is to automatically use the clip's resolution to set its resolution settings, eliminating the need for the T + Click or Paste Special workflows.
When a clip is connected, the Resolution settings are greyed out and display the values derived from the connected clip.
When no clip is connected, the Resolution settings can be configured manually.
User Interface
The user interface of the Colour Source node has been modified so the options displayed depending on the mode selection are shown on the right side.
Project and User Palettes
Three palettes are available when the Colour mode is selected in the Colour Source node:
- The Pure Colours
- The Project Colours
- The User Colours
The content of the Project palette can be set in the Colour Picker and Colour Sample. The colours are only available in the current project. The content of the User palette can be set in the User tab of the Colour Picker. The colours are only available to the current user.
Bit Depth in the Colour Picker
When opening the Colour Picker from the Colour Source node, the Bit Depth option is automatically set to match the node's Bit Depth parameter.
GMask Tracer
Garbage Mask
The maximum value of the Blur parameter has been increased from 200.00 to 1000.00.
Selective
The Selective object can no longer be added to a GMask Tracer setup. Use the Isolate node to produce a matte clip using objects other than Garbage Masks.
Output
The Result output is no longer added by default in a new node.
It is no longer possible to deactivate the Matte render pass from an output.
Matchbox and Lightbox
Load Shader File Browser
Use the Visibility option in the Load Shader file browser to toggle between two directories.
| Select: | To display: |
|---|---|
| Autodesk | The content of the default application path where shaders included with Flame Family application are located. |
| Shared | The content of the path defined in the sysconfig.cfg file. |
Front Matte Offset
The Position and Centre parameters of the Front Matte Offset Matchbox shader can be modified using on-screen manipulators.