Annotations
 Add annotations in the form of strokes, rectangles, circles, lines, arrows, or text to clips in the Player or in a Viewport.
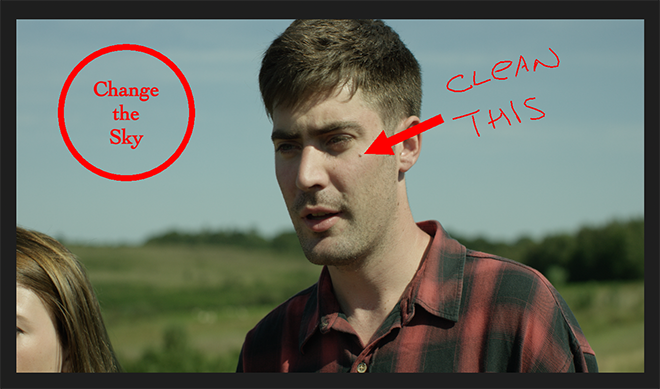
Add Annotations
Annotations can be added to clips in the following environments:
| Environment | Player / Viewport |
|---|---|
| Conform | The Preview panel. |
| Timeline | Player Source-Sequence view Triptych Player |
| Batch | All viewports displaying an image. |
| Effects | All viewports displaying an image. |
| Full Screen Player |
They are saved in a Marker or Segment Marker and are displayed over their entire length.
To add an annotation, either:
Add a Marker or Segment Marker.
In the Add Marker window, select one of the Annotations tools.
Click Add.
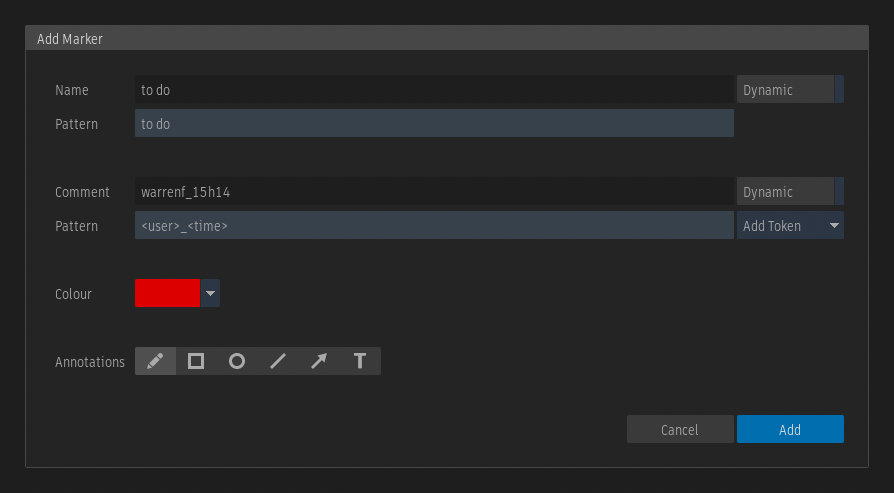
The marker or segment marker is added, and the Annotation Tools window is opened with the tool chosen in the previous step selected. If the Text tool was selected, a text layer is created.
or
Select an annotation in the drop-down associated with the Toggle Annotations Overlay button.
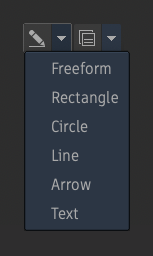
A marker is added, and the Annotation Tools window opens with the chosen tool selected. If the Text tool was selected, a text layer is created.
or
Select an existing marker or segment marker.
In the Timeline Ribbon, either:
Click Add.
The Annotation Tools window is opened, and the last used tool is selected.
Click the icon of an annotation tool.
The Annotation Tools window is opened, and the chosen tool is selected. If the Text tool was selected, a text layer is created.
Once the Annotation Tools window is opened and a tool is selected, click in the player to draw the annotation.
Timeline Ribbon Display
The display of the annotations controls in a marker's Timeline Ribbon depends on its size.
When there is enough room to display the full controls, it is possible to select an annotation from the Timeline Ribbon.

When there is not enough room to display the full controls, click Add to open the Annotation Tools window where the tool selection can be made.

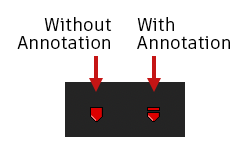
Distinguish Markers With and Without Annotations
Markers and segment markers with at least one annotation have a different look in the timeline, making it possible to distinguish which ones have annotations from those that do not.
The Annotation Tools Window
Use the parameters in the Annotation Tools window to select a tool, set its attributes, or write the string of a text layer.
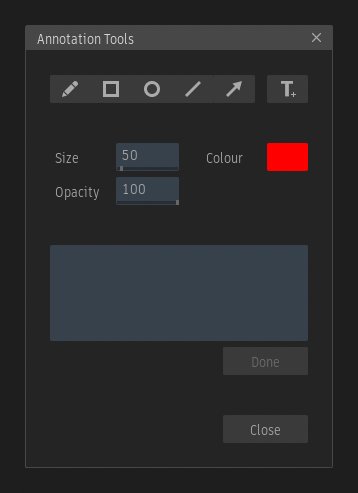
Tools
Select a tool to draw in the Player.
Freeform
Select Freeform to handwrite text or draw strokes.
Rectangle
Select Rectangle to draw an outlined rectangle.
Circle
Select Circle to draw an outlined circle.
Line
Select Line to draw a straight line.
Arrow
Select Arrow to draw a one-point arrow.
Text
Click T+ to add a Text layer.
Attributes
The attributes parameters display either the values of the next annotation to be added when a tool is selected or the values of the selected annotation.
Size field
Sets the width of a Freeform, Rectangle, Circle, or Arrow annotation and the size of a Text layer.
Colour
Sets the colour of an annotation.
Opacity field
Sets the opacity of an annotation.
Text field
Sets the string of a Text layer.
Done
Click to exit the edit mode of the Text field.
Display the Annotations
To enable or disable the display of the Annotations in a Player or Viewport either:
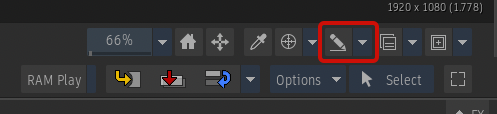
Click the pencil icon button in the Viewing controls.
Use the Toggle Annotations Display keyboard shortcut, assigned to the F12 key in the Flame and Smoke Classic shortcut profiles.
The Toggle Annotations Display keyboard shortcut is not assigned to a keystroke by default.
The pencil icon button indicates the display status of the Annotations overlay. The status is applied differently depending on the environment:
| Environment | Rule |
|---|---|
| Timeline | The status affects all the players. |
| Effects | The status affects all viewports in all layouts. |
| Batch / Batch FX | The status affects all viewports in all layouts for the current Batch Group or Batch/MK setup. |
Video Preview Device
The display of annotations in the video preview device can be controlled using the Show Annotations Overlay setting in the Video Monitoring tab of the Project preferences.
Edit Annotations
The attributes and position of existing annotations can be edited.
To edit an annotation, either:
- Move the positioner over the explicitly or implicitly selected marker.
- Select Edit in the drop-down associated with the Toggle Annotations Overlay button.
or
- Move the positioner over the explicitly or implicitly selected marker.
- Use the Edit Annotations keyboard shortcuts assigned to Shift + F12 in the Flame and Smoke Classic shortcut profiles.
or
- Select an existing marker or segment marker.
- Move the positioner over the marker.
- Click Edit in the Timeline Ribbon.
In all use cases, the Annotation Tools window is opened.
Then:
Click on an annotation inside the Player or Viewport.
The selected annotation is shown with a green outline.
The attributes in the Annotation Tools update to display the values of the selected annotation.
Use the parameters in the Annotation Tools to modify the size, colour, opacity, or text of the selected annotation.
Click and drag an annotation in the Player or Viewport to move it to a different position.
Clear Annotations
It is possible to delete an annotation or to clear all the annotations associated with a marker.
To delete an annotation:
- Enter the Edit mode using one of the methods mentioned in the section above.
- Select an annotation in the Player or Viewport.
- Press the Delete keyboard shortcut.
To clear all annotations:
- Move the positioner over the explicitly or implicitly selected marker.
- To clear all annotations for the selected marker, select Clear in the drop-down associated with the Toggle Annotations Overlay button.
- To clear all annotations for all the markers at this frame, select Clear All in the drop-down associated with the Toggle Annotations Overlay button.
or
- Select an existing marker or segment marker.
- Move the positioner over the marker.
- Click Clear in the Timeline Ribbon.
Navigate Between Markers with Annotations
Options to navigate between Markers with annotations are available in the Player and Timebar navigation controls. Keyboard shortcuts are also available. For more information, see Navigating between Marks and Markers.
Include Annotations in a Snapshot or Exported Media
Annotations can be burned into a snapshot or in exported media.
For more information, see Exporting Snapshots and Media Export dialog window Settings.
Include Annotations in a Grabbed Reference
Annotations can be burned into a grabbed reference.
For more information, see Comparing a Clip to a Reference.
Propagation of Markers from a Clip to Batch
Markers and annotations in a clip are preserved and included in the Batch Group or Batch setup created using the Create Batch Group or Shot Publish workflows.
In these workflows, segment markers are converted to Node markers.
Search for Markers with Annotations
To identify which markers have annotations on them, enable the Has Annotations filtering criterion in the Markers tab of the Explorer or in the Search and Select in Timeline dialog window.
When enabled, only the markers and segment markers that have at least one annotation appear in the list or are selected in the Timeline.
Python API
Use a read-only property and a function of the PyMarker object to identify which markers have annotations and to clear them.
PyMarker
| Command | Type | Description |
|---|---|---|
<PyMarker>.has_annotations |
Read-Only Property | Indicates whether a marker has annotations. |
<PyMarker>.clear_annotations() |
Function | Used to clear all annotations from a marker. |
Examples
# Find which markers have annotations in the current sequence.
for marker in flame.timeline.clip.markers:
    if marker.has_annotations:
       print(marker.name)
# Clear all the annotations in a sequence.
for marker in flame.timeline.clip.markers:
if marker.has_annotations:
marker.clear_annotations()