Forma Data Management can be accessed directly from InfoDrainage on the File tab.
Accessing Forma Data Management projects
To access project files, you must:
-
Be signed in to your Autodesk account in InfoDrainage.
-
Have a subscription that includes Forma Data Management.
-
Be a member of at least one Forma Data Management account and project, with permission to access the folders that contain design files.
From the File tab, click Autodesk Projects (Tech Preview) and choose:
-
Open from a Project - open an existing InfoDrainage design (.iddx) from a project.
-
Upload to a Project - publish a design to a project folder (first publish, or save a copy to a new location or name).
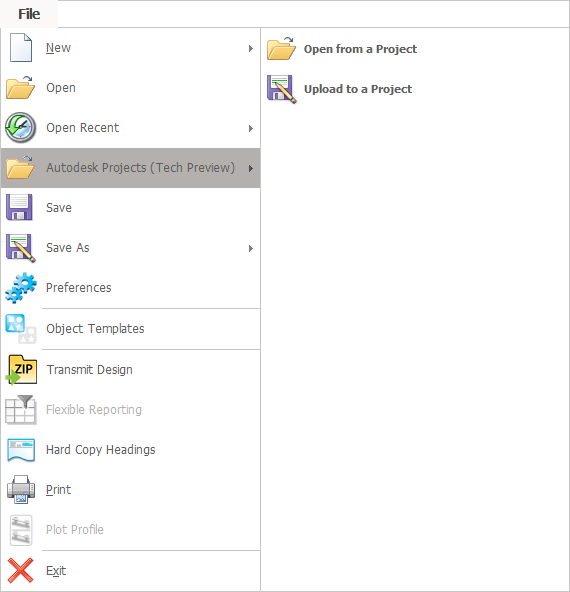
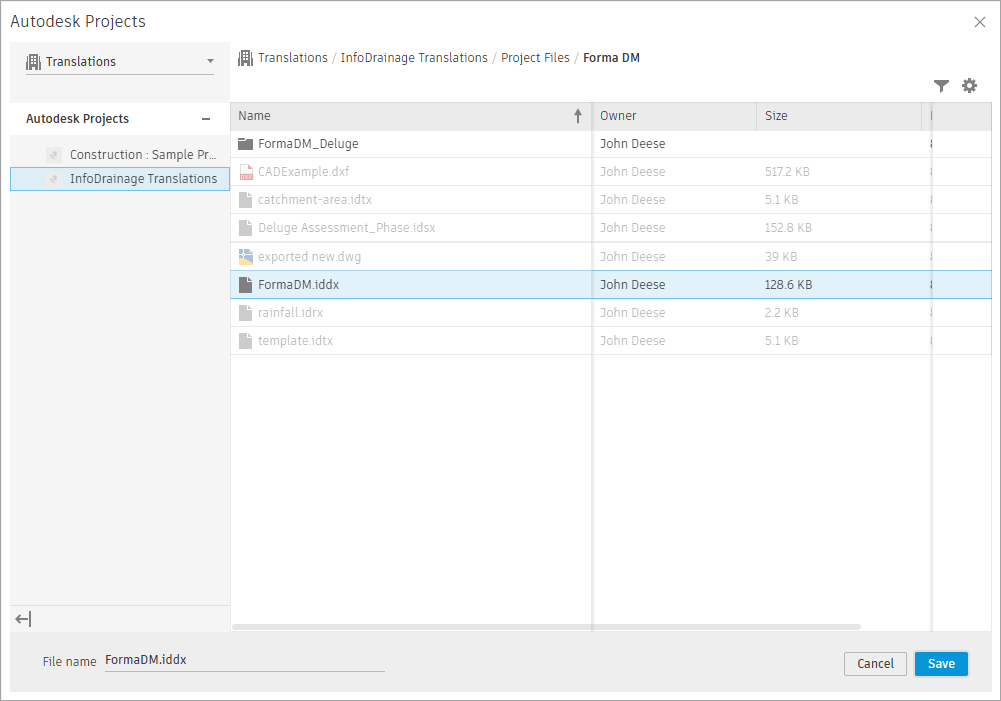
If you do not have access to Forma Data Management, a message is displayed when you open Autodesk Projects. For more information, see FAQ: Is Forma Data Management part of my subscription?
Using multiple accounts or hubs
If you are a member of more than one account or hub, you may need to change accounts to access a specific project. Use the account and hub controls in the Autodesk Projects picker to switch between them.
Select a project
You may be included in more than one project. In the picker, select the account, then select the project you want to use. Navigate the project folder structure to locate your design files.
Only InfoDrainage design files (.iddx) can be opened or published from the Autodesk Projects picker. Other file types in the project are visible but cannot be selected.
To open a design from Forma Data Management
-
On the File tab, click Autodesk Projects (Tech Preview) → Open from a Project.
-
In the Autodesk Projects dialog box, select the appropriate account and project.
-
Navigate to the folder that contains the design.
-
Select the .iddx file and click OK.
InfoDrainage downloads the design and any linked files used by it, then opens the design in the application. A progress message is displayed while the design is being retrieved.
When a design is opened from Forma Data Management:
-
The design name appears in the application title bar with a Cloud: prefix.
-
InfoDrainage reserves the design in Forma Data Management so other users cannot edit it at the same time.
-
If another user already has the design reserved, InfoDrainage opens it read-only. You can view the design, but you cannot publish changes back to the same file. For more information, see About locking cloud designs.
To upload a design to Forma Data Management
Use Upload to a Project to publish a design to Forma Data Management for the first time, or to save a copy of the current design to a different project folder or under a new name.
-
Open or create the design you want to publish.
-
On the File tab, click Autodesk Projects (Tech Preview) → Upload to a Project.
-
In the Autodesk Projects dialog box, select the account and project.
-
Navigate to the destination folder.
-
Enter a file name for the design. The name must use the .iddx extension.
-
Click OK.
InfoDrainage publishes the design and any linked files used by it to the selected folder. A progress message is displayed while the design is being published.
After a successful upload, InfoDrainage associates the open design with the cloud location. You can use Save to publish subsequent changes to the same file.
For more information about linked files, see About linked files in cloud designs.
To save changes to a cloud design
When you open a design from Forma Data Management, InfoDrainage remembers the cloud location. Use Save to publish your changes back to the same file.
-
Make your changes to the design.
-
On the File tab, click Save, or press Ctrl+S.
InfoDrainage publishes the design and any changed linked files to Forma Data Management. Each successful save creates a new version of the design in the project.
If someone else published a newer version while you were working, InfoDrainage displays a message when you save. Re-open the latest version from the project and apply your changes again.