To Specify the Center Mark Style
What's New: 2027
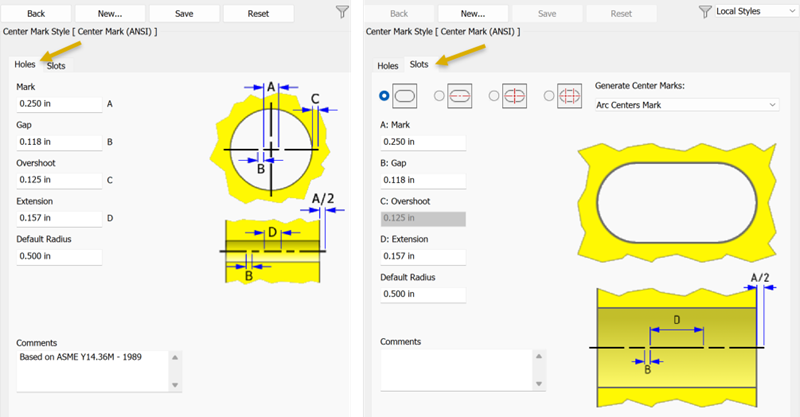
The drawing center mark display is controlled by the Center Mark Style. This style provides control over the center mark for both holes and slots.
Before you begin a drawing, define a center mark style for hole or slot types.
Set up center mark styles
- Select Manage tab
 Styles and Standards panel Styles Editor to open the Style and Standard Editor. Expand the Center Mark style category, and double-click a center mark style.
You have two options at this point, 1) create a new style or 2) modify the existing style.
To create a new style click New. If modifying an existing style, skip this step.
- In the New Style Name dialog, accept the default "Copy of Default (xxx)" or enter a new name.
- Select the Add to Standard check box so the new style is available to all documents that use the standard. Click OK.
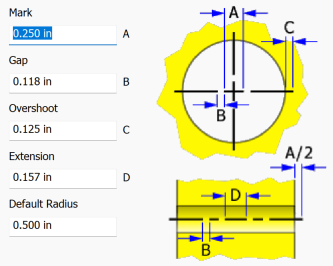
The Holes tab is active by default. Specify the values for how a hole center mark displays.
Click the Slots tab. For each of the slot center mark types do the following:
Click the radio button to define or modify each center line type.
The Center Mark types can be used with the Automated Centerline command in drawings. For more information see To Add Automated Centerlines to a Drawing View.
 No Mark, no mark is used for slots.
 Length Mark, defines a centerline placed along the slot long axes.
 Center Mark, defines the center mark placed at the slot center.
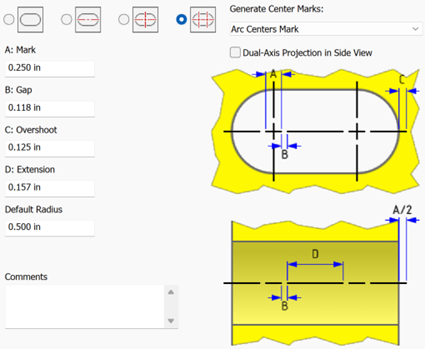
 Arc Centers Mark, defines the two centermarks placed on the fillet centers for a filleted slot.
- Dual-Axis Projection in Side View, available when using Arc Centers Mark. When selected, projects two axes through each radius center. Deselect to use a single centerline axis.
Generate Center Marks, in the dropdown select the center mark type to be used by the Automated Centerlines command for slots.
Specify the available parameters for each type.
Enter a comment in the Comments field if desired.