Create finished walls in a room using a wall segment or within a room's boundaries.

To place a finished wall using a wall segment:
- Click Architecture tab
 Build panel
 (Wall).
- Click Modify | Place Wall tab Draw panel
 (Place By Segment).
- In the Placement panel, click
 Exterior Side or
 Interior Side to decide which side of the wall assembly should face the target it picks. Note that the interior and exterior sides referred to here correspond to the interior and exterior sides set in the wall assembly. If Exterior Side is selected, the exterior side of the newly built wall will be attached to the existing wall. You can also use the Space key on the keyboard to control these buttons.
- In the canvas, hover over a wall segment to view a highlighted line or indicator showing where to place the wall.
- TAB to switch between segments including the columns and segments ignoring the columns for the selection.

- Click the highlighted segment in the canvas to place the wall.
To place the same finish walls in a room:
- Click Architecture tab Build panel
(Wall).
- Click Modify | Place Wall tab Draw panel
 (Place By Room).
- In the Placement panel, click Exterior Side or Interior Side to decide which side of the wall should face the target it picks. You can also use the Space key on the keyboard to control these buttons.
- In the canvas, hover over a room to see a line highlight of potential walls.
- TAB to switch between including and not including the columns in the selection.
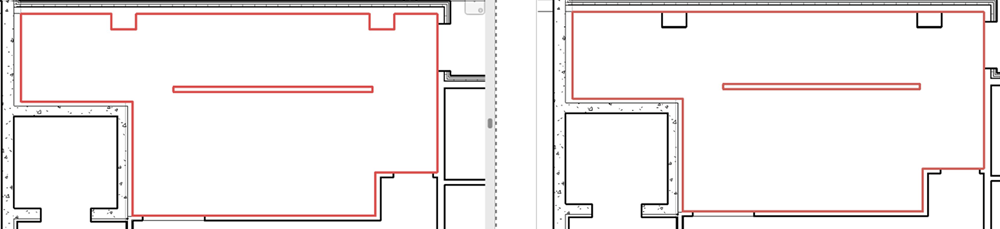
- Click the line indicator in the canvas to place the walls.
Note:
- You can only pick walls that are cut by the associated level of the current plan view.
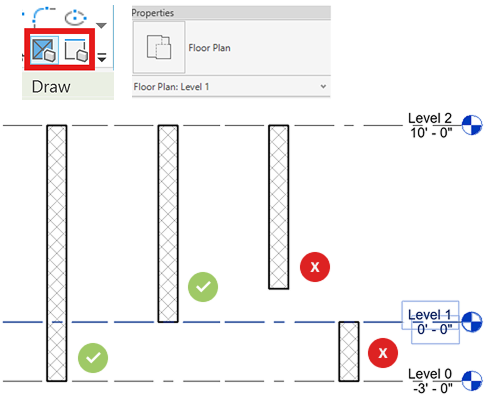
- You cannot pick curtain walls, ellipse walls, face walls, in-place walls, and room boundary lines as target to create walls.
- You can use these tools on linked models.