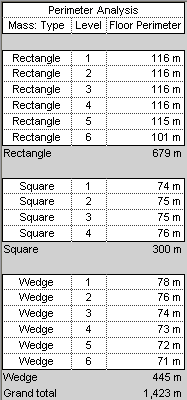
Use the following procedure to create a schedule for analyzing the perimeter of masses in a conceptual design, based on the scenario described in Perimeter Analysis Example. Specific steps may vary depending on the information that you want to show in the schedule.
To create a perimeter analysis schedule
- Create mass floors.
See Creating Mass Floors.
- Click Manage tab
 Views panel
 Schedules drop-down
 (Schedule/Quantities).
 - In the New Schedule dialog, do the following:
- For Category, click Mass Floor.
If Mass Floor does not display by default, select Show model categories in this view. For Filter list, select Architecture.
- For Name, specify the schedule name.
- Select Schedule building components.
- Click OK.
- For Category, click Mass Floor.
- On the Fields tab of the Schedule Properties dialog, for Scheduled fields (in order), add the following fields:
- Mass: Type
- Level
- Floor Perimeter
- Click the Sorting/Grouping tab, and do the following:
- For Sort by, select the following:
- Mass: Type
- Ascending
- Footer
- Title and totals
- Blank line
- For Then by, select both Level and Ascending.
- At the bottom of the dialog, select the following:
- Grand totals
- Title and totals
- Itemize every instance
- For Sort by, select the following:
- Click the Formatting tab, and do the following:
- Under Fields, select Floor Perimeter.
- For Alignment, select Right.
- Select Calculate totals.
- (Optional) Specify formatting for Level and Mass: Type: under Fields, select a field name. Then for Alignment, select Center.
- Click OK.
The schedule shows total linear dimensions, based on the combined perimeters of the mass floors. Use this information to estimate building costs for the design.
Note: Perimeter values include the entire perimeter of each mass floor, even when the mass floors in adjacent, joined masses overlap. See Overlapping Mass Faces.
