The Move tool works similarly to dragging. However, it offers additional functionality on the Options Bar and allows more precise placement.
To move elements with the Move tool
- Do one of the following:
- Select the elements to move, and then click Modify | <Element> tab
 Modify panel
 (Move).
 - Click Modify tabModify panel (Move), select the elements to move, and then press Enter.
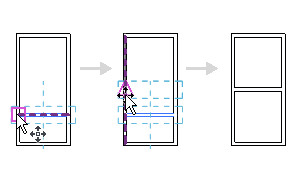
- Select the elements to move, and then click Modify | <Element> tab
- On the Options Bar, click the desired options:
- Constrain: Click Constrain to restrict the movement of the element along vectors that run perpendicular or collinear to the element.
- Disjoin: Click Disjoin to break the association between the selection and other elements before moving. This option is useful, for example, when you want to move a wall that is joined to another wall. You can also use the Disjoin option to move a hosted element from its current host to a new host. For example, you can move a window from one wall to another wall. This feature works best when you clear the Constrain option.
- Click once to enter a start point for moving.
A preview image of the element displays.
- Move the cursor in the direction that you want the element to move.
The cursor snaps to snap points. Dimensions appear as guides.
- Click again to complete the move, or, for more precision, type a value for the distance to move the element, and press Enter.