In the Material Editor panel of the Material Browser dialog, you can add an asset to a material if it does not already have one of the same type.
Note: Revit LT does not support physical or thermal assets for materials. The Physical and Thermal tabs do not appear in the Material Editor panel, and some of the functionality described in this section does not apply to Revit LT . See Materials in Revit LT.
To add an asset to a material
- Select the material in the Material Browser dialog.
- In the Material Editor panel, click
 (Add Asset) to display the Add Asset drop-down menu, and then select the asset type that you want to add. Assets that are already present in the material cannot be added and therefore cannot be selected in the Add Asset drop-down menu.
 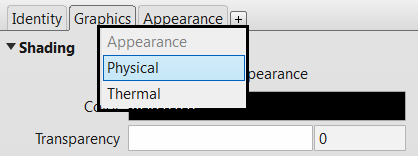 The Asset Browser opens.Note: The list of assets displayed in the Asset Browser is filtered based on the selected asset type.
 - In the Asset Browser, expand the appropriate folders in the left pane, and then in the right pane, select the asset to add to the material. Note: Thermal assets are available in the Autodesk Physical Assets folder in the Asset Browser. Expand this folder, select a category, and then click the Aspect column to view the Thermal assets available.
- Click the
 button to the right of the asset.
 The selected asset is added to the material and displays in the Material Editor panel of the Material Browser dialog.