Design Collaboration FAQ
On this page:
- General FAQ
- DWG FAQ
- Transform feature FAQ
- Large Model Experience BETA
- High-Performance Graphics
- Coordination space FAQ
General FAQ
Q1. Why can't I save or share my package?
A1. If your package contains locked files, or two or more models with the same name, you won't be able to save or share it. If possible, remove the locked files and remove or rename the models with duplicate names, and try again. See the Packages help topic for more information.
DWG FAQ
Q1. Why can't I share my package containing DWG files?
A1. If your package contains DWG files that have two or more Xrefs with the same name, you won't be able to share it. See the Work with DWG Files topic for more information about using DWG files in Design Collaboration.
Q2. Why am I experiencing performance issues with my DWG files?
A2. The performance of Design Collaboration can be affected by having large numbers of DWG files in your team folder. To improve performance, keep only DWGs that are relevant to the design in the team folder. Store non-design DWGs, for example deliverables, in a separate folder outside the team folder. In addition, you can turn off support for DWG files for a project.

Q3. When creating a package, I selected a model and chose to include references. There are now other models and documents selected in the Content Browser that I can't deselect. Why is this?
A3. The additional models and documents selected in the Content Browser are those referenced by the originally selected model. When you choose to include references in a package, as long as the referenced files are either in your team folder or have been previously shared, these files are also automatically selected for inclusion. If you save your package and then return to edit it later, these selections will persist.
To remove the additional files from the package:
- Toggle off the Include references in package option.
- Manually unselect the files.
Transform feature FAQ
Q1. Why can't I find the Transform button?
A1. The Transform feature is only supported in the aggregated Project Model view. If you are in a package view, the Transform button won't be visible in the left panel. In addition, as at least two models are required to enable alignment, if you are viewing a 3D view or a single model, the Transform feature isn't visible.
Q2. Why is the Transform button disabled?
A2. There are two possible reasons for this:
- Missing permissions: You need Edit or Manage permissions for the team folder that the models you want to transform are in.
- Nothing to transform: If the current view is empty or only contains models that are not owned by your team, then it won't be possible to transform anything.
If you have WIP models owned by your team that you want to transform, use the Teams filter in the left panel to ensure they are visible.
Q3. Why can I select a model, but not transform it?
A3. Some models are 'read-only'. This means they can be viewed and their coordinates are displayed, but they can't be transformed. These models have a lock symbol ![]() next to their name in the drop-down list in the Transform Model panel.
next to their name in the drop-down list in the Transform Model panel.
The are a couple of reasons models might be locked and unavailable for transform:
Your team doesn't own the model
Reason: Models can only be transformed by the team that owns them. If you modified the position of another team's model that you've consumed, the changes would only happen on your consumed copy. This could cause model inconsistencies between teams, for example if the owning team were also to realign the model. Each team could potentially be viewing the model in a different position, which may cause communication problems, for example when discussing issues.
Solution: Currently, the only way to transform a consumed model is to request the owning team to make the change. Once the owning team has shared the fixed model, consume it again to see the correct position in your team view.
The model version has already been shared
Reason: Models can only be transformed if they have not been shared. This is to ensure consistency between how the model is viewed by your team and by other teams. If a model's position was to change after it had been shared, the change would only be visible to your team. Any teams that had already consumed the model would see it in its previous position.
Solution: The only way to transform a model that has already been shared is to upload a new version of it. You can transform the new version as needed and then share it again.
Large Model Experience BETA
Q1. How does the Large model experience option work?
A1. The Large model experience option, found on the Viewing toolbar > Settings option > Configuration tab, works by optimising models to decide which objects should be prioritised for rendering, from any given position in the model. For example, it will prioritise bigger items in the scene and those nearer the camera. This helps to improve the performance of the viewer, especially reducing object dropout while navigating.
The advantages of turning on this option are especially noticeable when zooming in to a model and exploring a specific area, or after sectioning or using the Levels filter on a model. In these situations, objects should appear more stable, with reduced or no dropout.
There are various factors that can impact how well this option works, such as how many models you have aggregated in the viewer, the number of materials (especially transparent objects) and the number of objects per model.
In addition, try turning off the following options when using the Large model experience option to further improve the viewer performance:
- Ambient shadows – this option requires extra processing, which can degrade the viewing experience with very large models or views.
- Ghost hidden objects – this option ghosts objects but doesn't help to reduce the number of objects being rendered, and can impair the experience.
- Display section hatches – this option requires extra processing, which can degrade the viewing experience with very large models or views.
High-Performance Graphics
Why are my models slow, crashing or not performing as expected on Windows?
Model performance in ACC can vary depending on size of models, complexity and hardware. Many laptops and notebooks often come equipped with dual graphics hardware, combining a graphics adapter integrated into the motherboard, with a faster, discrete graphics adapter. This setup is designed to balance performance with energy consumption.
Typically, the discrete, high-performance adapter is used for demanding tasks such as gaming, video editing and graphics-intensive applications, while the energy efficient adapter handles routine tasks to conserve battery life.
When working with Autodesk products or tools that are graphically intense, such as the viewer in Design Collaboration, switching between graphics adapters in the middle of an operation can lead to display and performance issues or program crashes. Also, by default, Windows defaults to the energy efficient option. Configuring your browser to always use the high-performance adapter when working in the Autodesk viewer, including in Design Collaboration, will avoid these issues.
This will not impact those with commodity hardware with no high-performance GPU, but will impact anyone using higher specification machines.
How can I configure Design Collaboration to use the high-performance graphics card?
On Windows, you can configure the graphics settings for your internet browser or for your graphics card to use high-performance graphics by default.
On Windows 11:
If applicable, check that you have the latest version of your graphics card video driver installed. For example:
Right-click the desktop and then click Display settings to open the System > Display dialog.
Depending on your system, either access the Related settings section and click Graphics, or click the Graphics settings option.
Search for or browse to your browser app or your graphics card app as appropriate.
Tip: To add your preferred browser:- Click Add desktop app.
- Use Windows explorer to search for or browse to the required app. For example, C:\Program Files\Google\Chrome\Application\Chrome.
- Click Add.
Expand the required item and click the GPU preference drop-down list. For example:
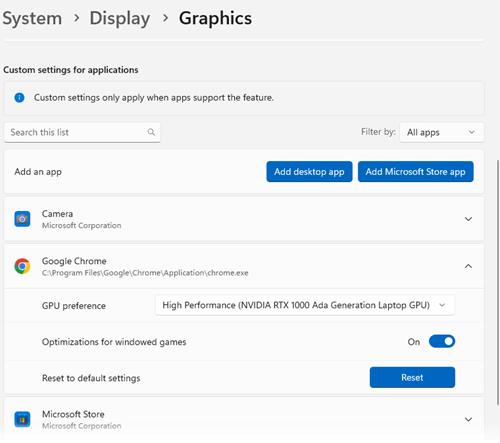 Tip: This may look different depending on your system. Alternatively there may be an Options button that enables you to specify the graphics specifications for each app.
Select the High Performance option.
Reload or restart your browser to confirm that the new settings have been applied.
It's also possible to configure settings for your graphics card directly. See How to configure Autodesk software to use high-performance graphics for more information.
Coordination space FAQ
The following are technical and system limitations when working with coordination spaces across Design Collaboration and Model Coordination:
Maximum contents of a coordination space:
- With automatic clash detection turned on: 1000 models.
Note: Each 3D view in a Revit file counts as one model.- With automatic clash detection turned off: 5000 files.
Note: Each Revit file counts as one file. File types not supported by Model Coordination don't count toward this limit.Maximum active coordination spaces with clash detection turned on at any one time (combined across Model Coordination and Design Collaboration): 20.
Tip: Other than the above, there is no limit on the total number of coordination spaces (active and inactive) you can have in a project.Maximum number of unique folders that coordination spaces can be configured against: 150.