Manage Account Members
Hub administrators can manage all hub members and their properties from the Members tool in Hub Admin. Properties include:
- Company
- Role
- Access level
- Subscriptions
Member Statuses
There are three member statuses that can appear in the members tools:
- Active: Members that have been invited and have accessed a product.
- Invited: An invitation has been sent but they haven't accessed a product yet.
- Not invited: If a member appears as ‘Not invited’, they have been added to the account but not invited to any projects. ’Not invited’ appears only in Hub Admin.
Hub Access Levels
When you add or edit members, you can assign hub-level access. Each level grants different capabilities in Hub Admin:
- Hub administrator: Full access to all Hub Admin tools, including adding and editing e-signature signers in Library > Cost Management > Settings > Manage.
- Executive: Access to hub-level dashboards in Insight. Executives cannot add or edit e-signature signers.
- Standards administrator: Access to Library and Templates only. Standards administrators can open Cost Management settings in Library, but cannot add or edit signers in E-signature > Manage. Only hub administrators can manage signers. To learn more, see Configure and Use E-Signature Integration.
If you do not select a hub access level, members are added to the hub for project administrators to invite to projects.
Add Members
You can add members in two ways. The default way is flexible. The legacy method is sometimes faster. When you enter emails, the default lets you assign different companies and roles to each person. The legacy method assigns the same company and role to all members added at once.
Default Add Members
Click Members from the left navigation to open the Members tool.
Click Add members.
Enter email addresses for the members or paste in a list of email addresses separated by commas, tabs, spaces or semicolons.

Click Enter on the right to add the members to the member table.

Optionally, if name fields are empty, you can enter the member's first and last name. These will be suggested when they are creating their profile.
Select a Company and Role for each member. The company and role can be used to quickly apply permissions to members.
Note: Roles update the access level selection. You can manually change the access level after selecting a role.
Choose the access level for the members.
- Hub administrator: Members are added as other hub administrators.
- Executive: Members are given access to hub-specific dashboards in Insight. See Executive Overview to learn more.
- Standards administrator: Members are given access to the Library and Templates tools in Hub Admin, but no other Hub Admin tools are visible to them.
Note: If you don't tick any of the boxes, the new members are added to the hub and are made available to project administrators to add to a project. The newly invited members won't receive an invitation yet. Invitations are sent when a member is added to a project.Click Send invitations to send email invitations to the members.
Bulk changes adding members
If you are using the default invite workflow, you can make the same changes to multiple people.
Select the members you want to make changes to.

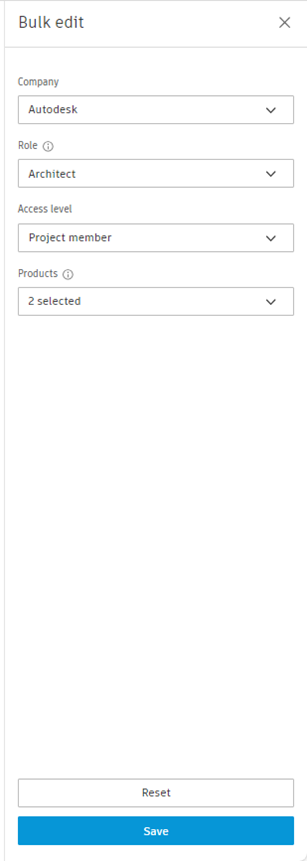
Click Edit. A panel appears on the right.
Use the drop-down lists in the panel to make changes to the members' company, role, access level and product access.
Click Save.
Legacy Add Members
Click Members from the left navigation to open the Members tool in Project Admin.
Click the drop-down list
 .
.Click Legacy add members.
Enter an email address for the members or paste in a list of email addresses separated by commas, tabs, spaces or semicolons.
Note: Only 100 members can be added at once.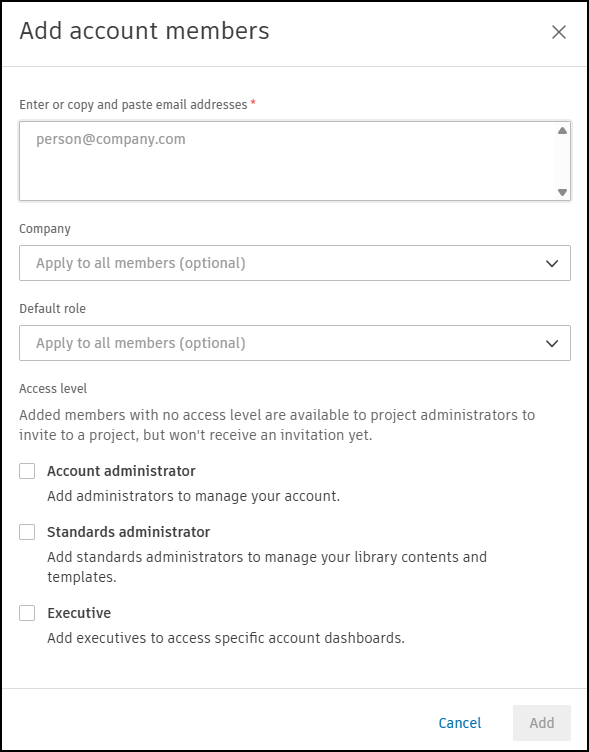
Select a Company or Role for the members. The company and role can be used to quickly apply the same permissions to multiple members.
Choose the access level for the members.
- Hub administrator: Members are added as other hub administrators.
- Executive: Members are given access to hub-specific dashboards in Insight. See Executive Overview to learn more.
- Standards administrator: Members are given access to the Library and Templates tools in Hub Admin, but no other Hub Admin tools are visible to them.
Note: If you don't tick any of the boxes, the new members are added to the hub and are made available to project administrators to add to a project. The newly invited members won't receive an invitation yet. Invitations are sent when a member is added to a project.Click Invite to send an email invitation to the members.
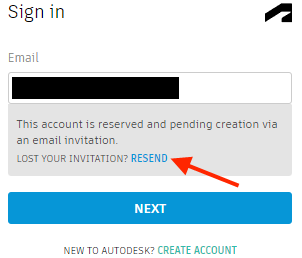
Invitations can expire after seven days.
- If members have already set up their account and logged into an Autodesk Forma, there is no expiration.
- Administrators can resend the invitation from the More menu
 .
. - Members can request to Resend the invitation while signing in.
Edit Members
After the members are added, you can edit their company, role, access level and subscriptions.:
From the Members tool, click the member's name in the list of members.
In the member profile on the right, define the member's Company and Role.
Select the member's Access level:
- Project member
- Project administrator
Apply subscriptions using the toggle switches or dropdown lists.
You can select the number of projects to see the
External Subscriptions
If someone has an external subscription, you can assign subscriptions to them the same way. External subscriptions are not counted against your internal subscription count. You do not need to assign a subscription to someone with an external one, but you can to prevent any downtime if an external subscription is removed.
Remove Members
To remove a member:
From the Members tool, click the member's name in the list of members.
In the member profile on the right, click the More menu
 and choose Remove member
  .Tip: You can also hover your cursor over the member's name in the list of members and click the More menu and choose Remove member.
Members removed from the hub are removed from all projects in the hub.
Finding Members
In the members tool, you can find specific members to modify their settings using the search and filters. Select a column to sort by that column.
You can filter by the following:
- Status: Find the members based on the status of their invitation.
- Company: Find a specific company that needs to have a member's access or subscription modified.
- Default Role: Find people based on the role specified in Hub Admin. The default Role in Hub Admin can be different from the role assigned to a member in a project.
- Access Level: Quickly see a list of your administrators.