Connecting to the Autodesk Fusion Compute MCP Server
The Autodesk Fusion Compute MCP Server is in Public Beta — tools, supported operations, and behavior may change. Share feedback.
Getting started (2–5 minutes)
The Autodesk Fusion Compute MCP Server is cloud-hosted and requires authentication. When you connect, your client opens a browser sign-in — authorize with your Autodesk account and your client receives a token automatically. Your client refreshes the token automatically, so you are not asked to sign in again.
Because Autodesk hosts Fusion, there is nothing to install and no server-side settings to manage. Configuration is client-side: the endpoint URL below.
Use the following server URL to connect:
https://developer.api.autodesk.com/da/v3/mcp/fusionMost clients need only this URL. ChatGPT on the web also needs a few OAuth settings — see Using ChatGPT on the web.
Refer to your client's documentation for configuration steps. The client-specific sections below provide detailed instructions for Claude Desktop, VS Code, Claude Code, Codex, and ChatGPT on the web.
Using with Claude Desktop
1) Open Claude Desktop connectors
- Open Claude Desktop.
- Go to Settings > Connectors.
2) Add a custom connector
- At the bottom of the connectors list, select Add custom connector.
- Enter the server URL:
https://developer.api.autodesk.com/da/v3/mcp/fusion- Follow the prompts to sign in with your Autodesk account.
3) Verify the connection
Start a new chat and try a query such as:
Start Fusion and model a box.You can also verify in Settings > Connectors. Find the Fusion Compute connector and click Configure. If the tool list is populated, Claude is successfully connected.
Using with VS Code
1) Open MCP settings
- Open VS Code.
- Open the Command Palette (Cmd+Shift+P on macOS, Ctrl+Shift+P on Windows/Linux).
- Search for and select MCP: Add Server.
2) Add the Autodesk Fusion Compute MCP Server
- Choose HTTP as the server type.
- Enter the server URL:
https://developer.api.autodesk.com/da/v3/mcp/fusion- Follow the prompts to sign in with your Autodesk account.
3) Verify the connection
Open the Command Palette and run MCP: List Servers, then select the server. From there you can start and stop it, and view its connection log in the Output window. Confirm the query below returns a result:
Start Fusion and model a box.Using with Claude Code
1) Add the server
Add the server from the command line:
claude mcp add --scope user --transport http fusion https://developer.api.autodesk.com/da/v3/mcp/fusionPut the flags before the server name. Use --scope user to make the server available across all your projects. Claude Code signs in automatically using a client ID metadata document, so there is no manual app registration step.
2) Verify the connection
Run claude mcp list, or /mcp inside a session, to confirm the server was added. Then try:
Start Fusion and model a box.Using Codex
This includes the Codex CLI, Codex in an IDE, and Codex inside the ChatGPT desktop app. For ChatGPT in a browser, or the chat view of the ChatGPT desktop app, see Using ChatGPT on the web.
1) Add the server
Add an MCP server of type HTTP (or Streamable HTTP) and enter the server URL:
https://developer.api.autodesk.com/da/v3/mcp/fusionUse this URL only. There are no OAuth settings to fill in and no manual app registration step.
2) Sign in
When Codex opens a browser, sign in with your Autodesk account and allow access.
3) Verify the connection
Confirm that the Fusion Compute tools appear in Codex, then try:
Start Fusion and model a box.Using ChatGPT on the web
Use this section for ChatGPT at chatgpt.com, including the chat view of the ChatGPT desktop app. Codex is set up differently — see Using Codex.
Before you start
- Turn on Developer mode in ChatGPT. Until you do, Plugins > Add does not offer Create MCP App. See OpenAI's ChatGPT Developer mode guide for availability and where to find the setting.
- On Business, Enterprise, or Edu workspaces, a workspace admin may need to allow Developer mode first. See Developer mode and MCP apps in ChatGPT.
1) Create an MCP app
- In ChatGPT, open Plugins, select Add, then select Create MCP App.
- Name:
Fusion Compute MCP, or a name of your choice. - Connection: select Server URL and enter the server URL:
https://developer.api.autodesk.com/da/v3/mcp/fusion- Authentication: select OAuth.
2) Configure Advanced OAuth settings
Expand Advanced OAuth settings and set the following values:
| Field | Value |
|---|---|
| Registration method | Client Identifier Metadata Document (CIMD) |
| OIDC enabled | Off |
| OIDC scopes supported | mcp:read, mcp:write, and offline_access, one per line and nothing else |
If Registration URL shows https://example.com, leave it as it is. This server does not use it.
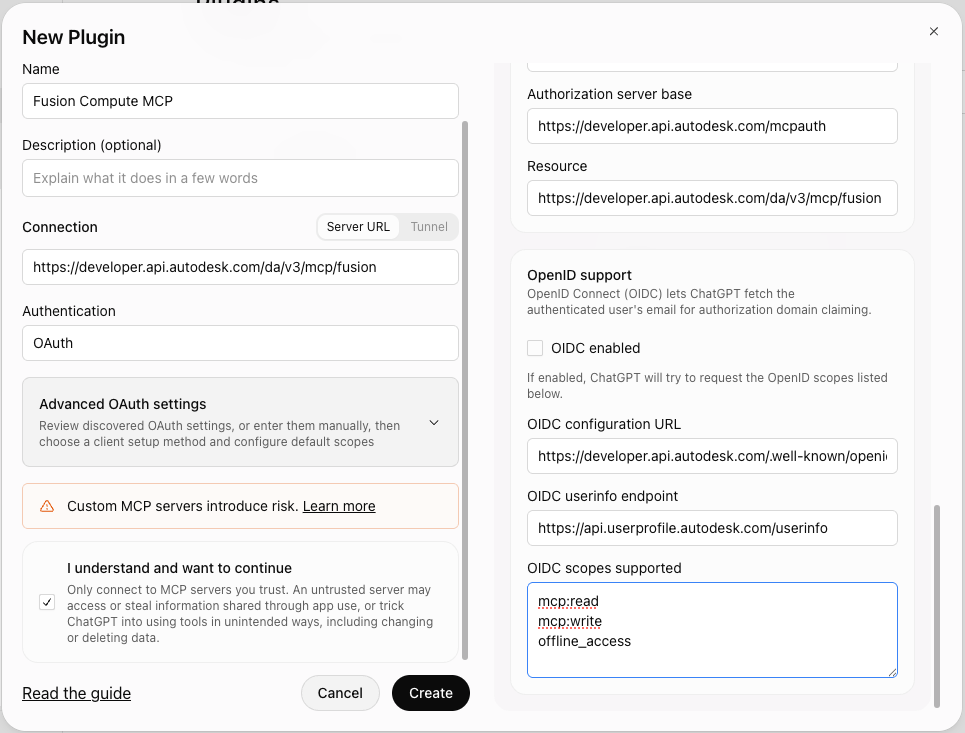
3) Connect and verify
- Select I understand and want to continue, then select Create.
- Sign in with your Autodesk account in the browser and allow access.
- Confirm that the Fusion Compute tools appear, then start a new chat and try:
Start Fusion and model a box.Other MCP clients
Any client that implements MCP Streamable HTTP and browser-based sign-in can use the same endpoint. Check your client's documentation for where its MCP configuration lives and how to reload it after an edit.
Verify it works
The quickest check is a session and version lookup, which runs without starting Fusion and does not consume capacity:
List my Fusion sessions and the available Fusion versions.A list of Fusion versions and your sessions (empty if you have none yet), returned immediately, confirms that your client is connected and authenticated. To confirm that you can start the engine itself, ask your client to start a Fusion session. Starting typically takes less than 10 seconds. If capacity is full you receive a queued status instead, which is expected.
If you run into issues, see Troubleshooting.