Revit Exterior to MAXtoA
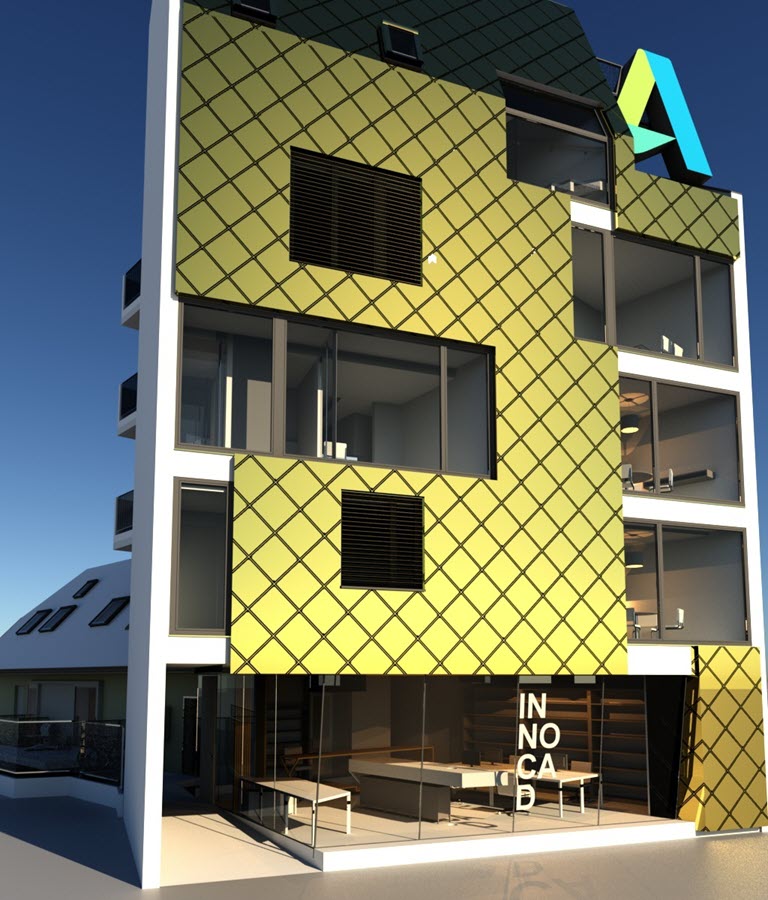
In this tutorial, we will cover how to convert a building scene from Revit to 3ds Max for rendering in MAXtoA. You will need to use the Scene Converter in 3ds Max to convert the materials into 3ds Max native Physical shaders, the Daylight/Exposure into a Sun Positioner and physical_sky, and the Camera into a Physical Camera. 3ds Max Photometric lights are supported in MAXtoA and therefore will not need to be converted. This process will save us time and energy from having to convert them individually for use with MAXtoA. Once converted, the scene will be set to use the ART renderer by default. Therefore, you will need to choose Arnold from the Render Setup. The house model ships with Revit and is free to use and share as a sample model owned by Autodesk.
Information about how to export a scene from Revit to 3ds Max can be found here.
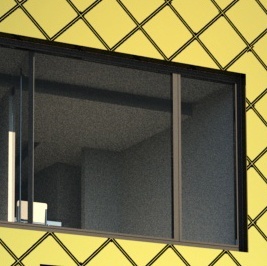
Revit House Project
- Typically, the first thing you should do when starting a new project in 3ds Max is to create a folder for that project. Rename the folder to 'Revit House'.
- Set 3ds Max's project to that folder: File -> Manage -> Set Project Folder.
- Copy the Revit scene to the 'import' folder of the project.
The use of Projects eliminates the need for modifying the User Paths in 3ds Max to handle every file or path you might need. It will automatically look in the .\sceneassets\images folder for any project-specific maps. The “.\” at the start of a path string means that it is relative to the project.
Revit Scene
- Start by importing the Revit file: Golden Nugget.rvt. If you do not have Autodesk Revit Interoperability installed for 3ds Max, try importing the .fxb file from Revit.
Info: Information about linking a Revit file to 3ds Max can be found here.
- In the Import Settings, choose {3D} (default) to import all of the interior and exterior geometry.
- Choose Combine By Revit Material (Combination Rule). This helps to make selecting objects easier as it means you don't get a huge amount of single objects.
- Disable RPCs as we will not need them for this tutorial.

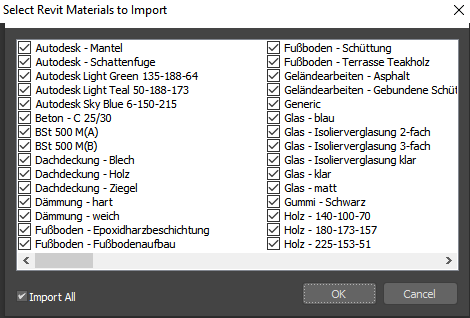
- Once the geometry has loaded, select Import All to import all of the Revit Materials. Note that the scene was originally designed in German and so the material names will be in German.
Set the System Unit in 3ds Max to feet (Customize -> Unit Setup). This is because the original Revit file works in feet.
Scene Converter
The 3ds Max Scene Converter, found in the Rendering menu converts all the Autodesk materials into Physical materials. Physical materials are compatible with the Arnold render engine. When you decide to use the Scene Converter, based on default settings the 3ds Max render engine will be set to the ART rendering engine and you must change the render engine back into the Arnold render engine.
After utilizing the 3ds Max Scene converter you still might get some errors about Legacy maps (Autodesk Bitmap and Autodesk Noise) which is not supported. If this is the scenario you can enable Legacy 3ds Max Map Support in the System tab in the Arnold Render Setup.
- Open the Scene Converter window - Rendering -> Scene Converter . The Scene Converter should default to Convert to ART Compatible Features using the ART.ms preset script. We will use this script as MAXtoA supports the Physical cameras and shaders provided by this script.
- Select Convert Scene. The script will convert the Autodesk Materials into Physical shaders, the Daylight/Exposure into a Sun Positioner and Physical Sky, and the cameras into Physical Cameras. The Max Photometric lights are now supported in Arnold and so will not need to be changed.
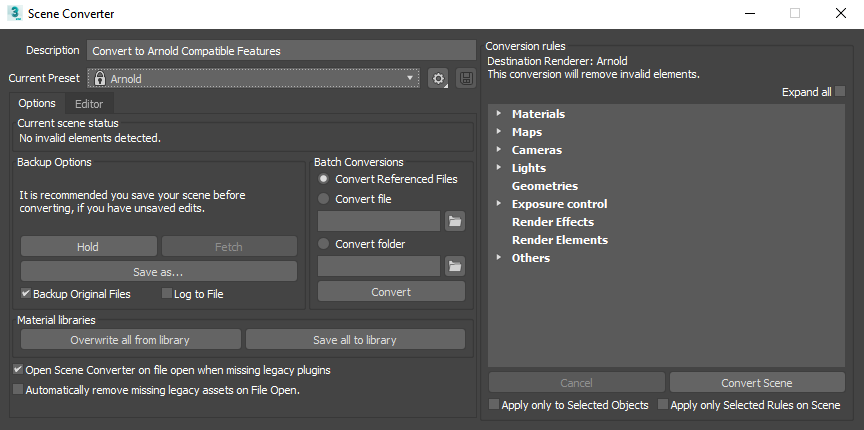
Besides the Sun Positioner, 3ds Max will import Photometric Lights (.IES) from Revit. The 3ds Max Revit importer supports parallel processing since 3ds Max 2019.3 which speeds up the import process a lot. With regards to materials it’s important to use the 3ds Max Scene Converter otherwise the imported Autodesk materials won’t render with Arnold and you do get a lot of warnings.
A video about using the Scene Converter can be found here.
Physical Sky
The current scene uses the Physical Sun and Sky Environment. This will need to be replaced with the Arnold Physical Sky shader.
- In the Slate Material Editor, create an Arnold physical_sky shader.
- Open the Environment and Effects window (8) and drag the physical_sky shader onto the Environment Map: parameter slot.

- If you notice any noise in the shadows, try increasing the number of Samples (Quality) for the IBL under Environment & Background in the Arnold Renderer tab of the Render Setup window.

Light sample noise is more visible in the shadows when using the default Samples (Quality) of 1. Increasing this value to 3 or 4 will reduce this type of noise. Bear in mind that render times will increase when increasing this value.
Light Portals
The skydome_light can use light portals to reduce noise for interior scenes, where the light comes in through relatively small openings. Instead of emitting light, they can be used to guide skydome_light sampling. Light portals must be placed to cover all windows, doors, and other openings through which skydome_light comes into the scene.
- Create a quad_light first and position and orient it outside so that it is pointing in through the window.
- Enable portal on the quad_lights.
 |
 |
| diffuse_samples: 2 (default) | diffuse_samples: 10 |
Rendering
Sampling
Once we are happy with the shaders and lighting, we can progress onto adjusting the sampling for final frame rendering.
Diffuse (Gi) Sampling
We can remove noise from the indirectly lit surfaces in the scene by increasing this value. In the example images below, we can see that there is some noise in the indirectly lit roof beams in the ceiling. Increasing the number of diffuse samples reduces this type of noise. Note that increasing this value will increase render times.
 |
 |
| diffuse_samples: 2 (default) | diffuse_samples: 10 |
Camera (AA) Samples
Once we are done finished refining the light and diffuse samples we can now increase the Camera (AA) value for final frame rendering. A Camera (AA) value of 3 is suitable for test rendering. However, when we are ready for final frame rendering, we will want to increase this value. In this example scene, a value of 5 or 6 was sufficient.
 |
 |
| Camera (AA): 3 (default sampling settings) | Camera (AA): 6 (final quality render) |
You can modify the Preset in the Render Setup window to save your Arnold render settings.
AOVs (Arbitrary Output Variables) provide a way to render any arbitrary shading network component into different images. For example, an artist might find it convenient to separate direct and indirect lighting contributions and later recombine them during compositing. Arnold provides built-in AOVs for outputting depth, position, and motion vectors.
Denoising
There are two denoising options available for rendering with Arnold:
OptiX denoiser
If you want to utilize the OptiX denoiser you must first create an imager.
Arnold Denoiser
The Arnold Denoiser can be run from a dedicated UI, exposed in the Denoiser tab (suitable for single images or completes sequences or as an imager. It favors quality over speed and is, therefore, more suitable for high-quality final frame denoising and animation sequences. To use the Arnold denoiser, you’ll need to render images out first via the Arnold EXR driver with variance AOVs enabled. It is also available as a stand-alone program (noice.exe). The workflow is as follows:
- Go to the Denoiser tab in the Arnold Render Setup and enable Output Denoising AOVs.

- Ensure that you are rendering out to an EXR file format. You can do this by activating the Save File option in the upper right corner of the Arnold Render Setup. The default options of the EXR file format are fine.
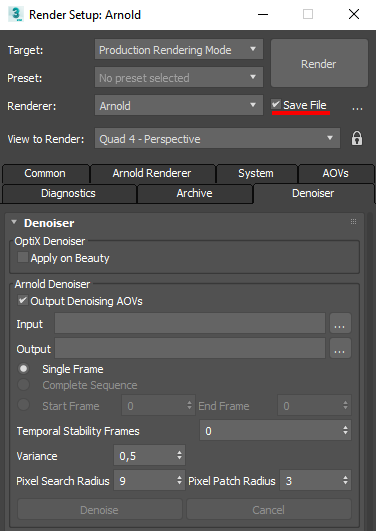
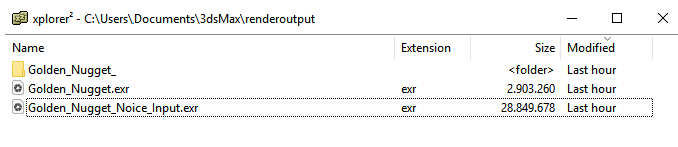
- Render the scene. Alongside your beauty file, Arnold will save an EXR version of it, also containing the AOVs needed for denoising. They are named after the beauty filename, postfixed by "_Noice_Input".
- Go to the Denoiser tab.
- Choose a rendered Noice_Input EXR image in the Input and a directory for the Output (denoised) files.
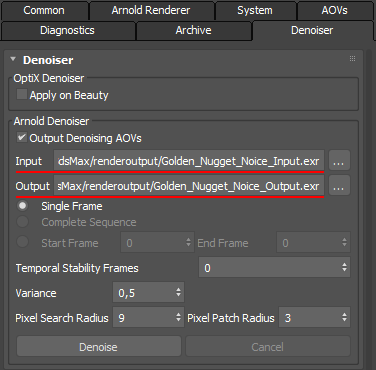
- Choose whether you want to denoise a single frame or a sequence and then select the Denoise button.
This will start the denoising process based on the settings that you have chosen. The denoised images are saved in the output directory.
More information about removing noise can be found here.
A tutorial on denoising a room interior can be found here.
That's it. You have reached the end of the tutorial. Well done! We encourage you to spend some more time with the MAXtoA user guide where you can find other tutorials such as this.