Cell Noise to Volume Displacement Animation
Polymesh objects can be rendered as volumes. This gives many creative opportunities for rendering solid objects in varied and interesting ways. This short 'making of' tutorial shows how to combine a polymesh with a volume by combining their shading using the displacement attribute of a standard_volume shader. We will also cover how to reproduce the above-animated effect using the cell_noise, color_correct, ramp_rgb and range shaders connected to volume_displacement of the standard_volume shader.
An example of a free to use head scan model can be found here.
The polymesh should be closed and not have anything self-intersecting, otherwise, the volume may not render correctly.
Step Size
- First of all, we need to convert the head mesh to a volume. Select the mesh and under its Arnold attributes, increase the step_size to 0.1. When the step_size is positive, it turns a polymesh into a volume and its value is used as the base step for raymarching the volume.
More information about volume step_size can be found here.
A basic scene file can be found here. |
Standard Volume
- Assign a standard_volume shader to the polymesh and increase the density to a very high value of around 4000. This will ensure that the displacement texturing looks more defined later.

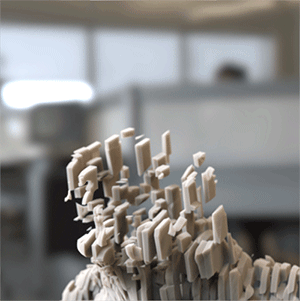
Head mesh rendered as volume
Range
- Connect a range shader to the volume_displacement of the standard_volume shader.
- Increase its output_max value to around 30. This will increase the effect of the volume_displacement once we connect the cell_noise shader to it.
Camera Projection
To animate the effect from top to bottom we will project a ramp through the V direction.
Create a camera_projection shader and connect it to the input of the range shader.
Remember to select the render camera that you want to use for the camera_projection.
Ramp RGB
- Create a ramp_rgb shader and connect it to the projection_color of the camera_projection shader.

Color Correct
- Connect a color_correct shader and connect it to the input of the ramp_rgb shader. You can use this to fine-tune the cell_noise shading effect.
Cell Noise
- Create a cell_noise shader.
- Change the pattern to cell1.
- Disable additive.
- Ensure that the coord_space is set to object.
- You will need to adjust the scale according to your scene size. In this case, the cell_noise is thinner because Y and Z are less than X.
- Increase the density to 1 and set randomness to around 0.2 to add some irregular shapes.
Final cell_noise settings

Animation
- Keyframe the black color of the ramp_rgb from left to right over time to see the effect move bottom to top across the head volume.
- Keyframe the time attribute of the cell_noise shader to animate the cell_noise effect.
Conclusion
That's it. Remember to increase the volume_samples for any lights in the scene when rendering the final animation.
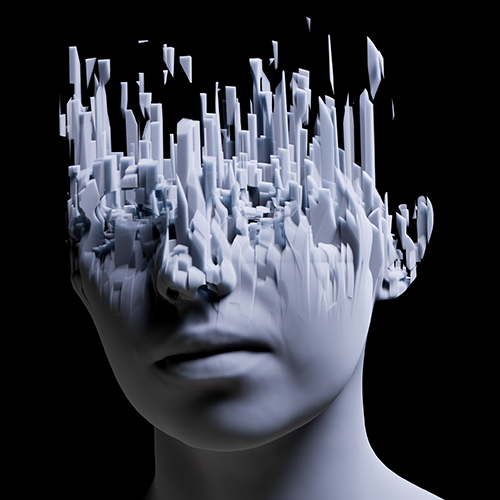
Further example with cell_noise scaled in Y

Final shading network