Nested Dielectrics
 |
 |
| dielectric_priority - glass: 0, bubbles: 0 (default) which is physically incorrect | dielectric_priority - glass: 1, bubbles: 2 (correct) |
Bubble rendering in glass using nested dielectrics
A video tutorial that shows how to render bubbles nested dielectrics in Arnold can be found here.
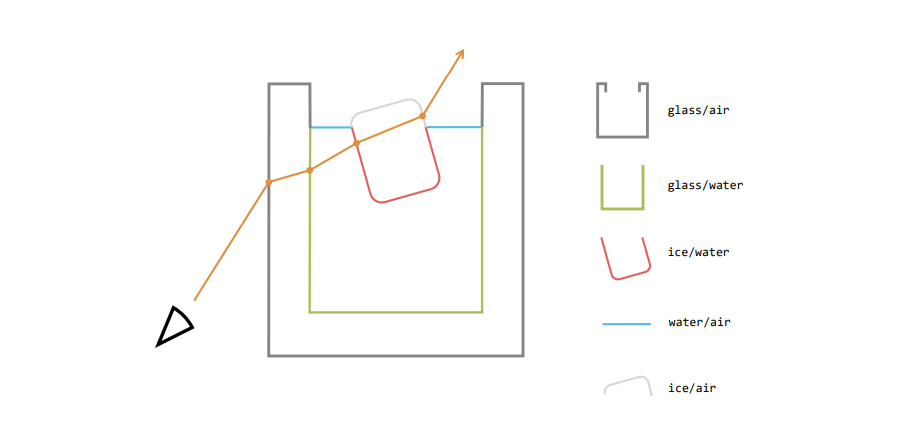
In the real world, light refracts and reflects when it hits the boundary between two dielectric (i.e. transparent) media which have a different index of refraction (IOR). For example, in the following glass of liquid, light refracts at the various boundaries between the air, glass, liquid and ice.
 |
 |
| Default dielectric_priority: 0 (not physically correct) | dielectric_priority: glass: 3, ice & bubbles: 2, liquid: 1. |
Creating such a scene in a renderer is typically accomplished by modelling the glass and water as closed meshes (filled with constant IOR material) which are either flush, intersect, or have an air-gap. Or in some renderers, one has to explicitly model each interface where the IOR changes, flagged with the IOR on each side. Manually breaking the scene up like this into separate interfaces where the IOR jumps is very inconvenient. Also, modelling geometry as flush or air-gapped produces various artefacts.
So the approach taken in Arnold (and many other renderers) is to use nested dielectrics, which means the scene is modelled by making the dielectric objects overlap, and in the areas of space where they overlap, the material is resolved into one of the overlapping dielectrics via a priority system. This correctly tracks how the IOR changes as the rays refract leading to realistic renders.
In case you need to revert to the legacy mode (which does not correctly compute the refractions), the dielectric priority resolution system and physically correct IOR tracking can be disabled globally with options.dielectric_priorities (Nested Dielectrics in the Advanced tab of the render settings).
Why priorities are needed
Glass of water example
To clarify these notions, let's use a glass of water as an example. This involves four transparent media (that is the glass, the water, the ice, and the surrounding air), which are all dielectrics defined by an index of refraction (or IOR). Of course, other non-dielectric media may exist in the scene, such as the metal table on which the glass sits.
At the boundaries between the dielectric media, the IOR in general jumps from one value to another as the ray transmits through the interface. On rendering this object the ray reflects or transmits at each dielectric boundary, and the Fresnel factor and refraction direction at each surface is determined by the ratio of the IORs on each side of the boundary.
So how do we set this up in a renderer? First, a couple of approaches which Arnold doesn't use, to compare.
Explicit IOR jumps 
One approach as mentioned above is to explicitly model the various interfaces, specifying for each the IORs on the exterior and interior side (as depicted below). This would involve breaking up the object into separate meshes for each interface, or tagging faces somehow. While this is a correct approach which some renderers take, it's obviously very inconvenient for an artist to have to do this, especially if the geometry is complex and/or animated.
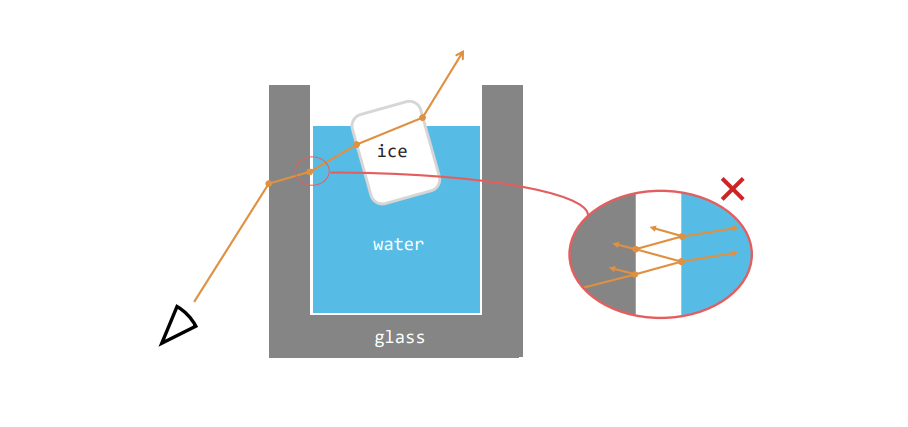
Air gapping or flush interfaces 
Another approach is to model closed meshes with well-defined IORs and put air-gaps between them so they don't touch or overlap, as below. This is perhaps slightly more convenient than breaking up the model by interface but unfortunately isn't physically correct as it generates inter-reflections in the air gaps. Another bad approach is to model the surfaces as exactly flush, which introduces numerical imprecision issues.
Arnold's method – nested dielectrics 
The approach that Arnold takes, which is also used by many other renderers, is based on the 2002 paper "Simple Nested Dielectrics in Ray Traced Images", by Schmidt & Budge. In their approach (which is usually referred to as nested dielectrics), dielectrics are modelled as closed surfaces which are allowed to overlap, but then we must specify which of the overlapping ones exists in a given region by assigning priorities. That is we assign each dielectric medium an integer priority, and then in an overlapping area, the highest priority medium is the only one which is assumed to exist, as depicted in the diagram below. (Note that air doesn't have a priority since we can just treat it as the absence of a medium). Light bounces through the scene reflecting and refracting correctly at the surviving interfaces after priority resolution, and the IOR of the medium is correctly "tracked" as the ray propagates.
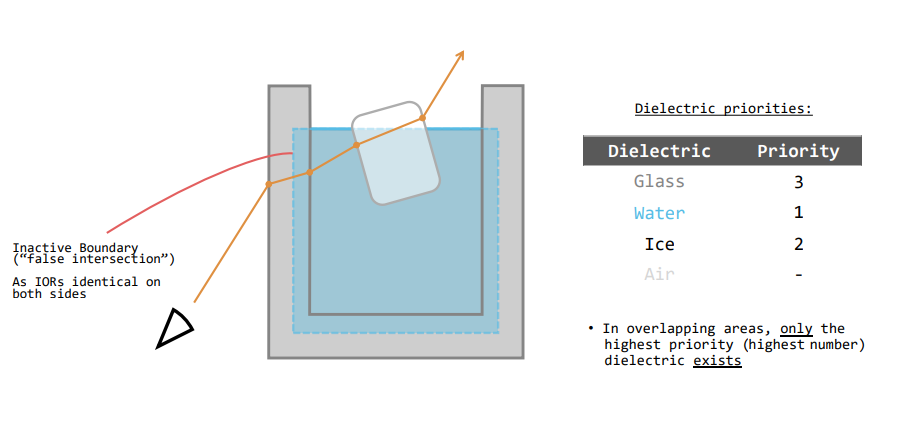
This is now both physically correct and relatively easy to set up. Note that this means that for example, the boundary of the water proxy mesh inside the glass is "inactive" in the sense that there is no actual IOR jump across this boundary. Schmidt & Budge refer to these boundaries as "false interfaces". These low priority false interfaces are effectively cutaway, similar to a Boolean operation. No shading occurs at these interfaces, light simply passes through them without interacting. Light reflects and transmits only at the real interfaces which are not cut away.
Dielectric priority
In Arnold, dielectric media (glass, water etc.) are created via the standard_surface shader, specified mostly under transmission, though note that the IOR of the dielectric is specified by the specular_IOR parameter. The priority is thus naturally a parameter of the standard_surface shader, i.e. dielectric_priority. As described above, when dielectric objects overlap, the higher priority objects override lower priority. The surviving highest priority media in a given region of space then specify the dielectric properties in that region (i.e. the IOR as well as the volumetric scattering properties).
dielectric_priority (found under transmission of standard_surface) is an integer (default 0) w hich can be positive or negative, where higher priority numbers override lower priorities. So for example, if glass with priority 2 overlaps water with priority 1, then in the overlap region, only the glass survives. Negative priorities are allowed, so, for example, a priority 0 object would override priority -1 (as it may be convenient to use negative priorities sometimes to specify a lower priority medium than the default 0).
Some other renderers have a lower number mean an effectively higher priority. We think this is unnecessarily confusing, so instead higher number corresponds to a higher priority, which overrides the lower number.
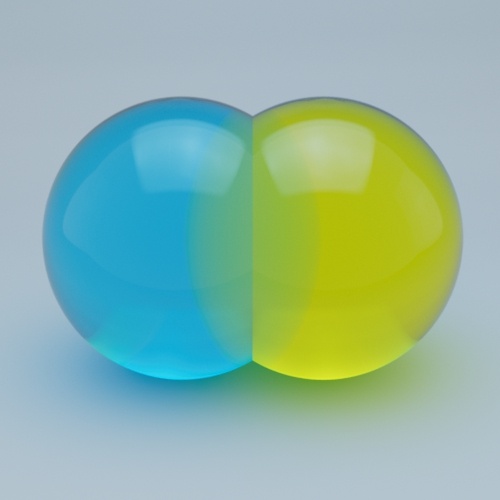
The most basic effect of the priorities is illustrated by these overlapping glass spheres with an interior scattering medium:
 |
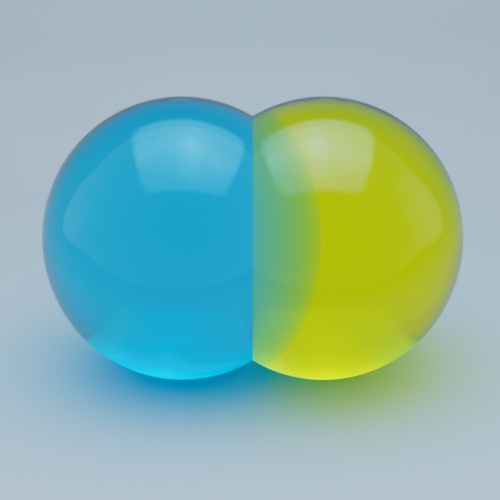 |
| Blue: 1. Yellow: 1 | Blue: 1. Yellow: 2 |
Note that for dielectrics with internal absorbing or scattering media, transmission_depth needs to be set. For example, see the orange juice example below. If equal priority dielectrics overlap, then their internal properties merge, i.e. the IORs average and the internal volumetric media are mixed (thus if two equivalent dielectrics with equal priority overlap, they effectively are merged). There is a global switch to disable nested dielectrics called dielectric_priorities. Dielectric priority disabled can be read as "no priority". In this case, the surface is never removed and the surface ignores any surrounding dielectric in which it may be embedded, treating the exterior as a vacuum. This functions as an unphysical mode (legacy) which preserves the look of scenes prior to the introduction of IOR tracking, and which also may be faster to render than if tracking is enabled.

dielectric_priorities: disabled
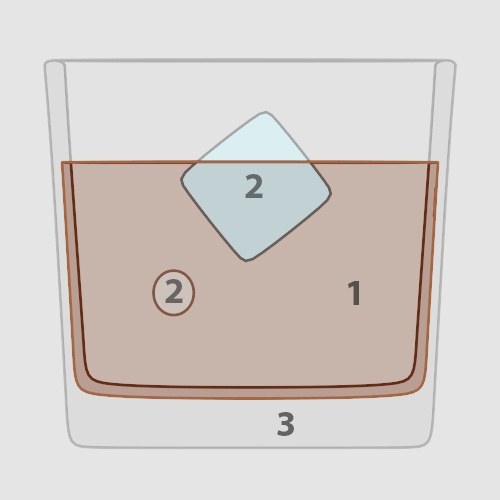
In the case of a glass of whiskey we expand the whisky mesh to overlap the surrounding glass and give the whisky a lower priority than glass. The whisky boundary within the glass then functions merely as a "proxy" mesh which indicates the presence of the lower priority whisky. We also give the whisky a lower priority than the ice, so the ice displaces the whisky. For example with the priorities shown, this defines the correct IOR at every point in space.
 |
 |
Liquid (1) has a lower dielectric_priority than the ice and bubbles (2). Glass (3) has the highest priority.
Specifying the dielectric medium
As mentioned, low priority "false" interfaces are cut away and effectively light passes through them undisturbed. Consequently, any shading parameters such as roughness take effect only at the real interfaces. However, not all shading parameters are completely ignored on the false interfaces – the shader parameters which define the interior of the dielectric medium are still taken into account as rays enter the dielectric medium (as the standard_surface shader also allows specification of an internal scattering medium "embedded" in the dielectric). These are the following:
The standard_surface shader parameters which determine the interior properties of nested dielectrics are:
- specular_IOR
- transmission_color
- transmission_depth
- transmission_scatter
- transmission_scatter_anisotropy
- transmission_dispersion
Setting these parameters on the water in the example above means that the interior of the water will be assigned these properties, even though the water interface inside the glass is false.
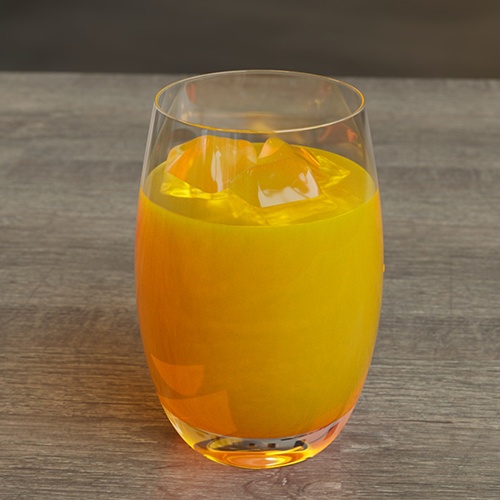
For example, if we want to render a glass of orange juice (see example below), the liquid mesh overlapping the glass mesh is low priority but it is necessary to set both transmission_color to orange and to set the transmission_depth in order to specify that the Beer's law absorption in the interior "bulk" of the juice is orange coloured (plus some optional transmission_scatter):
 |
 |
transmission_scatter added to standard_surface assigned to orange juice geometry (dielectric_priority : 1)
With zero transmission_depth (the default) the transmission_color functions only as a surface tint, which as it occurs on the boundary of the liquid which overlaps the glass, is ignored leading to clear juice.
Ensure that transmission_depth is set to a non-zero value if you want the dielectric to have internal absorption/scattering (for example orange juice, wine, honey, murky water, etc.).
Note however that any purely surface properties such as roughness (textured or constant), will only take effect if applied to the real boundaries which remain after priority resolution.
Parameters of the standard_surface shader which do not control the interior properties of the dielectric medium will be ignored if applied to the false interfaces of low priority objects. For example, in the glass of orange juice example if we set zero transmission_depth (which is the default), the transmission_color functions then only as a surface tint, which as it occurs on the false boundary of the juice inside the glass, is ignored in the interior "bulk" of the juice leading to an incorrect look:
 |
 |
| transmission_depth: 0 (default) resulting in clear juice. | transmission_depth: 4. Juice renders correctly. |
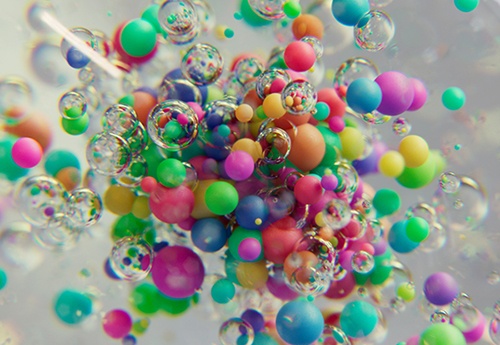
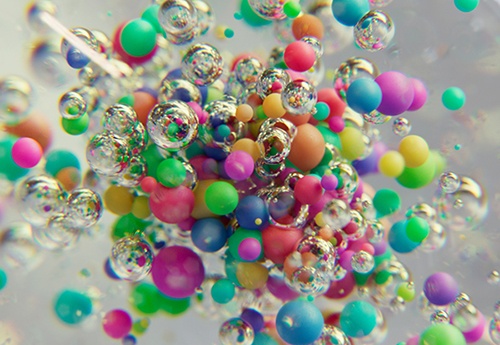
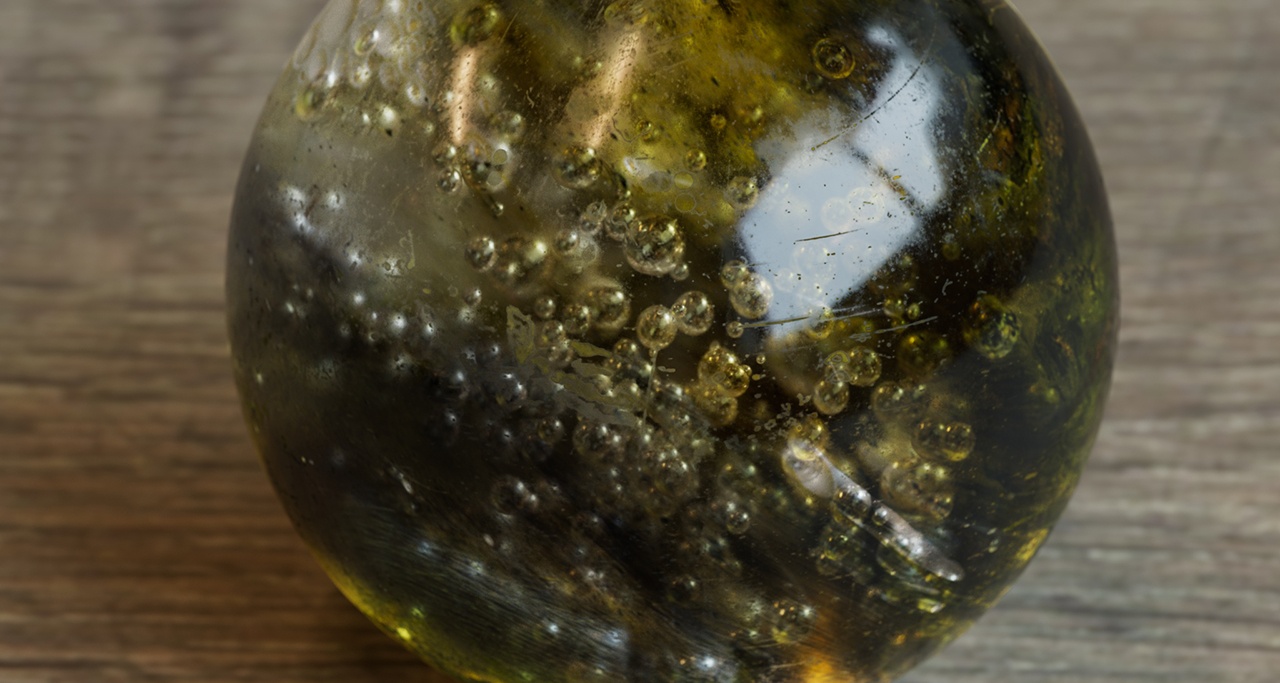
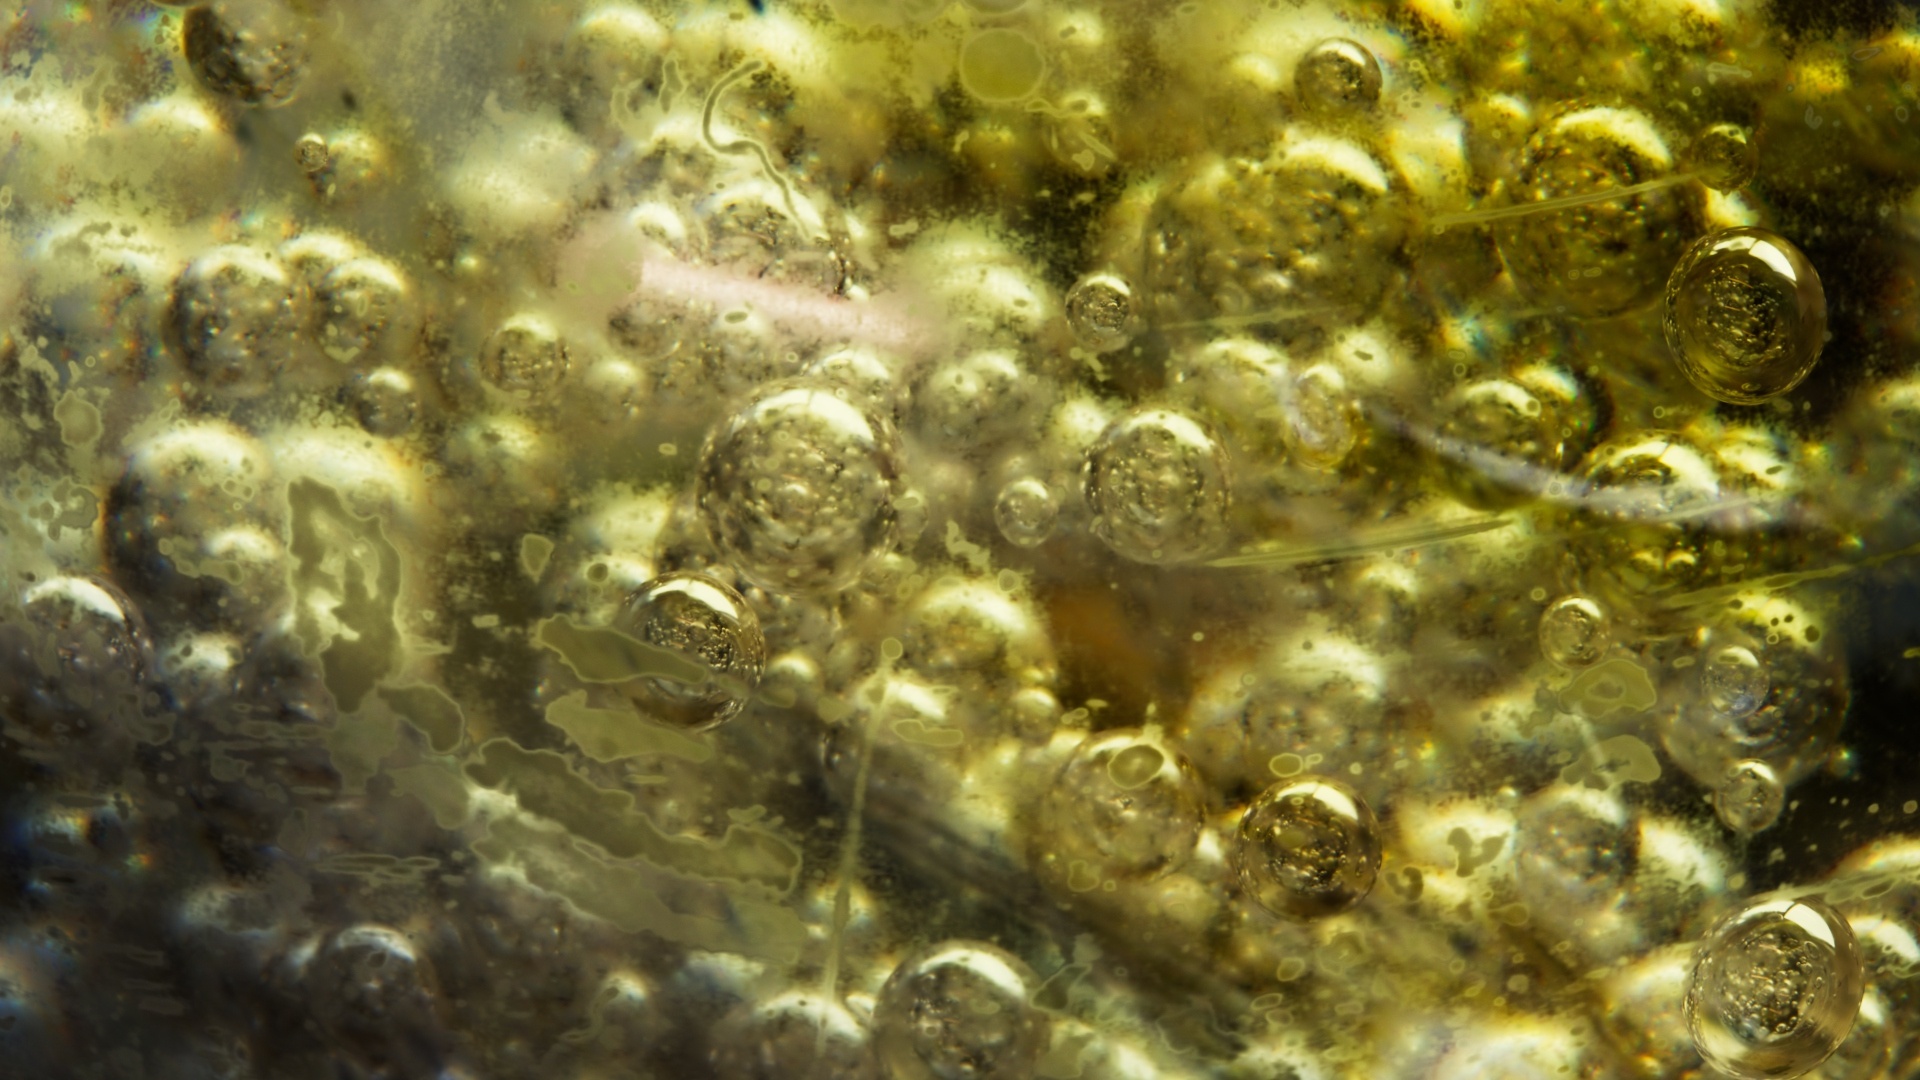
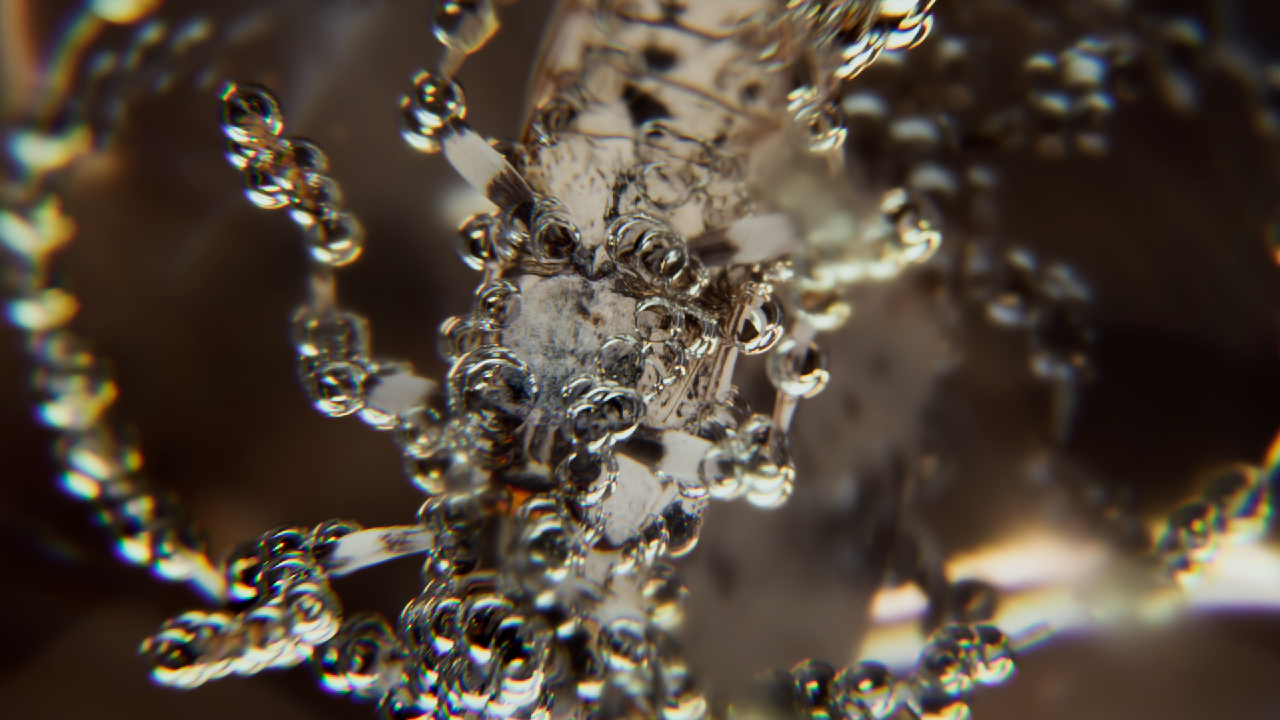
Bubble rendering
Rendering of bubbles (in glass, say) should be achieved by giving the bubble geometry a higher priority than the glass and the IOR of the bubble interior (e.g. specular_IOR = 1.0, for air). In the example below, specular_IOR has been set correctly for both glass: 1.5 and air bubbles: 1. The dielectric_priority is set to 1 for the glass, and 2 for the air bubbles.
 |
 |
 |
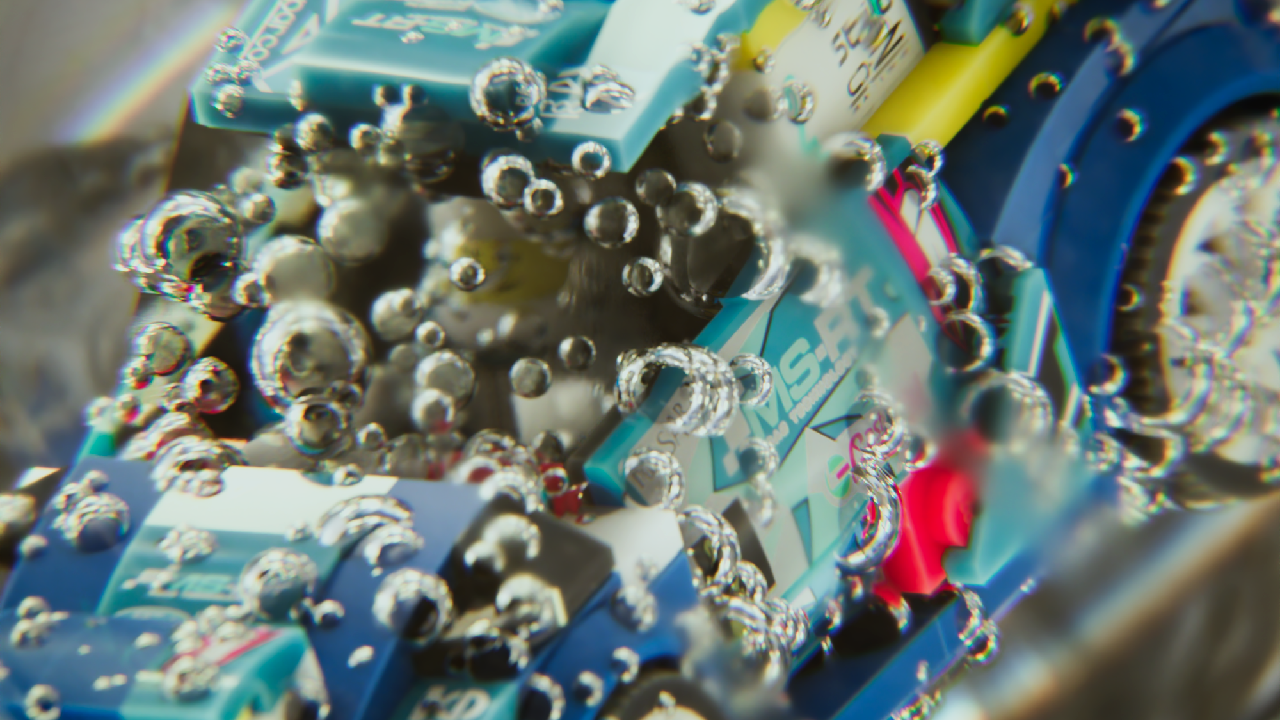 |
dielectric_priority: glass: 1, bubbles: 2.
Bubbles inside glass or water are super bright because of the ring of total internal reflection (TIR) around them, with a perfect reflection.
When rendering bubbles inside glass the old trick of flipping the normals to fill the bubble with a vacuum only works when not using nested dielectrics, i.e. if dielectric_priorities is disabled.
Ray Depth
Rendering realistic reflections and refractions in complicated geometry may require a high ray depth due to the large number of internal reflections which can occur.
Ensure that the specular/transmission/total ray depths are high enough, otherwise, the liquid/glass may appear dark.
 |
 |
| specular_ray_depth: 1 (default value) | specular_ray_depth: 5 |
 |
 |
| specular_ray_depth: 1 (default value) | specular_ray_depth: 5 |
Note that increasing specular_ray_depth can dramatically increase render times.