Main Contract
Main contracts are contracts between the general contractor and the customer. By creating distinct billing schedules you may cover different phases or payments.
In this article:
- Create the Main Contract
- Edit the Main Contract
- Create the Schedule of Values (SOV)
- Batch Associate Budgets to Main Contract SOV
- Spread Markup Budget Value in the Main Contract SOV
- Lock and Unlock the Main Contract SOV
- Delete the Schedule of Values
- Delete the Main Contract
- Main Contract Statuses
- Related Articles
Create the Main Contract
To create a main contract in Cost Management:
Select the Budget tab.
Select the Main Contract tab.
Click the edit icon
 .
.Click Add.
Enter a code.
Enter a name.
Choose a type for the main contract (for example, unit price). Main contract types are defined by a project administrator in Project Admin. See the Main Contract Types section in the Budget Settings article to learn more. By default, you can choose:
- Cost Plus - Work carried out based on actual cost plus additions including but not limited to overheads and profit.
- Fixed Price - Work carried out for a fixed sum where actual costs incurred may differ from the incoming value paid. If you choose this option, markup cost item values will be spread over normal cost items in approved owner changes. Learn more about spreading markup budget values.
- Unit Price - Work carried out which will be calculated based on detailed measurement of task progress.
You can add subitems that were not part of an initial budget using the More menu  . See Add or Delete Subitems in the Main Contract to learn more.
More than one contract can be created. If you've added more than one contract, select the More menu
  next to the item's name to set which is the default one.
Edit the Main Contract
To edit a contract after it's created, click the  icon to enter the edit mode. From this point, you can perform several actions within the More menu
  . For example:
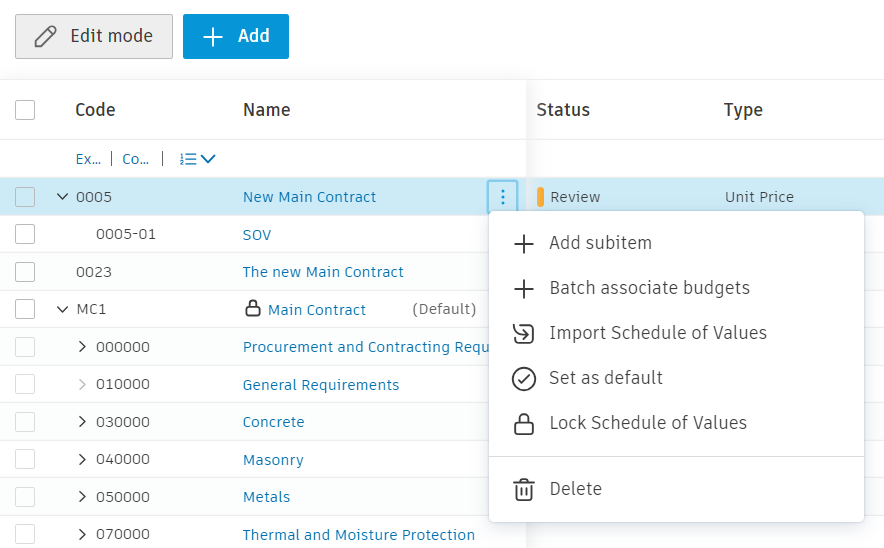
You can also change the view of the Main Contract table. Click the ![]() to control the visibility and order of column. See the Control Column Order and Visibility article.
to control the visibility and order of column. See the Control Column Order and Visibility article.
Create the Schedule of Values (SOV)
Once the main contract is created, create and add schedule of values (SOV) from selected items within the Budget tab. You can also import a SOV and add or remove main contract's subitems.
Create the SOV from the Budget Tab
Select the Budget tab, and then again the Budget tab.
Click the edit budget icon
 .
.Select the budget items for the main contract.
Note: Budgets can only be added in batches of 200, so for larger budgets, add them in multiple batches.Click Create Main Contract SOV.
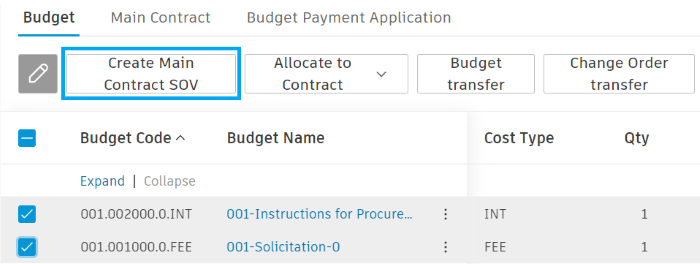
Select the name of the main contract using the drop-down list.
Use the radio button to bring in either each line item or bring in only certain budget code segments.
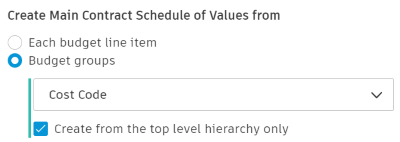 Tip: You can also create from the top-level hierarchy only. The owner can review the budget faster when only the top level of the hierarchy is used for the main contract.
Click Create.
The main contract SOV will now be created automatically and link to the budget. This connection allows members to see what they will be paid and what they need to pay their suppliers.
Import the Schedule of Values
You can import a SOV to your main contract. To do so:
- Select the Budget tab.
- Select the Main Contract tab.
- Click the edit budget icon
 .
. - Select the More menu
 of the main contract.
 - Choose Import Schedule of Values.
- In the new window, click Choose File. You can add a file from your computer. You can download an example document by clicking Document Template. Fill it out with values and then import.
- After you choose a document, click Import.
Add or Delete Subitems in the Main Contract
To add subitems to the main contract:
Select the Budget tab.
Select the Main Contract tab.
Click the edit budget icon
 .
.Select the More menu
 in the desired row.
 Select Add subitem. A new line will appear under the main contract.

Fill in the required information in the new row, for example, choose the budget code to link a main contract to a budget. Either type in a value or associate it to a budget code by selecting within the budget code column; the value will autopopulate.
After adding the subitems, you may want to toggle the Preserve the Main Contract value option. See the Spread Markup Budget Value in Main Contract SOV section to learn more.
To delete the items from the schedule of values, follow the procedure but select Delete.
Batch Associate Budgets to Main Contract SOV
To batch associate budgets to the main contract SOV:
Select the Budget tab.
Select the Main Contract tab.
Click the
 icon.
icon.Click the More menu
 next to a main contract.
Choose Batch Associate Budgets.
Select the budgets to associate with the main contract. Note that the selection limit is 200. You can search by code or name, or group the budget codes by budget code segments.
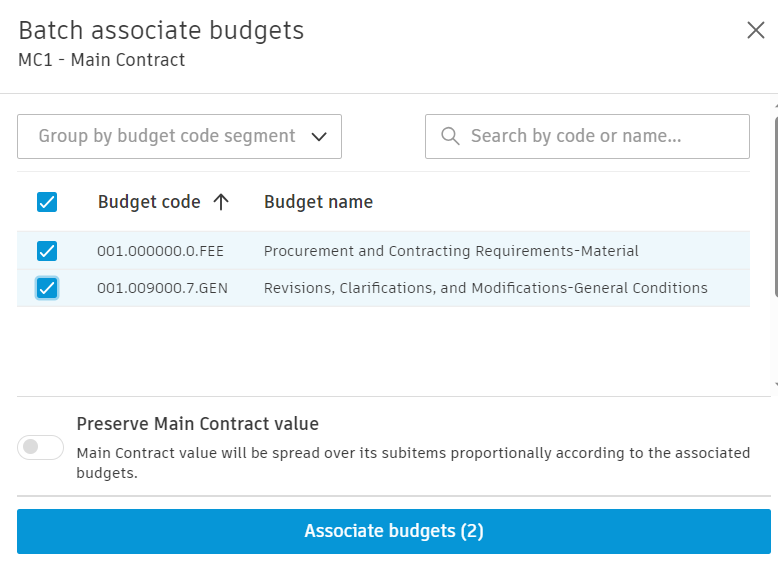 Note: Budgets linked to other main contracts don't appear in the list.
Selecting from the Batch Associate Budget window means that the original unit cost of the main contract item will be overridden and will show the new selected budget item value. If you do not want this, toggle the Preserve Main Contract value option to spread over its subitems proportionally, according to the associated budgets. See the Spread Markup Budget Value in Main Contract SOV section to learn more.
Note: If Fixed Price is set as contract type, the setting to preserve main contract value will be toggled on by default. This setting assumes that fee or markup details may not be shared with the owner, so markups are automatically distributed to the work line items in the change orders as well.
Click Associate Budgets.
Hide Budget Associated Items
Budgets may have several associated items that you can hide in the main contract view. To do this:
- Click the More menu
 .
. - Select Hide Budget Associated Items.
Spread Markup Budget Value in the Main Contract SOV
As a general contractor, you may have an internal budget price and a selling price. In case these two are different, there is an option to track two sets of values within Cost Management. In this scenario, an owner sees the full price with markups included without making them visible from an owner's collaborative perspective.
Once you choose Fixed Price for the main contract's type, you'll have the option to preserve the main contract value when associating it with a budget. The value of the markup cost item will be distributed among the non-markup cost items.

You'll find information that a markup is included. If an OCO is added to the main contract before Fixed Price is selected, automatically spread markup after the type is switched to Fixed Price.
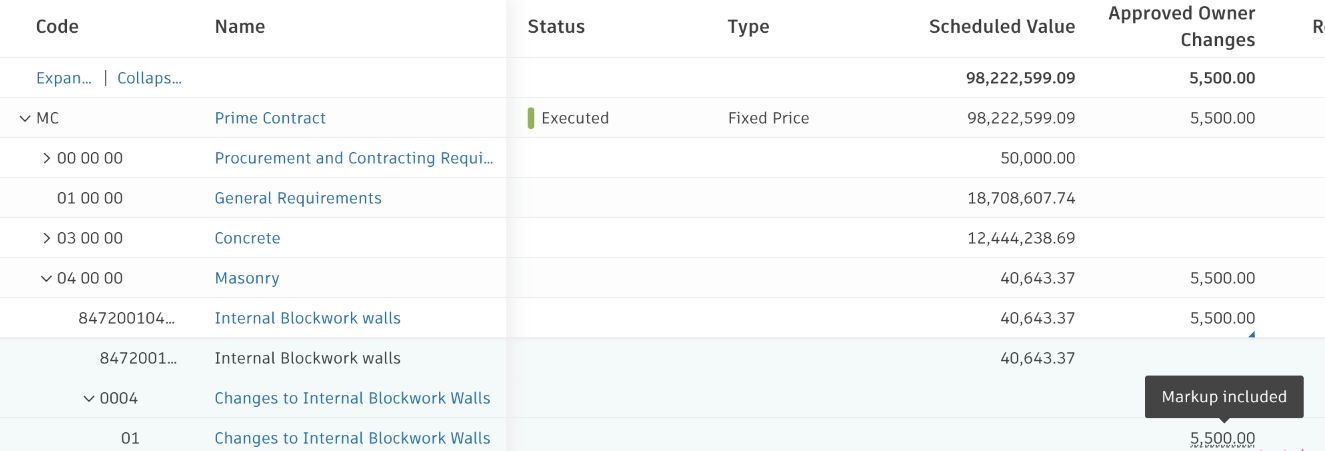
An option to choose to preserve the main contract value shows:
- When linking a budget to a main contract in the Budget Code or Budget Name columns
- While batching associate budgets
From an owner's perspective:
- The Markup Summary section in the flyout panel is no longer visible.
- While responding to an OCO or COR, the unit cost is showing as a sum of the amount and spread markup in the Scope of Work section. The markup list is not visible for an owner.
- Markup cost items and the Markup Summary section are hidden in the budget payment application, and an owner sees the full price with all markups without marking them.
Lock and Unlock the Main Contract SOV
If you have full control permission for the Main Contract tab, you can lock the main contract SOVs to avoid inconsistency, unplanned changes in projects, and errors. To do this:
- Click the More menu
 of the main contract.
 - Select Lock Schedule of Values.
To update the main contract SOV again, unlock it first.
Delete the Schedule of Values
To delete the schedule of values in Cost Management, you must have full control permission for the Main Contract tab. Deleting the SOV may have an impact on other parts of your project. Make sure you deleted any associated budget payment applications first.

To delete an associated budget payment application:
Select the Budget tab.
Switch to the Budget Payment Application tab.
Select a main contract and then a billing period from drop-down lists.

Click Status Change.

Revert the payment application's status to the Draft or Revise and Resubmit.
Click the More menu
 .
.Click Delete Payment Application.
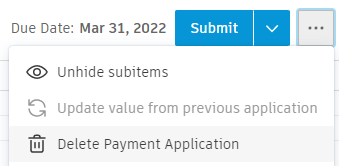
Click Delete in the pop-up window.
Repeat the action for every billing period within the payment application connected to the main contract.
After deleting an associated budget payment application, you can delete the main contract SOV. To do so:
- Select the Budget tab.
- Switch to the Main Contract tab.
- Click the Edit icon
 .
. - Select the main contract SOVs you want to delete. Click the More menu
 next to it.
 - Click Delete and confirm.
Delete the Main Contract
To delete the main contract, you need to delete the schedule of values and associated budget payment applications first. After that:
- Select the Budget tab.
- Switch to the Main Contract tab.
- Click the Edit icon
 .
. - Select the main contract that you want to delete. Click the More menu
 next to it.
 - Click Delete and confirm.
Main Contract Statuses
During the creation state, the main contract doesn't have any status. With the work progression, you can choose one of the following statuses:
- Review: The main contract is ready and awaits revision from all the parties.
- Signed: The main contract was signed by all necessary parties.
- Executed: The main contract is executed by the project administrator.
- Closed: The main contract is closed.