Compliance Requirements
During the submission of cost payment applications, budget payment applications, contracts, CORs, OCOs, RFQs, or SCOs, project teams often have to provide supporting documentation. With the compliance requirements workflow, you can track and store lien waivers, certificates of insurance, bonding documents, and other required materials before submissions proceed.
Project administrators create compliance requirement templates in settings. Then members upload the required documents in the item's details panel. The system tracks compliance status and can block submissions until requirements are met. You can also enforce tax-based compliance rules that block Send or Submit until tax is applied.
In this article:
- Set Up Compliance Requirements
- Make Requirements Optional or Required
- Set Expiration Dates
- Create Condition-Based Requirements
- Tax-Based Compliance
- Upload Required Documents
- Track Compliance Status
- Troubleshooting
- Related Articles
Set Up Compliance Requirements
Where you configure compliance and which requirement types are available depends on the item type:
| Item type | Settings | Document-based | Condition-based |
|---|---|---|---|
| Contracts | Cost settings | Yes | Yes |
| Cost Payment Applications | Cost settings | Yes | Yes |
| Budget Payment Applications | Budget settings | — | Yes (tax) |
| CORs | Change Order settings | — | Yes (tax) |
| OCOs | Change Order settings | Yes | Yes (tax) |
| RFQs | Change Order settings | Yes | Yes (tax) |
| SCOs | Change Order settings | Yes | Yes |
Condition options include budget code segments and tax-based compliance. For detailed steps, follow the links in the Settings column above.
Make Requirements Optional or Required
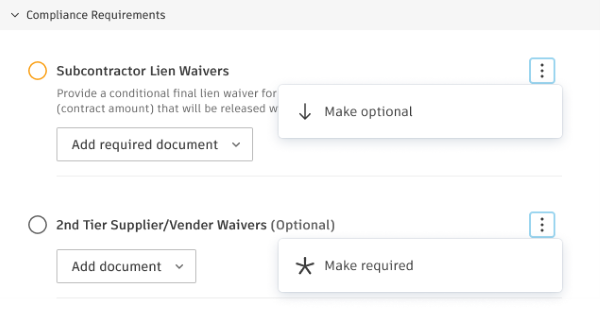
After creating templates, you can customize requirements for specific items. Navigate to any item's details panel and find the Compliance Requirements section:
- Click the More menu
 next to any requirement.
 - Choose Make Optional or Make Required.
Set Expiration Dates
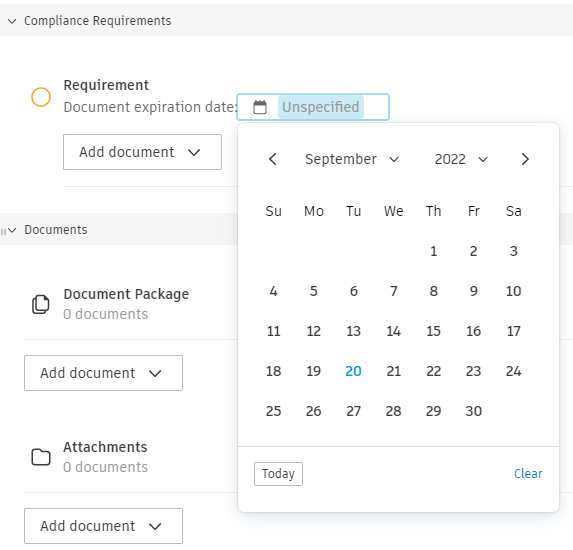
For time-sensitive documents like insurance certificates, you can require expiration dates. This option is available for document-based compliance requirements only.
- In the requirement setup, enable Requires document expiration date.
- Members will be prompted to set expiration dates when uploading documents.
- Expired documents will show in calendar views and notifications.
Create Condition-Based Requirements
Condition-based requirements are available for Contracts, Cost Payment Applications, Budget Payment Applications (tax), CORs, OCOs, RFQs (tax), and SCOs. They block actions until specific conditions are met. For contracts, you can create condition-based requirements that block actions based on:
- Budget code segments or contract values (for example, Cost Type or Original Commitment vs. Revised Budget).
- Tax application. See Tax-Based Compliance.
For SCOs (Supplier Change Orders), you can create condition-based requirements that control when SCOs can be processed.
Learn more about setting condition-based requirements for contracts and cost payment applications and SCOs.
Tax-Based Compliance
Tax-based compliance blocks Send and Submit until tax is applied on the item. Configure it as a Condition requirement, not a document requirement.
Tax-based compliance is available for:
- Contracts and Cost Payment Applications — Compliance Requirements in Cost settings
- Budget Payment Applications — Compliance Requirements in Budget settings
- CORs, OCOs, RFQs, and SCOs — Compliance Requirements in Change Order settings
Before you create a tax-based compliance requirement, add at least one Active tax formula in Settings > General > Tax. See Tax Formulas.
To create a tax-based compliance requirement:
- Open the Add Requirement dialog from Cost settings, Budget settings, or Change Order settings.
- Enter a Name (and optional Description).
- For item types that show Compliance type, choose Condition (or Document for document-based requirements).
- For Budget Payment Applications and CORs, the dialog shows the condition row only. Skip Compliance type and continue with the next step.
- In the condition row, configure:
- Field: Tax
- Operator: Is applied
- Value: Leave blank. This field is disabled by design. The system checks only whether any tax has been applied to the item, not which tax formula was used.
- Configure Applicable to (and, for Cost Payment Applications, retention status and payment application stages).
- Click Save.
The condition label varies by item type. Examples include Allow sending Contract only if, Allow submitting Cost Payment Application only if, and Allow submitting Budget Payment Application only if.
Apply a tax formula in the item flyout when the rule isn't satisfied. On RFQs, suppliers may apply tax and the general contractor validates it before Send or Submit. See Tax Formulas.
Upload Required Documents
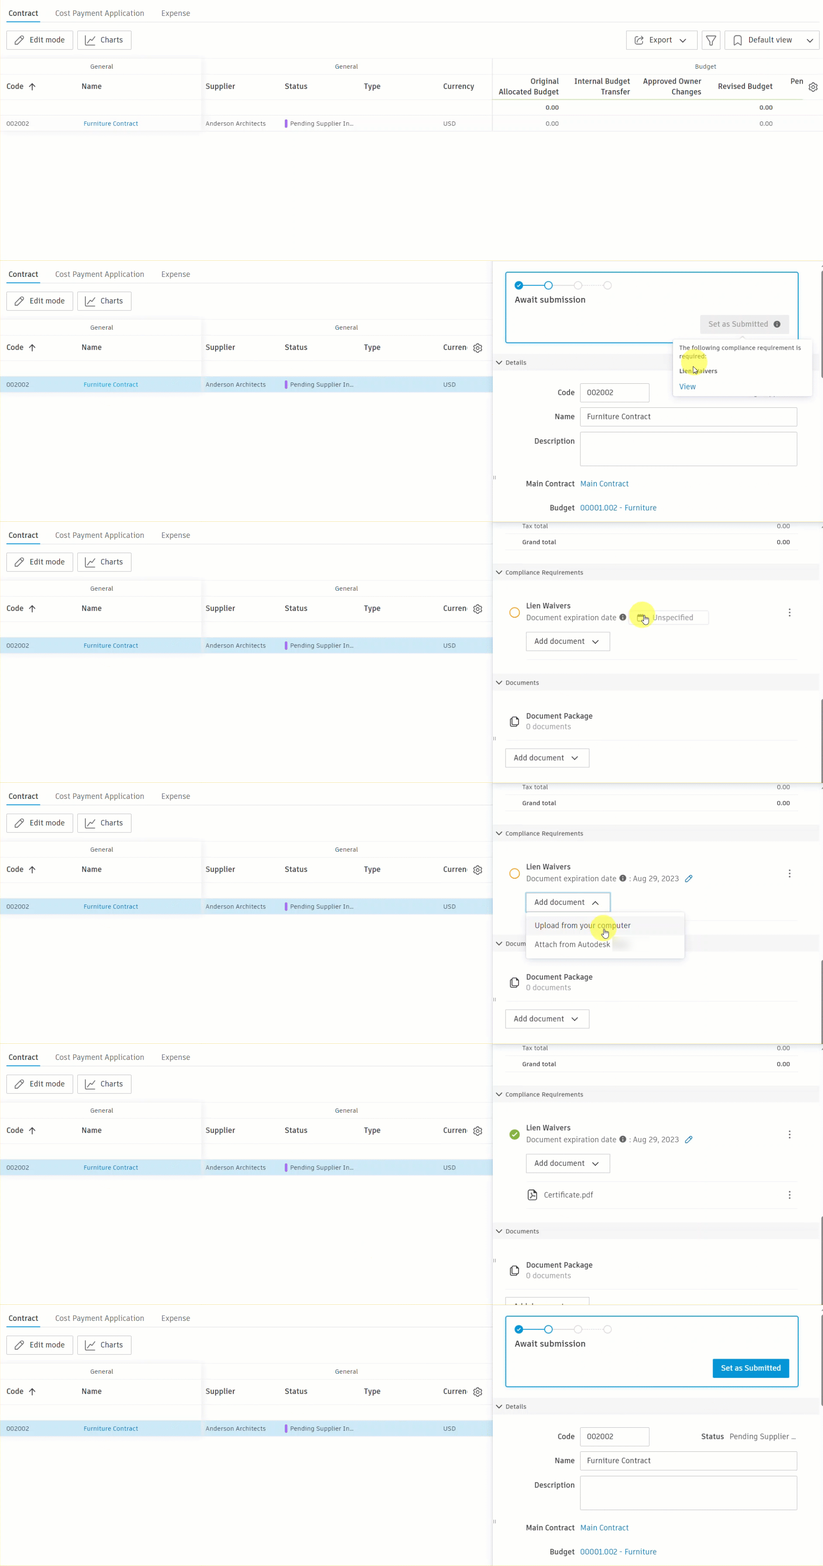
Members with collaborative permission can upload documents to meet compliance requirements.
When compliance requirements are active, you'll see them in the item's details panel. When requirements are needed, you'll see:
- A note: The following compliance requirement is required
- Submit button disabled until documents are uploaded
- List of required vs. optional documents
To upload documents:
Go to the Compliance Requirements section in the item details.
Click Add Document next to the requirement.
Choose your upload method:
- Select Existing Documents: Choose from documents already in the project.
- Upload from your Computer: Browse and upload new files.
- Attach from Autodesk Document Management: Select from connected Autodesk Document Management.
You can view, download, or remove documents before submission. After submission, documents have limited editing to maintain audit trails.
Track Compliance Status
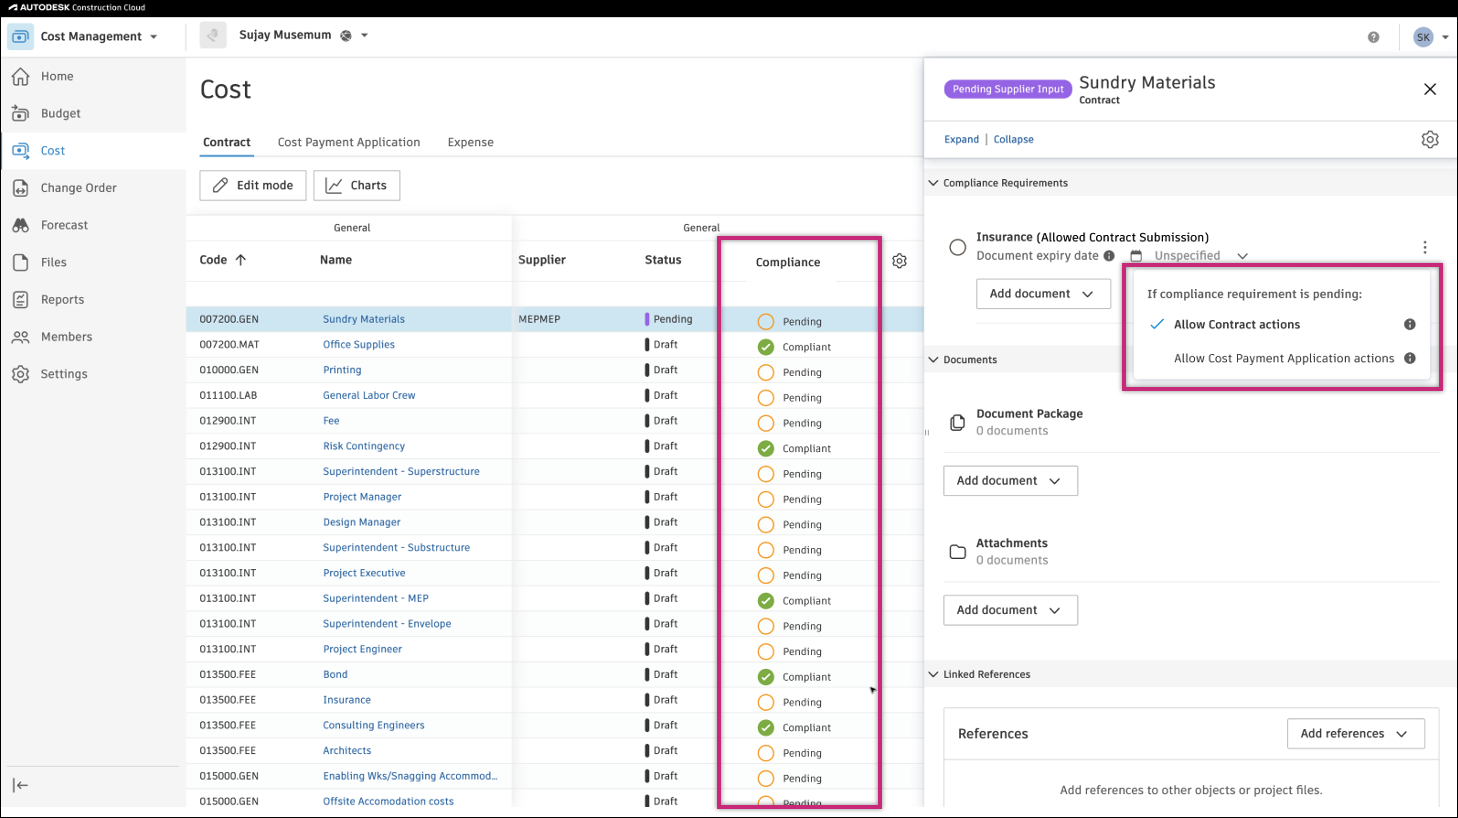
The compliance column in overview tables shows real-time status:
- Compliant: All requirements met.
- Pending: Documents needed.
- Not Applicable: No compliance requirements apply to this item.
- Not Required: Compliance requirements are not mandatory for this item.
View Compliance Status in Tables
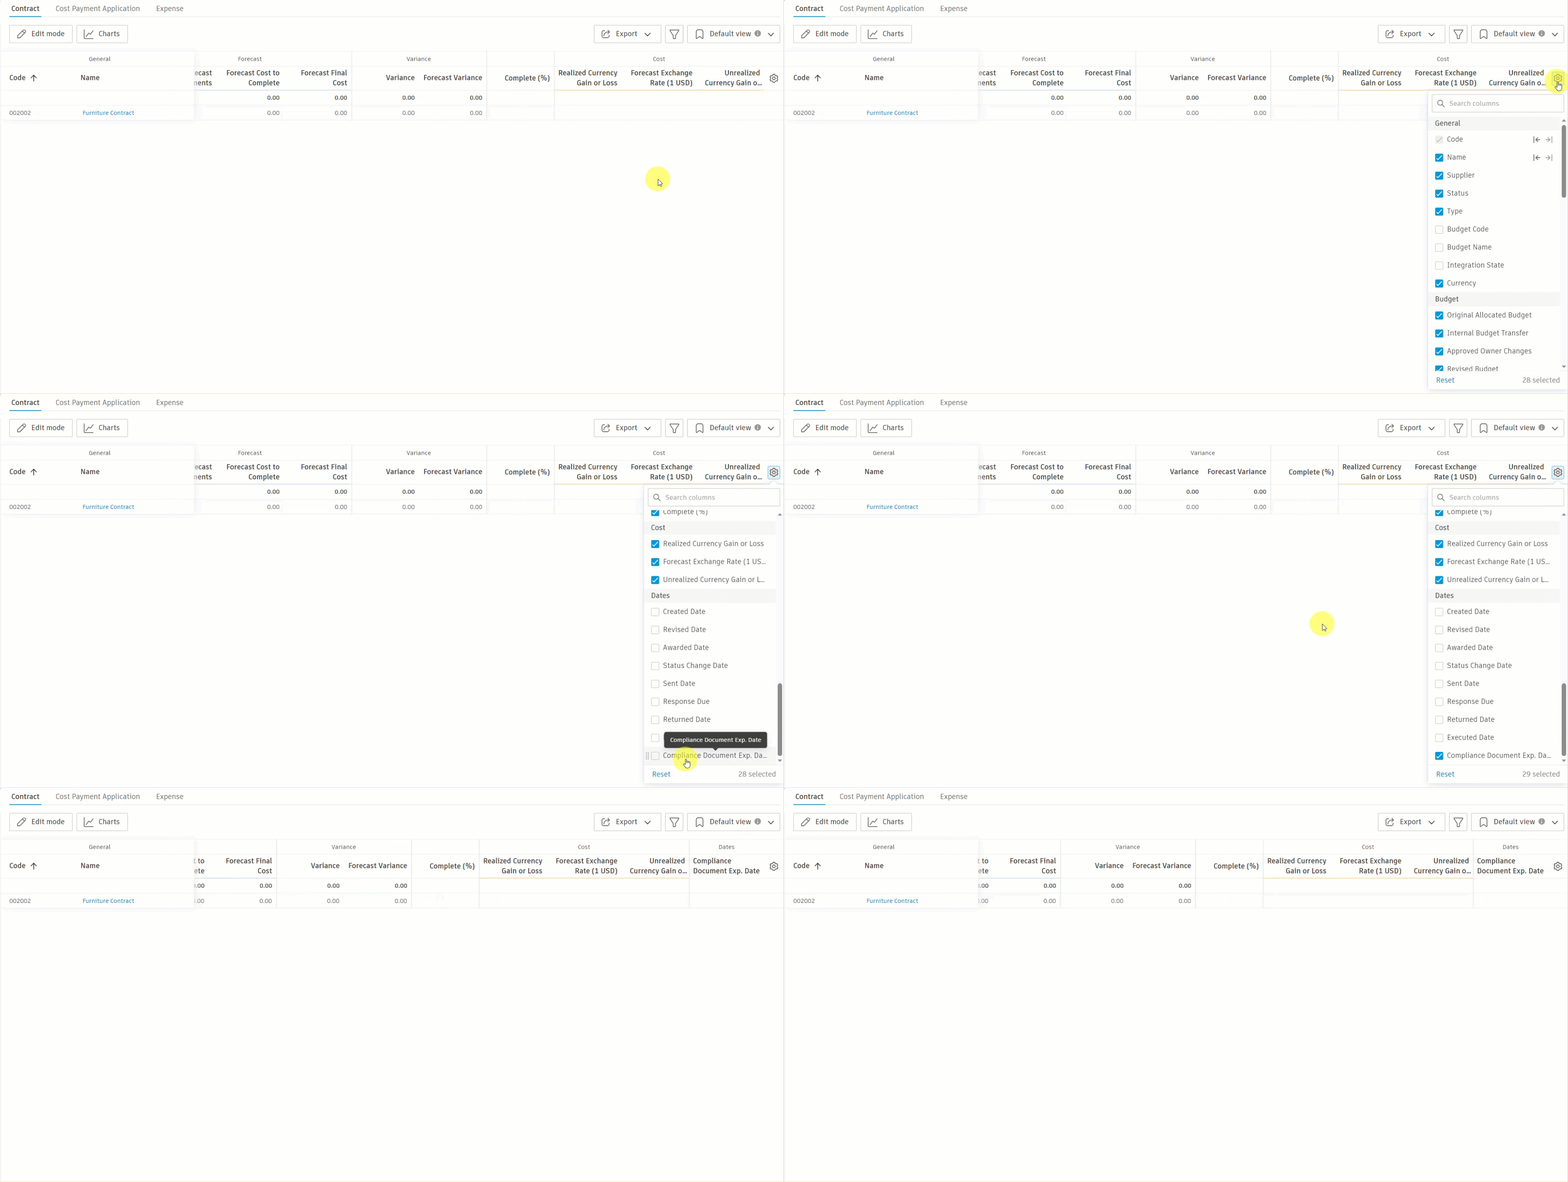
Add the Compliance Document Exp. Date column to track expiration dates:
- Go to the relevant tab (Contract, Cost Payment Applications, Budget Payment Applications, CORs, OCOs, RFQs, or SCOs) in the Cost, Budget, or Change Order tool.
- Click the
 icon.
icon. - Find and select the Compliance Document Exp. Date column.
The column appears in the Dates section. Use grouping by dates to quickly identify upcoming expirations.
Calendar Integration
Expiration dates automatically appear in:
- Project home page calendar view.
- Date-based table groupings.
- Notification systems.
Troubleshooting
| Issue | Solution |
|---|---|
| Can't submit even with documents uploaded | Check if all required compliance items have documents |
| Documents not appearing in compliance section | Ensure that documents are uploaded to the correct requirement |
| Compliance column not visible | Add the column through table settings (gear icon) |
| Can't modify uploaded document | Documents in compliance requirements have limited editing for audit purposes |
| Wrong expiration date showing | System shows the latest expiration date when multiple requirements exist |
| Contract blocked unexpectedly | Check condition-based requirements for budget code segment rules that apply to linked budgets |
| Send or Submit blocked for missing tax | Apply a tax formula in the item flyout. See Tax Formulas. |
| Value dropdown empty for Tax condition | This is expected — the Value field is disabled by design. The system checks only whether any tax is applied, not which formula was used |