Change Order Settings
Project administrators can access the settings for Cost Management from Services. This article focuses on the Change Order settings:
- Navigate to Cost Settings in Cost Management
- Number Format
- Financial Markup Formulas
- Required Fields for Change Orders
- Change Order Types
- Cost Item Types
- PCO and Cost Item Scope
- Change Order Source Types
- RFQ Approval Workflows
- COR Approval Workflows
- OCO Approval Workflows
- SCO Approval Workflows
- Compliance Requirements
- Document Templates
- Dates for RFQ, COR, OCO, SCO
- Custom Attributes
- Default Email Subjects and Messages
Navigate to Cost Settings in Cost Management
Click the Module Selector


 .
.Select the Services tab.
Select Cost Management in the left panel.
Note: If you enter Project Admin directly from Cost Management, you start in this position.The General secondary tab is selected by default. Switch to the Change Order tab.

Number Format
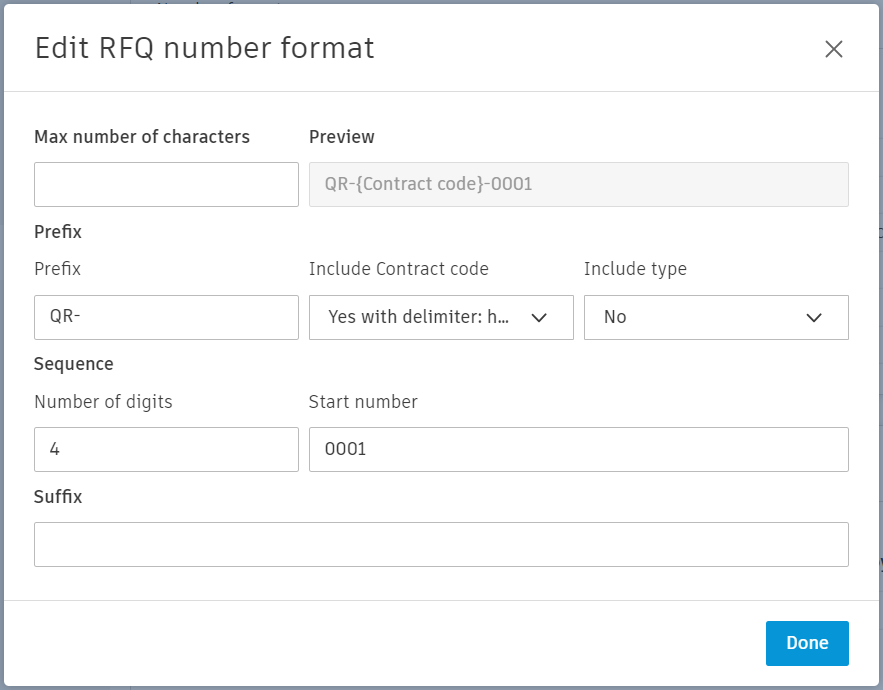
Change the number format that is generated when you create change orders and cost items.
- Click Module Selector .
- Select the Services tab.
- Select the Change Order tab.
- Expand the Number Format section.
- Select the More menu
 for the number format that you would like to define.
You can define:
- Max number of characters.
- Prefix: anything before the generated numbers.
- The number of digits and starting number. This sets how the numbers are automatically generated.
- Suffix: anything after the generated numbers.
Financial Markup Formulas
Use financial markup formulas to add calculated charges — such as bonds, contingencies, or fees — to change orders before submission to the owner. See the Potential Change Order article for an example.
Before you can apply a financial markup, a project administrator must create the financial markup formula in the Change Order settings tab.
Create a Financial Markup for a Change Order
As a project administrator, you need to create a financial markup formula:
Select the Services tab from Project Admin, and then select Cost Management in the left panel.
Switch to the Change Order tab.
Click Add in the Financial Markup Formulas section.
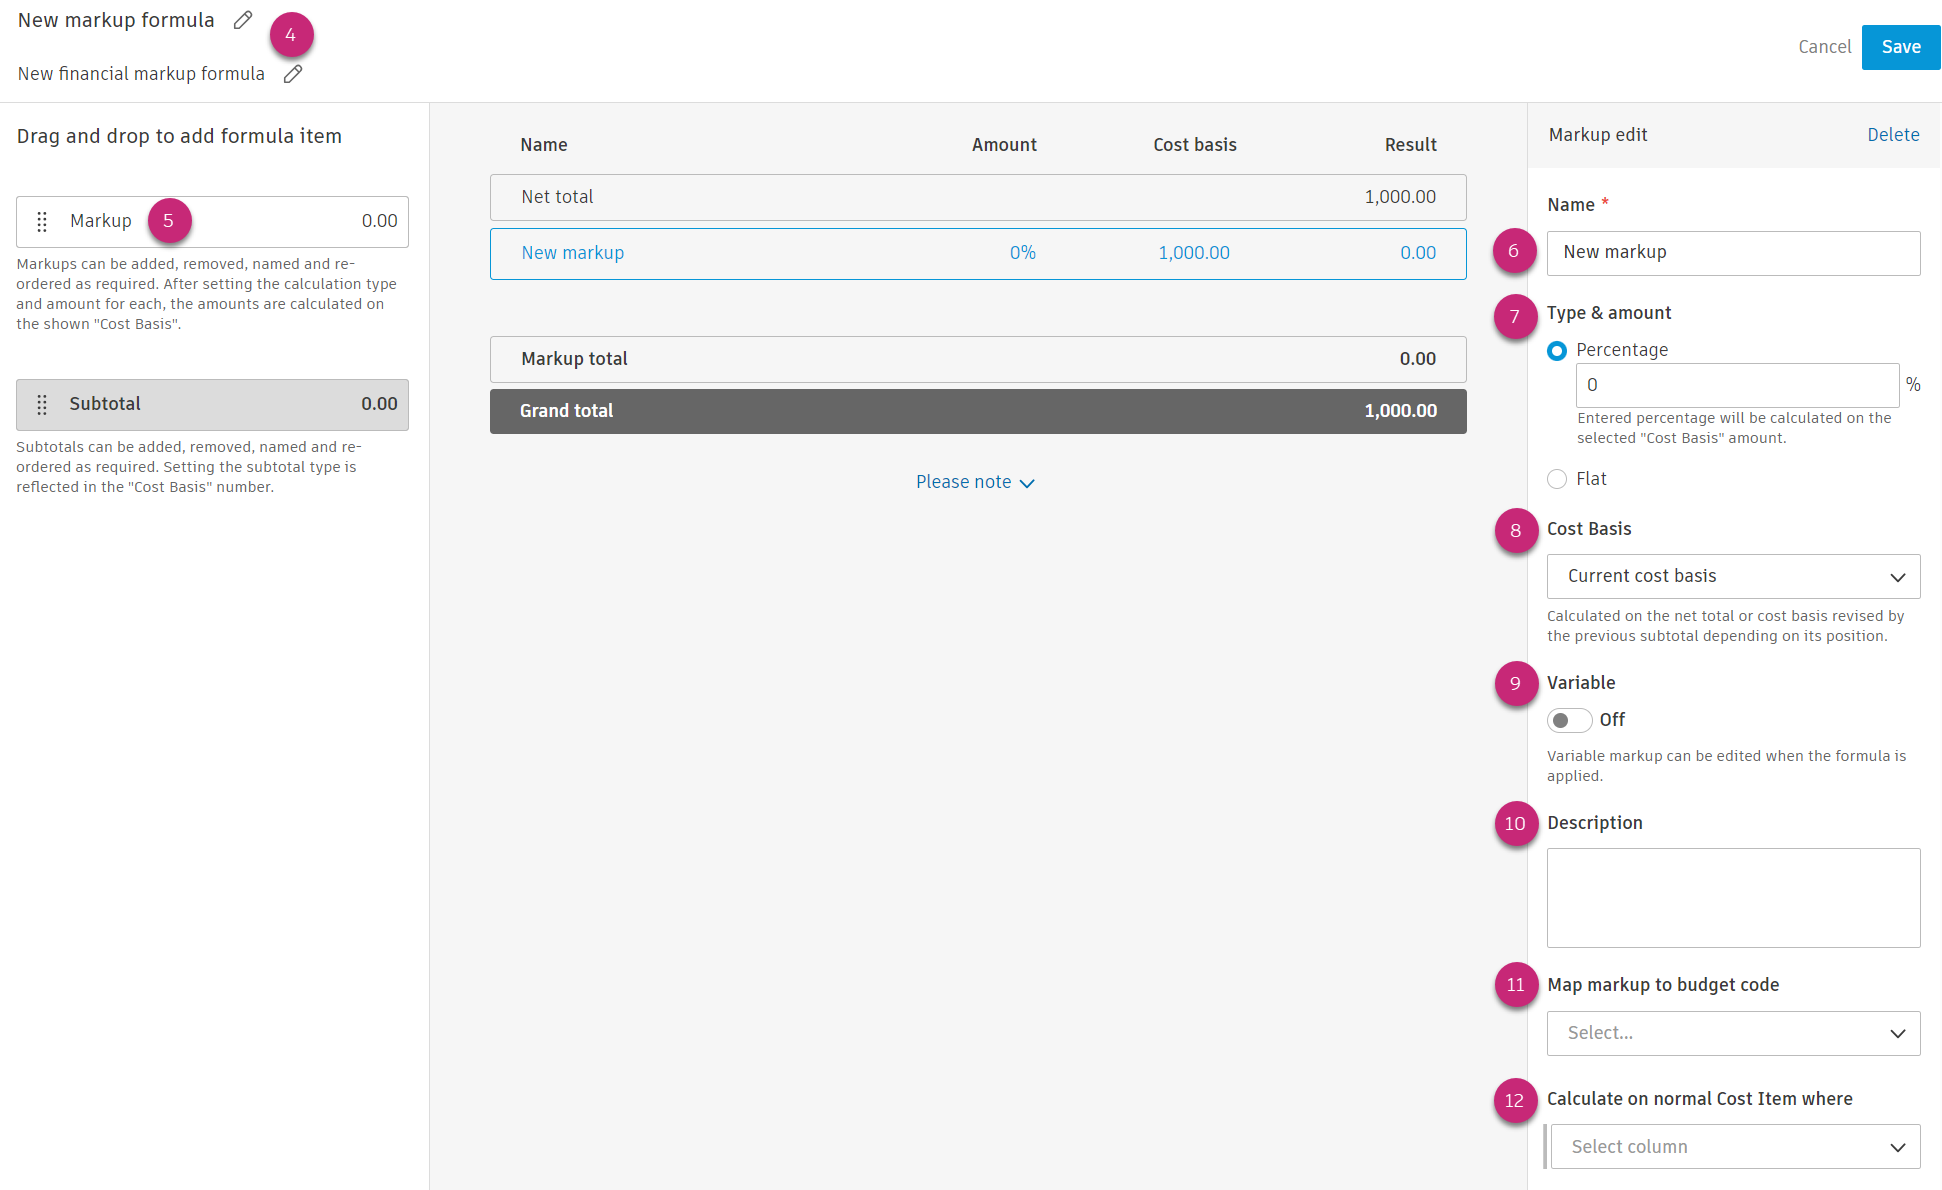
Name the new financial markup formula. You can also add an optional description by clicking the pencil icon.
Click Markup from the left panel to add it to the formula.
In the editor on the right, enter the name of the new markup.
Select the markup type and amount. Available options include:
- Percentage: Calculates the markup as a percentage of the cost basis.
- Flat: A fixed amount applied as a total for the markup at the PCO level.
Select the cost basis for the markup. Only available on percentage-based markups.
- Current Cost Basis: Multiplies the percentage and the cost.
- Net Total: Multiplies the net total amount.
- Revised Cost Basis: Multiplies the following subtotal and percentage.
- Preceding Markup Subtotal: Equals the total of all preceding markup above the selected markup, excluding the net total.
- Grand Total: Multiplies the calculated grand total and the percentage.
- Preceding Total: Calculated on the total of net total and all preceding markups.
Toggle whether the variable can be edited when the formula is applied.
Provide an optional description of the markup.
By default, markups are calculated on all budget items. Click the Map Markup to Budget Code drop-down list to make a markup only apply to a specific budget code.
Click Calculate on normal Cost Item where to select a column, operator, and value combination to apply the markup to. By default, markups are calculated on all budget items. For text columns, operators include Does not start with and Does not end with. See Filter and Group for other string filter operators in Cost Management.
To add a subtotal to your financial markup formula:
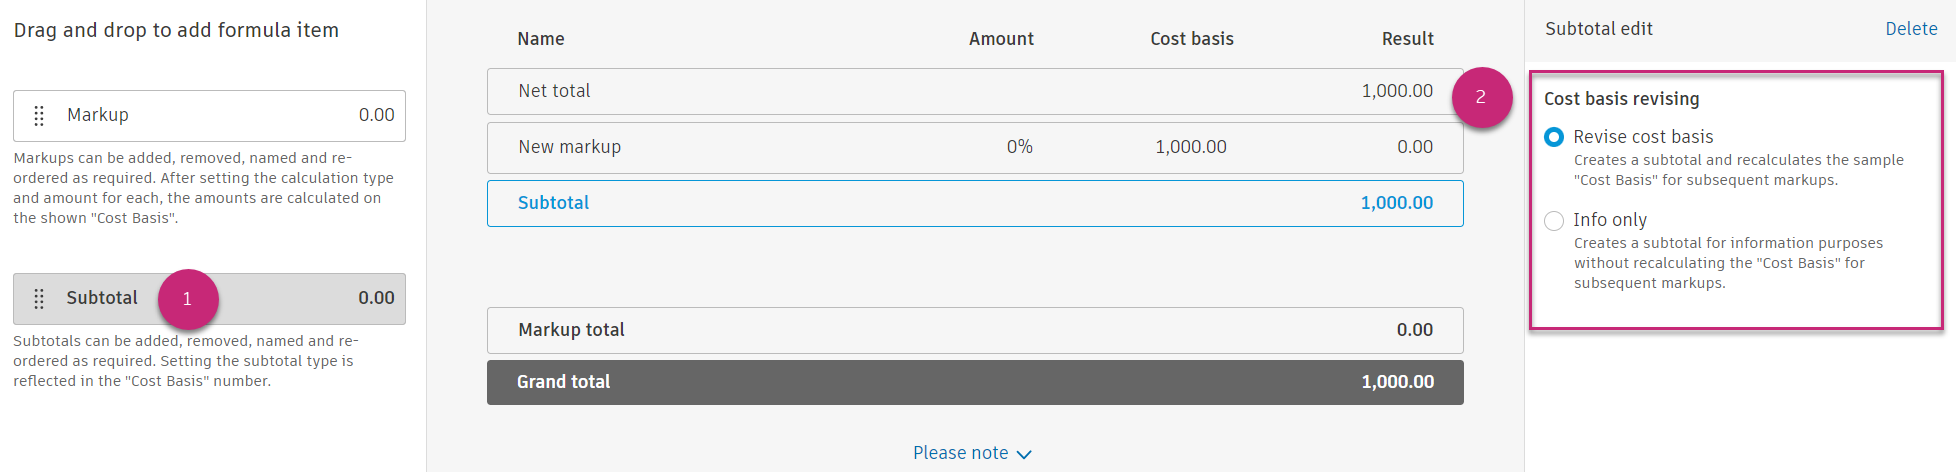
Click Subtotal from the left panel.
Select the appropriate cost basis revision. Available options include Revise Cost Basis or Info Only:
- Revise Cost Basis creates a subtotal and recalculates the sample cost basis for subsequent markups.
- Info Only creates a subtotal for informational purposes but does not recalculate the cost basis for subsequent markups.
You can add more markups or subtotals as required. After everything is ready, click Save.
After you created financial markup formula, you can decide where to use it in Cost Management. Choose between two options:
Budget Change - to calculate owner's markups in the PCO, COR (Change Order Request), and OCO (Owner Change Order) tables. This is the default option.
Cost Change - this workflow is aimed at Owners who want to calculate supplier's markups in the PCO, RFQ (Request for Quotation), and SCO tables. When this option is selected, PCO, RFQ, and SCO will have a one-to-one relationship and be associated with the same contract. This option is set as default, when in Project Process the:
- Owner has the main role,
- Change Order Request option is turned off,
- Use Potential Change Order for Change Order Requests option is turned off,
- Owner Change Order option is turned off.
Delete or Deactivate a Financial Markup Formula
To delete or deactivate a financial markup formula:
- Select the Services tab.
- Select Cost Management in the left panel.
- Switch to the Change Order tab.
- Click Deactivate or Delete in the Financial Markup Formulas section.
By clicking Deactivate, you can temporarily switch it off so it will not be used in change orders from now on. By clicking Delete, you'll permanently remove the created financial markup formula.
Required Fields for Change Orders
Project administrators can define a set of fields as required for each change order type. You can select which statuses trigger the requirement, ensuring important information is captured at the right stage of the change order workflow.
To set up required fields:
- Open Services, and then Cost Management from the left navigation.
- Switch to the Change Order tab.
- Scroll down to Required Fields.
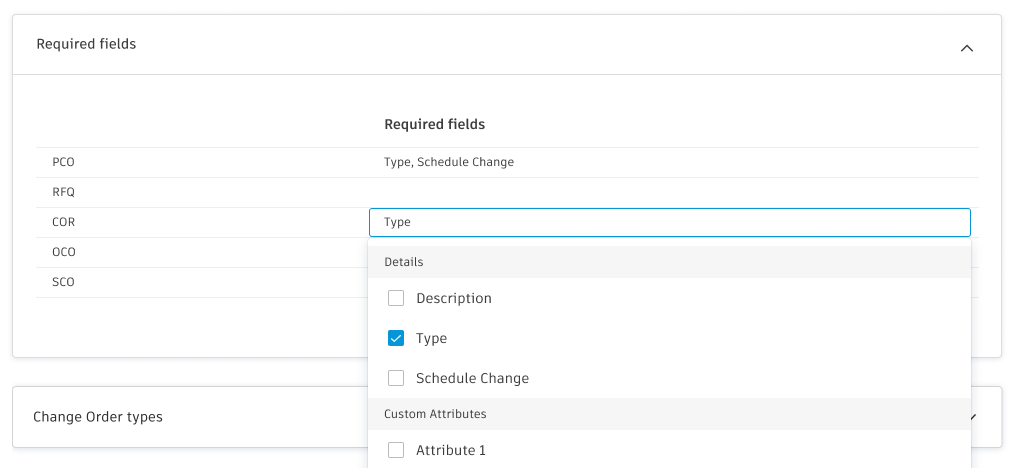
- Select the drop-down list next to the change order type (for example, PCO, RFQ, COR, OCO, or SCO).
- Click Add and choose the fields to make required. Available fields include system fields and custom attributes.
- Define when the field is required by selecting the applicable statuses in the Required for status column.
Required fields apply to all existing instances and to the ones that will be created in the future.
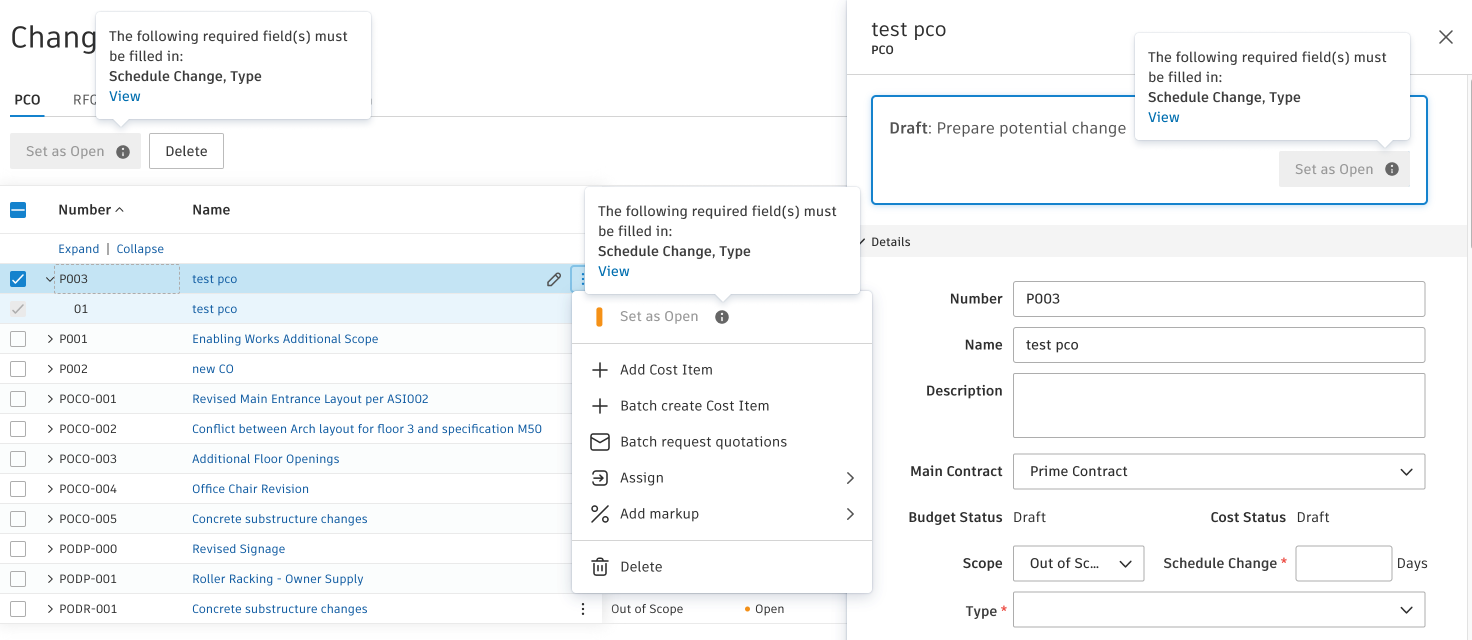
After setting it up, when advancing the status of a change order, those fields are marked as obligatory and must be filled in to proceed with the change order workflow. By clicking View, you'll be redirected to the missing data.
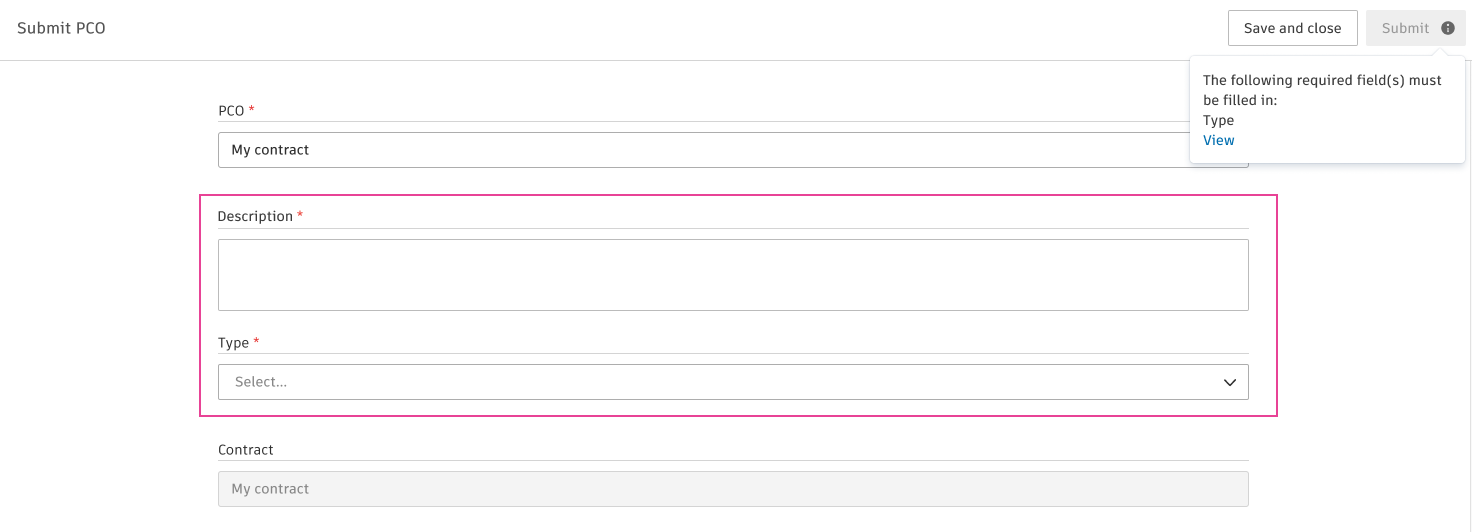
Members with collaborative access also see the required fields when submitting an RFQ (Request for Quotation). See the Collaborative Potential Change Order Workflow article to learn how to collaborate with suppliers in Cost Management.
Change Order Types
Change order types can be used to filter your budget and contract tables and be part of your change order codes. You can deactivate the default types or add your own.
To add change order types:
Select Change Order tab from Services.
Expand the Change Order Types section.
Click Add.
Enter the type name.
Enter a description.
Choose which change order module a type applies to. When you open the change order's flyout panel, you'll see this information displayed in the Type field as an option to choose for a particular change order.

Select whether a specific change order type should be set as the default option for a given change order. If a type is designated as the default for a change order, it will remain selected in the Applicable to section.
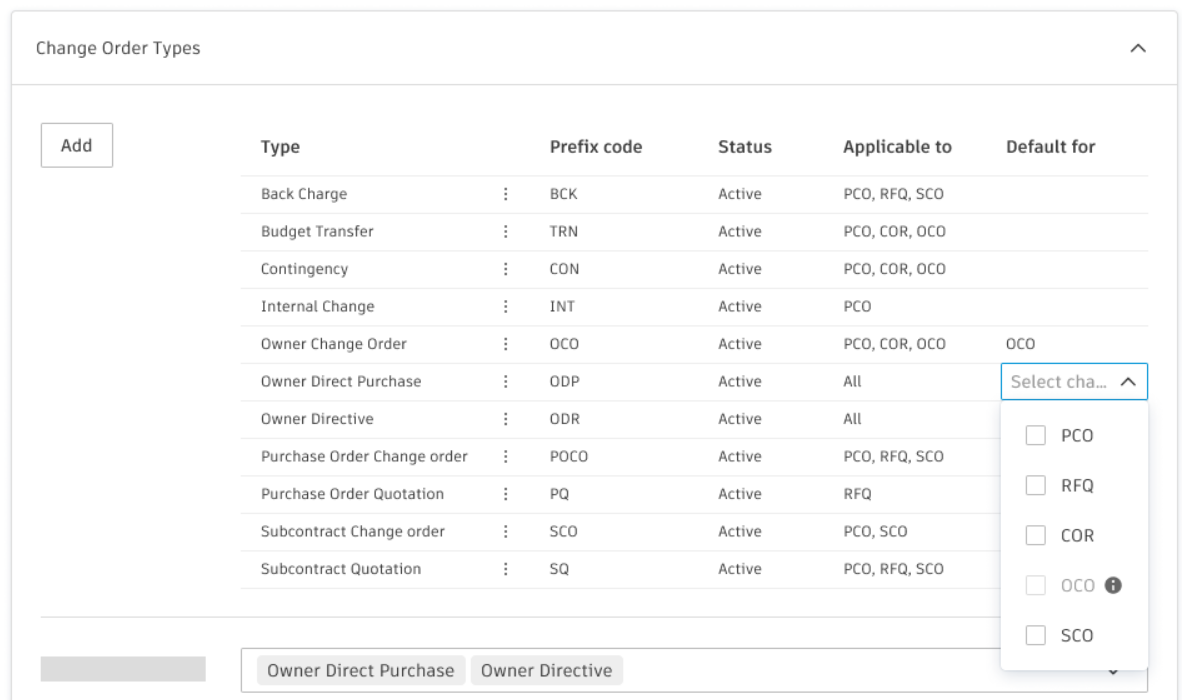
Select the More menu to deactivate undesired default types.
Change Order Pay Before Approval
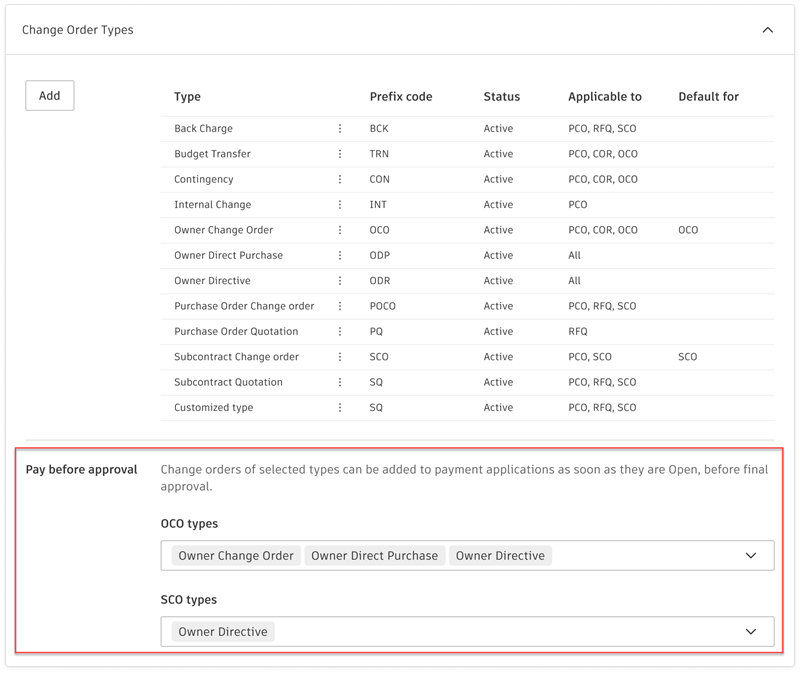
Administrators can select any OCO/SCO change order types to be manually added to Budget and Cost Payment Applications before these orders are approved. This allows the value of the change order to be edited between payment applications.
To add change order types that can be included in payment applications when they have at least Open status, before final approval:
Select the Change Order tab from Services.
Expand the Change Order Types section.
Go to Pay before approval.
Select the desired OCO and SCO types from the drop-down menu.
Cost Item Types
Cost item types help categorize and organize the different kinds of cost items used in change orders. These types allow project teams to classify cost items by their nature or purpose, such as Back Charge, Budget Transfer, Owner Directive, and others. You can add new cost item types to meet your project's specific needs or deactivate existing default types that aren't relevant to your workflow.
Cost item types work alongside cost items, which are the individual line items within change orders that track estimated, proposed, submitted, approved, and committed values as they move through the change order workflow from PCOs to final execution.
PCO and Cost Item Scope
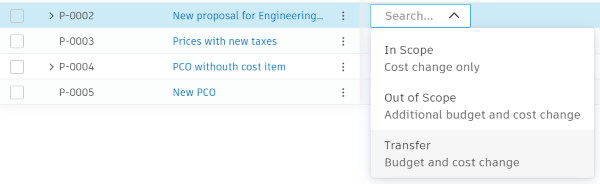
Customize the name of the change order scope so that it can suit your company's needs.
To change the name:
- Select the Change Order tab from Services.
- Expand the PCO and Cost Item Scope section.
- You can either add a customized name for the original scope or change its description.
In the example, Contingency is changed to Transfer:
Change Order Source Types
Change order source types can be used to filter your budget and contract tables and be part of your change order codes. You can deactivate the default types or add your own.
To add change order source types:
- Select the Change Order tab from Services.
- Expand the Change Order Source Types section.
- Click Add.
- Enter the type name.
- Enter the type description.
Select the More menu to deactivate undesired default types.
RFQ Approval Workflows
Streamline the Request for Quotation (RFQ) process by automating internal review of supplier-submitted pricing before the RFQ moves to Proposed or Accepted. Create multiple workflows to make sure the right people validate pricing before it's used to generate an SCO or presented to the owner.
The workflow runs when a supplier submits their response or a full control member clicks Set as Proposed. The RFQ moves to In Review while the workflow is active, and cost items inside stay in Pricing or Revise and Resubmit.
When the final reviewer approves, the RFQ moves to Accepted. If Automatically generate SCO is on for the workflow, the system also creates a draft SCO. Learn more about approval workflows.
COR Approval Workflows
Streamline the Change Order Request (COR) process by automating the workflows involved before submission. Create multiple workflows to assure thorough review and approval by all relevant parties, including the General Contractor (GC) and the owner, before the COR is officially submitted.
After clicking Submit or Set as Submitted, the COR can go into an In Review status. During this stage, reviewers can participate in a review process on a COR and select a response (Proceed, Revise, or Reject).
After the review process, mark the COR as Submitted for internal reviews or Accepted if the owner is involved. Learn more about approval workflows.
OCO Approval Workflows
Automate the workflows that an OCO (Owner Change Order) goes through before being submitted to the owner. You can create multiple workflows to make sure that the right people see an OCO before the owner is involved in the process. For example, if the value of an OCO is above a certain threshold, it may require a manager's approval.
Key features for OCO workflows:
Default step names: When creating OCO workflows, the default step names are Review 1, Review 2, Review 3, etc. You can customize these names as needed.
Collaborators as reviewers: External collaborators with Collaborate, Full Control, or Admin permission can be added as reviewers in OCO workflows. This enables architects, consultants, and other upstream stakeholders to participate in the review process before items are submitted to the owner.
Action upon completion: Configure what happens when the final reviewer approves the OCO:
- Submitted (default): The OCO status changes to Submitted, indicating it's ready for owner approval.
- Approved: The OCO status changes directly to Approved, bypassing the need for separate owner approval. This is useful when the workflow includes the final decision-maker as a reviewer.
Reject response: Reviewers with Collaborate, Full Control, or Admin permission can select Reject as a response, which returns the OCO with a Rejected status.
Learn more about approval workflows.
SCO Approval Workflows
Automate the workflows that an SCO (Supplier Change Order) goes through before being submitted to the supplier. You can create multiple workflows to make sure that the right people see an SCO before the supplier is involved in the process. For example, if the value of an SCO is above a certain threshold, it may require a manager's approval.
Learn more about approval workflows.
Compliance Requirements
Compliance requirements ensure that specific documents or conditions are met before change orders can be submitted or processed. You can set up different compliance requirements for CORs (Change Order Requests), OCOs (Owner Change Orders), RFQs (Request for Quotation), and SCOs (Supplier Change Orders) to maintain project standards and regulatory compliance.
To define compliance requirements for change orders:
Select the Change Order tab from Services.
Click the Compliance Requirements drop-down list.
You can add compliance requirements by clicking Add next to the desired change order type: COR, OCO, RFQ, or SCO. After clicking Add, the respective requirement window opens.
Add the name and description of the requirement. These will be seen in the Compliance Requirements section in the change order details panel.
Choose the Compliance type when the dialog shows it:
- Document: Requires document submission before the change order can be processed (available for OCO, RFQ, and SCO).
- Condition: Sets a condition that must be met (available for COR, OCO, RFQ, and SCO). For tax-based compliance, set Tax and Is applied in the condition row.
CORs do not show Compliance type for tax-only requirements. Configure the condition row after you enter a name.
For document-based compliance requirements:
Requires a document is a default option. You can choose an extra option Requires document expiration date. See the Set Expiration Dates section in the Compliance Requirements article for more information.
Choose to which type the compliance should be applicable:
- For COR and OCO: Select the applicable main contract type (for example, Cost Plus, Fixed Price, Unit Price, or custom types) or main contract name.
- For RFQ and SCO: Select the applicable contract type.
If a compliance requirement is pending, project administrators can block or allow actions:
- Block COR actions / Allow COR actions: Controls whether CORs can be submitted without meeting the requirement.
- Block OCO actions / Allow OCO actions: Controls whether OCOs can be submitted without meeting the requirement.
- Block RFQ actions / Allow RFQ actions: Controls whether RFQs can be sent without meeting the requirement.
- Block SCO actions / Allow SCO actions: Controls whether SCOs can be sent without meeting the requirement.
This option is useful when your workflow requires mandatory document submission before a change order can be sent for review or approval. Only the general contractor or a member with full control permission can override compliance conditions. After you set Allow actions, the compliance requirement is optional.
For condition-based compliance requirements (available for COR, OCO, RFQ, and SCO):
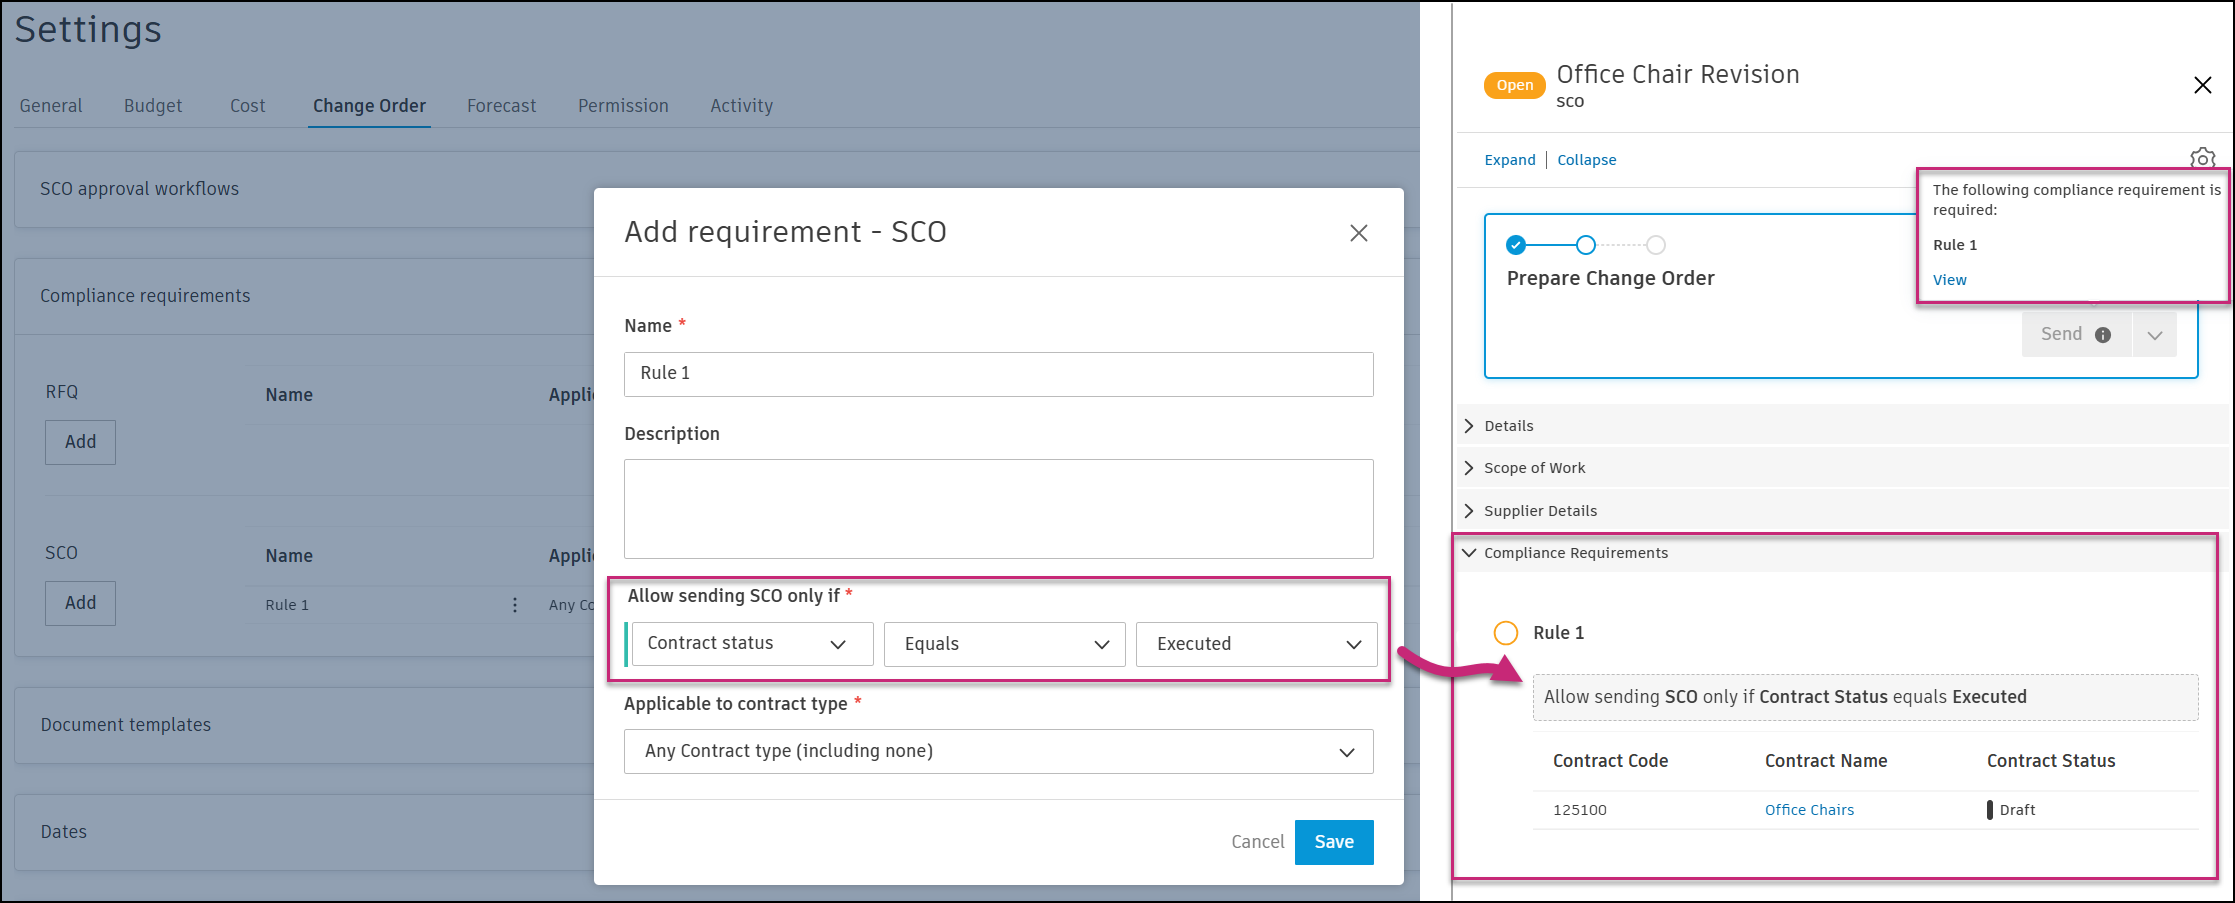
- Set a condition on which the compliance will be based. For example, require tax-based compliance by choosing Tax and Is applied, or create a condition where you can't send SCOs unless the contract is in an Executed status.
- Choose applicability (for example, main contract type for CORs and OCOs, or contract type for RFQs and SCOs).
Click Save when finished.
After adding a compliance requirement in Services, whenever compliance is not met during the workflow, you'll see a notification: The following compliance requirement is not fulfilled followed by a list of unmet requirements.
See the Compliance Requirements article to learn how to work with these types of documents.
Edit compliance requirements
By clicking the More menu next to the compliance requirement, you can choose from the options:
- Edit - Opens the Add Requirement window where you can make edits
- Move Up or Down - Moves the item up or down the list within the flyout panel
- Deactivate – Inactivates the item at any time, even if a requirement instance exists
- Delete - Deletes the item but enabled only when there is no requirement instance
Document Templates
Create templates that generate documents for your various change orders. Learn about setting up document templates. Learn about variables that can be used in document templates.
Dates for RFQ, COR, OCO, SCO
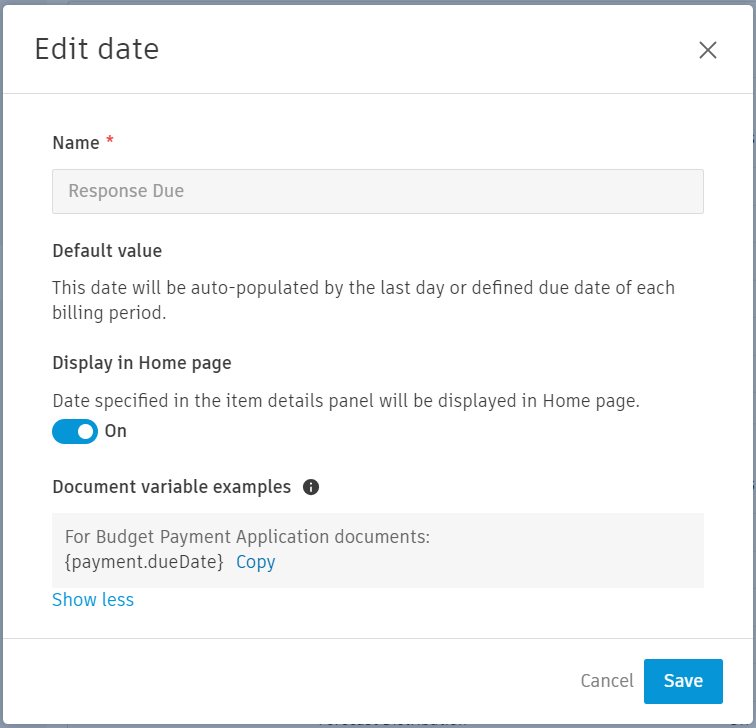
You can define a default value for dates and choose to have them displayed on the home page. This will help you manage the schedule in Cost Management. To do so, open the More menu and click Edit.
can't be displayed on the home page and can't be edited.If applicable, you can choose the default value for the date. Use the relative date option for cases where an activity is relative to the date of another activity (for example, creating a procurement schedule). The relative date option is only available for editable system-generated dates and custom dates. For example, here you can select the number of days that a response is required for an RFQ (Request For Quotation).
Available document variable examples are shown by clicking Show More. You can use those to prepare document templates.
Custom Attributes
Add custom attributes to the different change order types. Learn about creating custom attributes.
Default Email Subjects and Messages
Customize default email subjects and messages for change order communications. These defaults apply when you send or submit items for review—not for e-signature signing notifications.
To edit a default email template:
- In Services, select Cost Management and open the Change Order tab.
- Expand Default email subjects and messages.
- In the table, open the More menu for a template and click Edit.
- In the Default template window, update Subject and Message.
To add dynamic variables:
- Click in Subject or Message.
- Click Insert variable next to the field.
- In the Quick select variables list, choose a variable to insert it at the cursor.
- To browse additional variables, click Access more variables from your project's Variable Finder in the list. The Variable Finder opens so you can search, preview data, and copy variable syntax.
- Mix variables with static text.
Variables resolve when the email is sent. Invalid or inapplicable variables for that communication type are left blank. Sending is not blocked. See Variables in Cost Management for the full list of available variables.