Upload and Publish Documents
Upload and publish:
Drawing and design files (including PDFs, IFCs, DWFs, linked Revit files and DWGs with xrefs)
Supporting documents (for example, calculations and configuration files)
Note: Supporting documents come in multiple file formats and complement design files with additional or version-specific information. Refer to the Supported Files topic for more information.
Organize specific versions of your documents into sets in a way consistent with best practices for Document Management in the AEC industry.
Upload and Publish Files
Use this method for non-linked PDFs, drawings, design, and other supported files. The workflow for uploading PDFs differs from other files, as you can specify a title block (layout template) during upload. If you are uploading several individual PDFs at one time, you can assign the same title block to all documents.
You can also add documents to a set during the upload to organize specific versions of your documents. Uploading and publishing consists of the four following workflows:
1. Upload
In the Folder tree, select the folder you want to upload files to.
Click the Upload files drop-down menu and select Upload file.
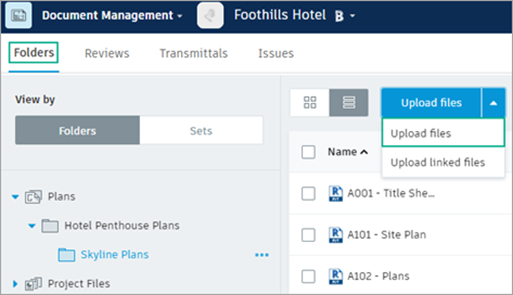
Navigate to the file on your computer that you want to upload and select it for upload.
Tip: You can also drag and drop a file from your computer into the BIM 360 folder.Note: To select multiple files, press Shift+Click or Ctrl+Click.Select Add Files to upload additional files.
If you are uploading files to Project Files, the files will go through a two stage process to check if they can be uploaded and viewed once uploaded. Files may display the following errors:
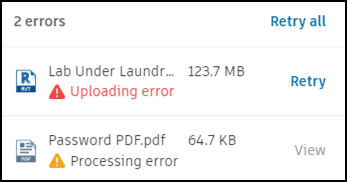
Stage Checks Checks successful Checks unsuccessful Uploading Files are checked to see if they are supported and that there are no network or server issues affecting the upload. Files display in the relevant folders. You can manage them with the usual file actions. However, you can't view the files or complete actions in the viewer until the files have passed the Processing stage. You can click Retry to attempt this stage again as any issues may be resolved. Processing Once files have passed the Uploading stage, they are checked to see if they can be opened in the viewer. A file may error if, for example, it's password protected. You can use and view the file. The file can't be:
- Viewed in the in-product viewer
- Used in a file comparison
- Marked up
However, you can still view PDF files using the Open in browser option, and share the file with others who can download it for viewing.Note: If the folder is enforced by the naming standard, the file names will need validating. See Upload Documents to a Naming Standard Enforced Folder to learn more.
2. Select Layout Template
If you are uploading PDFs to the Plans folder, in the Layout Template column, select a template (title block) or select New Title Block. Alternatively, continue with no template and specify it later.
 Download source file.
3. Select or Create Set
To add the document versions to a set:
Click Set not specified.
Choose Publish to a new set to create a new set (project administrators only). If you choose this option, provide a Set name. The Issuance date is optional.
Optionally, choose Publish to an existing set if your set already exists.
Tip: If you have multiple sets, use the search box to quickly find the set you need.Click Continue.
Tip: See Document Sets for more information.
You can also watch this video to learn more about how to add documents to a set.
4. Publish
Select Continue. Your files are then processed and published. A Results dialog box is displayed when completed.
Tip: When uploading documents to the Project Files folder that consist of multiple pages, sheets, or views, you can open the individual pages in the viewer that have already been extracted, while the others are still processing. Refresh the viewer to update the pages that can be viewed.Note: You can move and make copies of files that are being processed. In the Folders view, select Copy or
  Move from the top toolbar.
Select Show to view the published files in your folder.
Upload and Publish Linked Files
Upload linked Revit files or AutoCAD files that include xrefs. You must specify the parent or host file, which will be linked to the child file data.
In the Folder Tree, select the folder you want to upload files to.
Click Upload
Linked Files.

Either:
- Select the parent (host) file, or
- Press Shift+Click or Ctrl+Click and select all files to be linked (parent and child).
In the Linked Files Upload dialog box, select Add files and choose additional (child) files if necessary.
In the Parent File column, which appears after upload is complete, check the parent file
Continue.- Your linked files are then processed and published. A Results dialog box is displayed when completed.
Select Show to view the published files in your folder.