Work with Checklists
Quickly add checklists to your project using your checklist templates.
View/Edit
- Click the Module Selector
 Field Management.
 - Click Checklists.
- Click a checklist in the list to open it for viewing or editing.
- Edit and make your changes.
- When done, click Save.
Filter
From the checklist instance log, click the Filters icon to open the menu of issue filters.
Select one or multiple filters.
- Type
- Template
- Status
- Location
- Assigned To (includes both checklist and section assignee)
- Final sign-offs
- Created on
- Last updated
- Scheduled
- Started on
- Completed on
- Checklist ID
- Archive status
When filters are active, you'll see the green Filtering is on button.
Create
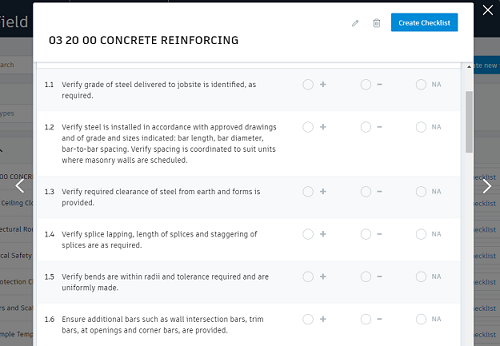
You can select from your project's checklist templates for specific evaluations in the categories of Quality, Safety, Punchlists, and Commissioning. There are two ways to create a checklist from a template.
When you create a checklist in a project, it's given a Checklist ID. This can be used in the search, sort, and filter features to quickly find the specific checklist on web. On mobile, you can search for Checklist ID as well.
From the checklist instance log:
- Click the Module Selector
 Field Management.
 - Click Checklists.
- Click Create Checklist.
From the template log:
Click the Module Selector
 Field Management.
Click Templates.
Do one of the following:
In the template list, to add a checklist for a template, click Create Checklist.

Click to open a checklist template. Click Create Checklist.
Item Capabilities
When an item has a problem you can provide more information through the following actions:
- Add a photo with the camera icon
 .
. - Add a note with the paper icon
 .
. - Create an issue to alert others of the problem.
Close and Reopen Sections
Once all required items in a checklist section have been completed, a Done button for the section becomes active. Click Done to close the section, which signals that the section is complete and ready for review.
If you need to make changes to a closed section, open the section and attempt to make a change. You will be prompted to reopen the section. Click Reopen and make the required changes, then close the section again.
Add or Remove Documents
When editing a checklist, you can add documents from Document Management in BIM 360 or upload them directly from your local machine.
Open a checklist to any section and click Documents in the drawer on the right-hand side of the screen.

Drag and drop a file from your computer to add it to the checklist. Or click Browse in order to select files from Document Management.
Checklist Activity Log
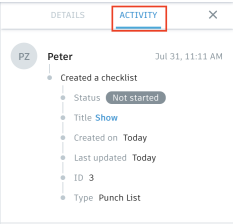
All activity on a checklist is tracked on its activity log. This allows you to see everything that happened on a checklist, including who made changes and when those changes occurred.
To view a checklist's activity log,
- Select the checklist from the checklist instance template.
- Click the Activity tab on the right detail drawer.

Click Show to reveal specific details about a checklist's title, description, responses, or document-link actions.
Activity tracking data for checklists began on August 31, 2021. Checklist activity that occurred after that date will be recorded in the activity log, but activity that occurred prior to that date will not appear in the log.
Archive and Restore Checklists
You can archive checklists when you no longer need them to appear in your project's lists of active checklists. This helps organize your checklists, and you can always view or restore archive checklists if you need to. Archived checklists will not sync to mobile devices. Only completed checklists can be archived.
To archive a checklist, open the checklist and click the archive icon in the upper-right corner. Confirm the action, and the checklist will be archived.

You can find archived checklists using a filter. To restore a checklist, open in and click the restore icon in the upper-right corner. Confirm the action, and the checklists will be restored.

Bulk Actions
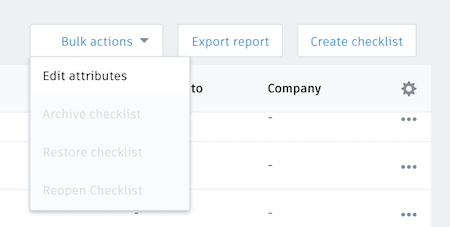
Bulk actions allow you to edit, archive, restore, or reopen multiple checklists at one time. The availability of these actions depends on checklists status:
- Bulk editing can be done for checklists marked "not started" or "in progress."
- Bulk archiving can be done for checklists marked "completed."
- Bulk restoring can be done for checklists marked "archived."
- Bulk reopening can be done for checklists marked "closed."
For bulk actions to be available, you must select multiple checklists. Once you've selected two or more checklists that you want to perform a bulk action on, click the Bulk actions button from the checklist log.

Next, select the action you'd like to perform. When you confirm the action, changes will be applied to all of the checklists you selected.
It's possible to perform bulk actions on multiple pages of checklists using filters. Set the filter you want to use, select the checklists on the page, and then navigate to subsequent pages to select additional checklists. Now bulk actions will apply to the selected checklists on all pages.
Export Checklist Summary
Project Admins have the ability to export checklist summaries.
To export a checklist, first select checklists you'd like to include from the checklist log. Then click the Export report button and select XLSX report.
Next, you'll be able to choose a title for the report. Once you've added a title, click Create Report. Your XLSX will download when it's been generated, and you'll be sent an email containing the report as well.
Note Checklist report generation is only available to project administrators.