Checklists (Android)
Create, manage, review, and monitor your workflows throughout a project using checklists. You can create Quality, Safety, Punch List, and Commissioning checklists from existing templates. You can also complete checklists, and create issues from non-compliant items.
This topic includes the following sections:
- Sync Considerations
- View a Checklist
- Download a Checklist
- Create a Checklist
- Complete and Filter Checklists
- Edit a Checklist
- Remove a Checklist
Sync Considerations
Note the following sync-specific considerations:
If your device has been synced to the project with the most recent version of checklist templates, you will be able to create and fill out checklists while offline.
To work with the checklists offline, you first need to download them to your Android device.
For more information on Checklist capabilities using the Android app, see Mobile Capabilities.
View a Checklist
Open the BIM 360 mobile app.
Tap the project that you want to open.
Tap
 .
.If no checklists have been downloaded, the Available tab opens by default. If at least one checklist has been downloaded, the workflow begins on the Downloaded tab.
To view or complete your checklist offline, you first need to download the checklist to your device. When no checklists have been downloaded, the Available tab opens by default. If at least one checklist has been downloaded, the workflow begins on the Downloaded tab.
Download a Checklist
These instructions assume that you're downloading your checklist for the first time.
Tap
. On the Available tab, click the download icon
 next to the checklist that you want to download.
To automatically select all checklists at the same time:
- Tap the more menu
 at the top right of the screen
 - Tap Select checklists
- Select the SELECT ALL checkbox
- Tap the more menu
Once a checklist has been downloaded, it appears on the Downloaded tab, marked with
 icon.
icon.
Create a Checklist
To create a checklist:
Tap the plus icon at the bottom right of the screen

Tap the template that you want to use.
Enter a title.
Optionally, select an assignee, location, and specify a due date.
Tip: You can assign by a member, role, or company. Assignees receive an email notification with a link to the checklist.Tap CREATE at the top right of the screen.
Complete and Filter Checklists
Tap Checklists
 .
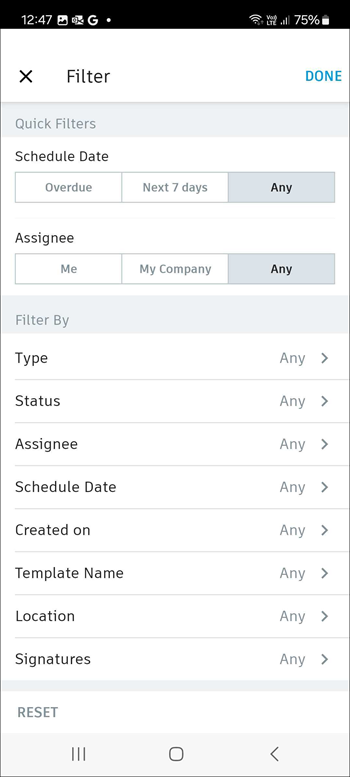
.To filter your checklists, tap FILTER on the right of the screen. The Filters panel is made up of two parts:
Quick Filters: You can quickly filter by Schedule Date (Overdue, Next 7 days, Any) or Assignee (Me, My Company, Any)
Filters: You can filter by type, templates, status, location or sublocation, assignee, schedule date, signature, or creation date, tap Filters
 .Note:
An assignee can be one of the following: member, role, or company. When you filter by assignee, the checklist is filtered by both the checklist assignee and section assignee.
After you apply filters, tap DONE at the top right of the screen.
On the Downloaded tab, tap the checklist that you want to complete.
Tap the ITEMS tab.
As you perform your inspection, review the criteria for each item and tap an appropriate response.
- To create an issue for non-compliant items, tap Issue. For more details, see Issues (Android).
- To attach a photo, tap Photo. You can upload an existing photo or take a new one.
- To attach a note, tap Note.
- To view files attached to the checklist, tap the blue link displaying the name of the file you want to open.
To complete each section, tap DONE, and then tap MARK AS COMPLETE at the bottom right of the screen.
You may need to submit your signature to complete a checklist. In the Signature/Final sign-offs section, tap the Tap to sign box, and draw your signature. If needed, hand the device to the person whose signature is required.
Tip: To delete a signature, tap .
. 
Tap CREATE.
Tap MARK AS COMPLETE at the bottom right of the screen.
Edit a Checklist
To edit a checklist, you first need to download it to your device.
- On the Downloaded tab, tap the checklist that you'd like to edit.
- Tap pencil icon
 at the top right of the screen.
 - Edit checklist details as required. You can edit a title, assignee, locations, and a schedule date.
- To add a document from Plans or Project Files folders, tap Add Document.
- Tap Done.
Remove a Checklist
You can remove a checklist from your local device while still keeping it in the project.
- On the Downloaded tab, tap the More menu at the top right of the screen.
- Tap Select checklists.
- Tap the checkbox next to the checklist that you'd like to remove.
- Tap the More menu again.
- Tap Remove from downloads.
- To remove all checklists:
- Tap the More menu at the top right of the screen
- Tap Select checklists
- Select the Select all checkbox
- Tap the More menu > Remove from downloaded
- Tap the More menu
For more information about how to enable signatures for checklist sections, see Create Checklist Templates. You can also refer to the Templates and Checklists topic to learn more.