Markups (iOS)
Create, style, view, edit, and otherwise manage markups in 2D documents and 3D models. For more information on markup capabilities using the iOS app, see Mobile Capabilities.
Visually appealing markups can help you designate areas for which you need to convey detail that would be difficult to describe by other means. For example, you can use markups to communicate incorrect room dimensions, or to designate a small space in a complex office plan that is currently open but needs to be closed off to create an additional room.
Note the following markup-specific considerations:
You can create private and public markups. Private markups can be created by members with View permissions (or higher) and can only be seen by their creator. Members with Edit permissions (and above) can public markups. Markups set to Publish can be seen by all project members. To learn more about folder, file, and shared task permissions, refer to the following topics:
By default, markups are private. To make a markup visible to all project members, tap a small arrow next to Private markup and then tap Published markup.
Create Markups
Tap to open a document or a model.
Tap Markup
 .
.Choose a desired tool from the markup toolbar at the bottom and start creating your markup.
Tip: To create the same markup, in the quick access toolbar tap Duplicate. To delete a markup, tap Delete.Use the styling options available in the styling toolbar at the bottom to apply desired line, fill, and text style.
Note: The available styling options depend on the tool you're using.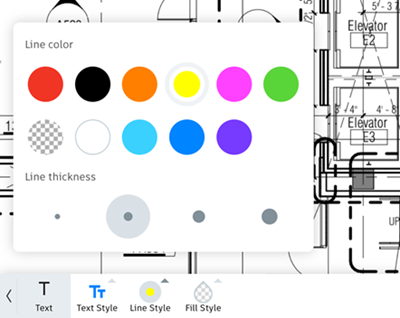
Tap the drop-down list in the top left corner of the screen and choose whether to create a private or public markup.
Tap Done.

Edit Markups
In the viewer, click a markup you want to edit to display the quick access toolbar.
Tip: As an alternative, tap
 Markups, then tap
  Edit next to the markup you want to edit.
From the quick access toolbar, select Edit.
Tap on the markup shape to edit.
Use the tools from the styling toolbar to make your changes.
Tap Done.
Tip: To change markup status, tap on the markup, and from the quick quick access toolbar select Publish/Archive.
Manage Markups
To view all markups associated with a 2D document or 3D model:
- Tap to open a document or model.
- Tap Markups. The list of markups is displayed.
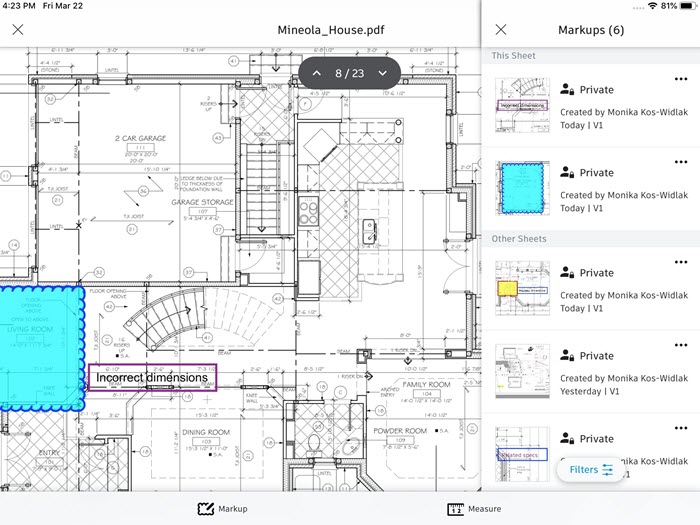
To filter markups by status or creator, tap Filters
 .
.To delete a markup, tap
Delete.Note: You can delete only private markups. Public markups can only be archived.To edit a markup, tap
Edit.To publish a private markup, tap
Publish.To archive a public markup, tap
Archive.