Issues (iOS)
You can create and manage issues related to 2D documents and 3D models, at the document or project level.
Note the following issue-specific considerations:
- You can create and assign issues while you are online or offline.
- Only issue creators and project administrators can set an issue to Closed when the work is completed.
- By default, the status of newly created issue is set to Open.
- Project administrators control all permissions associated with viewing and creating issues. For more information about how issue permissions work, see Issue Permissions.
- For more information on issue capabilities using the iOS app, see Mobile Capabilities.
Create a Document-level Issue
Create issues in 2D documents or 3D models.
Tap to open a document or model.
Tap
 Issue.
In the viewer, tap a location where you want to place an issue pin. If a project administrator mapped areas to locations the location field automatically populates.
In the New Issue form, use the Type Field to specify the issue type and sub-type.
Note: Issue types and sub-types are configured by project administrators in the Project Admin module of the BIM 360 web application.Specify the issue status.
Note: The status options available depend on the settings made by your project administrator within the Project Admin module. For more details, see Issues.Enter a title.
You can optionally add a description of the issue.
For Assigned to, you can assign by users, roles, or companies. Assignees will receive an email notification with a link to the issue.
If needed, add a location, edit location details, and specify the due date of the issue.
Note: Locations can only be added by project administrators in the Project Admin module of the BIM 360 web application.You can optionally specify the issue owner and the root cause, including custom root cause specified in the Project Admin module of the BIM 360 web application.
To attach a photo, tap
 . You can upload an existing photo or take a new one. You can also add markups to photos during upload, using the pen tool.
When done, tap Create.
A round pin representing the issue appears in the viewer at the specified location. The color of the pin corresponds to the issue status.
Create a Project-level Issue
Create issues that aren't associated with a specific location in a 2D document or 3D model, but with a project.
- Tap to open a project.
- Tap
 Issues.
 - Tap
 .
. - In the New Issue form, follow Steps 4-12 from the Create a Document-Level Issue section above.
View Document-level Issues
View issues associated with a 2D document or 3D model.
- Tap to open a 2D document or 3D model.
- Tap

 Issues.
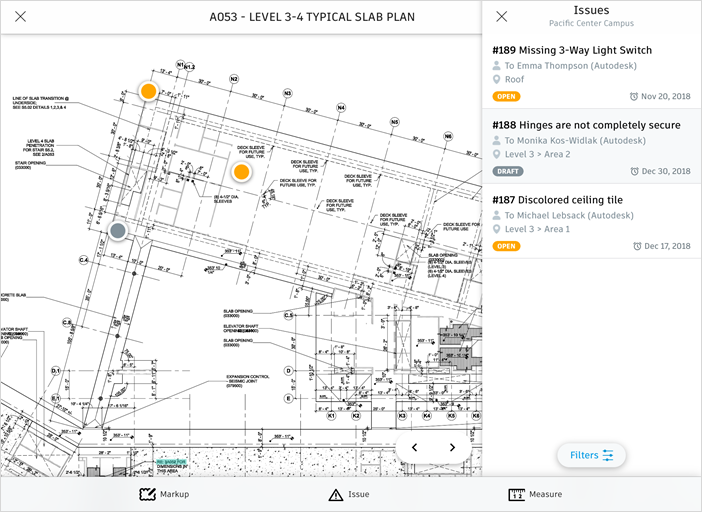
The list displays the issue number and title, assignee, location, status, and due date if these fields have been specified.
View Project-level Issues
View issues associated with a project.
- Tap to open a project.
- Tap Issues.
The list displays the issue number and title, assignee, location, status, and due date if these fields have been specified.

Manage and Edit Document-level Issues
Manage and edit issues associated with a 2D document or 3D model.
Tap to open a 2D document or 3D model.
Tap
Issues.To filter the issues by type or subtype, status, location or sublocation, assignee, or due date, tap Filters
 .
.Tap an issue to edit it.
Tip: You can also tap a pin on the viewer to edit your issue.To change the issue status, tap
 and select a new status.
To attach a photo, on the Details tab tap
 . You can upload an existing photo or take a new one.
On the Details tab, update the issue details as desired.
Tap the Activity tab to view the activity associated with the selected issue.
Optionally, enter a comment in the field at the bottom of the tab, and tap
 .
. In the comment field, you can mention a user, role, or a company using autocomplete, as follows:
- Type '@' and start typing the name you want to address.
- Choose a user, role, or a company from the list of suggestions.
- Tap . A notification is sent by email.
Tap an attachment to view it.
Manage and Edit Project-level Issues
Manage and edit issues associated with a project.
- Tap to open a project.
- Tap Issues.
- To filter the issues by type, status, location, assignee, due date, or root cause, tap Filters .
- Follow Steps 4-11 from the Manage and Edit Document-Level Issues section, above.