| Quick Start |
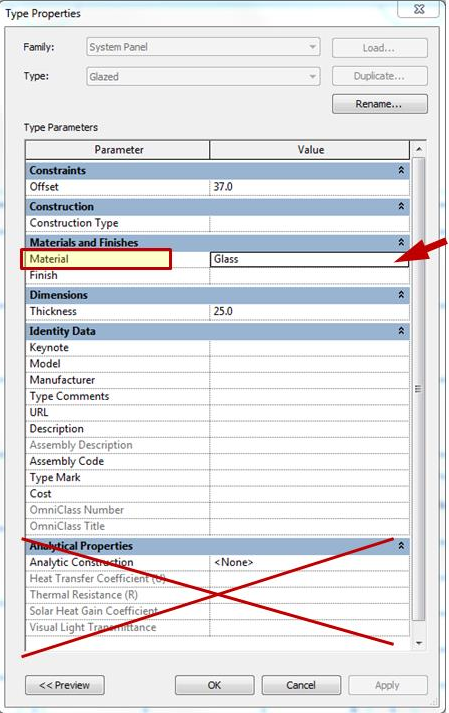
- Select the glass pane to which you want to assign material properties and From the Properties editor, select Edit Type.
- From the Material and Finishes category, click on the "…" in the Value column for Material (or select window and in the properties window from Materials and Finishes select "…" in front of glass).
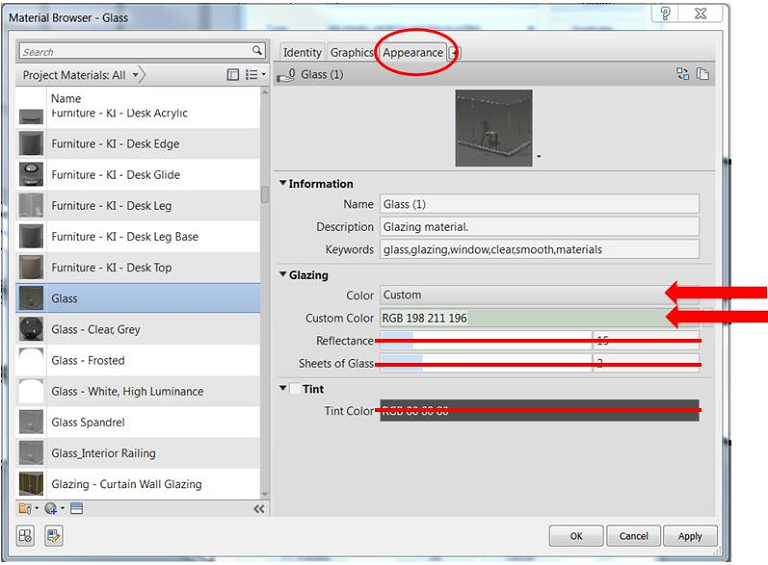
- In the Material Browser dialog box go straight to the Appearance tab.
- Note that T-Vis should be set by changing ONLY the Custom Color parameter. In the Color field, select Custom.
- Set the RGB value with the help of the following table and its description in the Detail Workflow section.
| Detail Workflow |
- Select the glass pane to which you want to assign material properties. From the Properties editor, select Edit Type. The Type Properties dialog box will appear. You’ll want to change the properties associated with the Material. Note: The Analytical Properties of the glass is only used in energy analysis and does NOT affect illuminance analysis results (even though visible light transmittance appears like it might be used in the rendering – it is NOT).

Also note that, depending on how the family is built, this material parameter might have a different title or be in a different parameter category.
- Click on the “…” in the Value column for Material. The Material Browser dialog box will appear.
- Go straight to the Appearance tab. This tab is used to determine the physical properties of the materials used in the rendering. Any changes made in the Graphics tab will ONLY affect the appearance of the object on the design canvas; it will not affect the rendering.

- From the Appearance tab, the only settings used in the illuminance renderings are the Color field under Glazing (accessible when you choose a Custom color – and explained below in “Setting the T-Vis of the glass”). Note: The Reflectance is NOT used for the illuminance rendering. Instead 360 Rendering uses a pre-defined value of ~4%. At this time Revit is unable to support other values.Note: T at this time, the diffusing effect of light passing through frosted or fritted glass is not supported by Revit's materials. Sunlight passing through the glass will always have sharp edges. Beware that this can give the impression of harsh light and glare - even if the glazing would effectively diffuse it in the real world.
Sheets of Glass is also not used for the rendering as 360 Rendering uses the actual model geometry. So, for example, if the layered construction of the window includes two panes of glass, the illuminance rendering will consider the combined effect of both panels (based on the "color" defined).
- The visible transmittance (T-Vis) of glass in the rendering is currently calculated from the Color and Tint values ONLY. However, it is best practice NOT to use Tint, meaning T-Vis should be set by changing ONLY the Custom Color parameter.
To set the T-Vis of your glass for illuminance renderings in Revit, Autodesk recommends setting RGB values to always be EQUAL. This is for simplicity's sake and should not affect analytical results given that illuminance is measuring the QUANTITY of light, not the QUALITY or color of that light.
The T-Vis of the glass will depend not only on the color you define, but also on the THICKNESS of that glass and how many panes there are. You can use the table below to approximate a T-Vis appropriate to the actual glazing geometry modeled in Revit.
For example, if you have modeled a double pane window with geometry that is 3mm thick for each pane, and you want the T-Vis of the window assembly to be 70%, you would specify R50, G50, B50. A "perfectly clear" piece of glass will have a T-Vis of about 92%.
 To use this chart:
- Determine the thickness of the window pane geometry in your Revit model and the number of panes modeled (single, dual, etc.)- this is the ROW
- Determine the T-Vis value you'd like to simulate - this is the COLUMN
- Set the "color" of the glass material in your Revit family to have RGB values that are each equal to the number in the CELL you've identified (high numbers are more transparent; low numbers are more opaque). Note: The values in this table may change with RaaS updates as we improve these workflows. Be sure to check back so you have the most accurate T-Vis values for your glazing.
The actual T-Vis derivation for a single pane glass is calculated as:
Tvis = 0.9216 * 10^( thickness_in * log_10( (color / 255)^2 ) )
Where:
- thickness_in = the thickness of the pane in inches (note: there is currently a bug in Revit that overestimates the thickness of glass. This bug is taken into account in the table above)
- color = value in the Revit dialog [0-255] based Note: For multiple panes the leading constant changes.
The table above calculates the inverse of this function. The equation is derived from the physics of light transport in glass. It combines the Beer-Lambert law of transmission and the Fresnel equations (which are used to calculate the leading constant: 1-R). The renderer implements these physical equations because they automatically account for things like directional variation in reflectivity and transmissivity and greater absorption in thicker panes of glass. Further it ensures that glass is always handled in a physically correct and consistent manner.