Add a Model to Create Assets
Before you begin, the models you want to import assets from must first be uploaded to the Files tool. Learn more in Upload Files.
To create assets from an uploaded model:
In the Assets tool, click
 on the right of the top header, and select Models from the drop-down list.
On the Models tab, click Add model.

Select the model that you want to import assets from. You can use the search box, or expand the Project files folder to browse the folders in the Files tool.
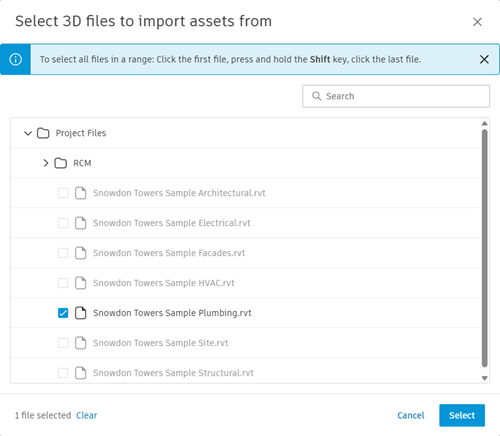 Note: The file types supported for model-based workflows in Assets are 3D RVT, DWG, IFC, and NWC files. Specifically, the file types supported are the same as those supported for clash detection in Model Coordination.
Click Select to add the model to the Models tab.
Click the model and then click Create assets on the right panel.

Step 1 - Choose an asset category that you want to use and click Import assets for that category.

Use the Import assets window to define your import rules for mapping.

First, select whether you want to import composite objects, child objects, or both from the Composite objects drop-down menu.
Note: A composite object is a group of individual model objects, or child objects, that represent a single object. Composite objects are defined in the authoring tool and can't be created or edited in Build.Search for or select an option from the Property drop-down list to specify the property you want to use.
Select a Condition and Value for your import rule.
Click Add a rule to add another rule for importing into the selected category. Select the And or Or option to determine how the rules work together.
When you've finished defining rules, click Show results to show the assets that will be included in the category based on the rules.
Review the included assets and your rules, then click Save to continue.
Repeat these steps to map assets to another category, or click Next to map properties.
Step 2 - To map model properties to asset fields, click Map properties next to an asset category.

Select an asset field, and search for a model property to map to the field. For example, selecting the Description asset field and choosing Type Name as the property will map type name properties from the model to the Description field in each asset that is created.

Select the Push updates option next to any asset fields that you want to automatically update when changes are made to the corresponding model property.
When you've mapped asset fields to properties as required, click Save.
Click Review changes.
Step 3 - Review the assets that will be imported. You can click the numbers in the Create, Update, and Detach columns to get an overview of how many assets will be added, updated, or detached based on your import.

- Optionally, select the Delete checkbox next to any assets that you want to remove from the project rather than leave as detached.
Click Apply changes to start the import process. Use the Pending updates dialog box to monitor the progress of the import.
When complete, the imported assets will appear on the Assets tab. Here, you can review and update asset details, and use them to start tracking and completing your workflows.
You can also visually track these assets in the model using the Files tool. Learn how in Track Assets in Models.