Work with Budgets
Discover how to create and manage your project's budget using the Budget tab. You can configure and customize your budget, track expenses, and forecast completion costs. Gain greater control over your project's financials and stay on top of your budget throughout the project lifecycle.
Quick Navigation
- Getting started? See Budget Tab Overview to understand the interface.
- Need to edit budgets? Go to Budget Edit Mode or Edit the Budget.
- Updating multiple items at once? See Batch Edit Budget Fields.
- Tagging budgets with classification codes? See Tag budgets with classification codes.
- Moving money around? Use Transfer a Budget Item, Transfer from Forecast Adjustments, or Create Change Order Transfers.
- Making adjustments? Jump to Create Forecast Adjustments.
- Tracking performance? Check Visualize Budget Data or Check Actual Cost.
- Administrative tasks? See Lock and Unlock the Budget or Export a Budget Report.
In this article:
- Budget Tab Overview
- Budget Edit Mode
- Add a Budget
- Edit the Budget
- Tag Budgets with Classification Codes
- Batch Edit Budget Fields
- Transfer a Budget Item
- Visualize Budget Data
- View Connected Change Orders
- Create Contracts from the Budget Tab
- Create Change Order Transfers
- Check Actual Cost in the Budget Summary
- Disable Cost Side on Selected Budget Lines
- View Currency Gains and Losses within Budget Overview
- Create Forecast Adjustments
- Lock and Unlock the Budget
- Export a Budget Report
- Related Articles
- More Resources
Budget Tab Overview

Click the
 icon to open the budget edit mode. There you can add a budget item and a subitem.
Create snapshots to easily compare budget data through time.
See the charts for budget and cost trends.
Click the budget name to open the flyout panel. In the flyout panel, you can edit a budget, see more details, create, and manage forecast distributions.
Click the More menu
 to:
to:- See actual cost from direct input, approved expense, or cost payment application.
- Add or edit forecast adjustments.
- Create a Main Contract SOV.
- Do an internal budget transfer.
- Do a change order transfer.
Learn more about the five main sections of the Budget and Contract tables.
Hover over the column's name to understand the logic behind them. Some of the values are also described in the Budget and Contract Tables article.
Lock your original budget to avoid accidental change. Only project administrators can lock budget. Learn more about it in the Budget Settings article.
Export a PDF or Excel report of your budget.
Tip: The Filter and Group tool may be helpful to create a more formatted report.Search through the budget table by code or name. Available for members with View All or Full Control permissions.
The Filter and Group tool helps to arrange efficient views of your data and create clear and legible reports.
See your saved views or create ones for quick access to budget data.
Control column order and visibility with the
 icon.
icon.
Budget Edit Mode
Members with the Full Control permission for budgets can edit the budget. If the budget is locked, only project administrators are able to make edits. Once the original budget is locked, it cannot be undone. Some of the budget functionalities may be performed only with the budget in edit mode.
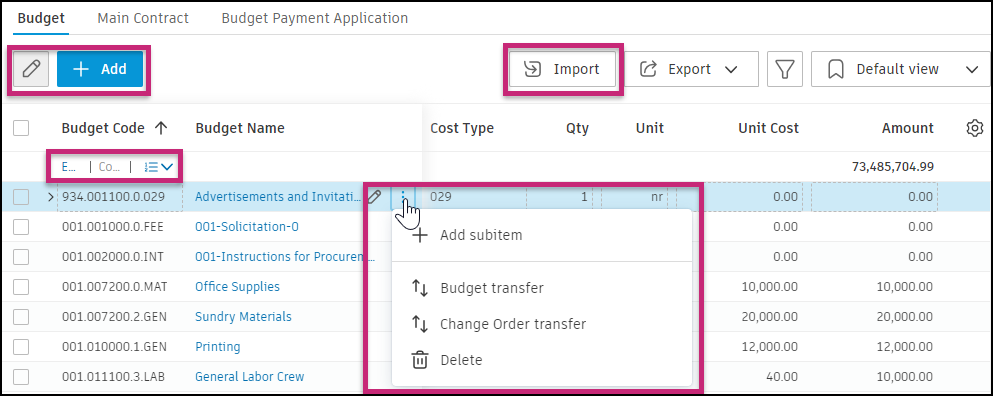
Select Add to manually enter new budget items. For more information, see the Create a Budget article.
Click Import to download a budget import template with helpful tips. Once downloaded and filled up, you can click this button again to import a finished budget Excel file. For more information, see the Create a Budget article.
Click Export to export a budget report.
Search budget table by code or name.
The Filter and Group tool helps to arrange efficient views of your data and create clear and legible reports.
See your saved views or create ones for quick access to budget data.
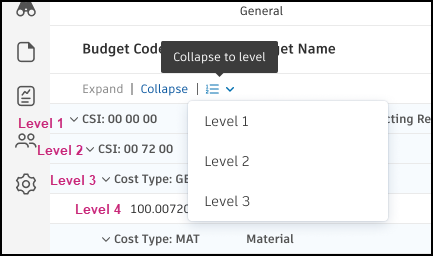
You can either expand or collapse the list of items. You can determine if you want them to collapse to which level.
Within each budget item, select the pencil icon to edit the budget name.
Click the More menu
to add or delete an item. For more information, see the Create a Budget article.Click within the Quantity, Unit, Unit Cost, Amount, Input Qty, and Location columns to add or edit the information.
By selecting one or more items, you can:
- Batch edit fields across the selected items
- Create a main contract SOV
- Allocate to contract
- Perform a budget or change order transfer
- Delete items
Note: There is no restriction on hierarchy levels. The totals from all child items are rolled up to the parent and divided by the parent quantity to provide a unit cost. This allows visibility into how the budget number was derived.
Add a Budget
To add a budget, see the Create a Budget article, where you'll find all the helpful tips and tricks.
Edit the Budget
The default budget view is a view-only version. To enter the Edit mode, click in the Budget tool.
You can edit the budget in several ways:
- Click Import to import an existing budget spreadsheet.
- Click Add to add individual budget items.
- Click the budget name for an existing item to open the details panel where you can edit the Name or Description fields. You can also tag the budget with classification codes.
- Select the Is Markup checkbox to tag the budget item as a markup budget. Markup budgets are typically derived from estimated budgets and calculated from formulas. Use this flag to filter and group budget items by markup status.
- Click into any editable field in the budget to make the required edits. Editable fields appear with a boxed outline when you hover your cursor over them.
- If necessary, hover your cursor over a budget item and click the More menu on the right side of the screen to delete a budget item.
Click the Edit icon again to return to the default view-only state.
Tag Budgets with Classification Codes
See Classifications in Cost Management for the full workflow.
After a project administrator assigns classification structures to the Cost Management project, members with permission to edit budgets can tag line items in the budget flyout.
Classification codes are optional. You can create and save a budget without selecting a code.
To tag a budget with a classification code:
Open the Budget tool and click a budget name to open the flyout.
Expand Classifications (below Budget Code Details).
For a structure, click the Code cell.
In the hierarchical picker, select a code, or click Clear to remove a code.
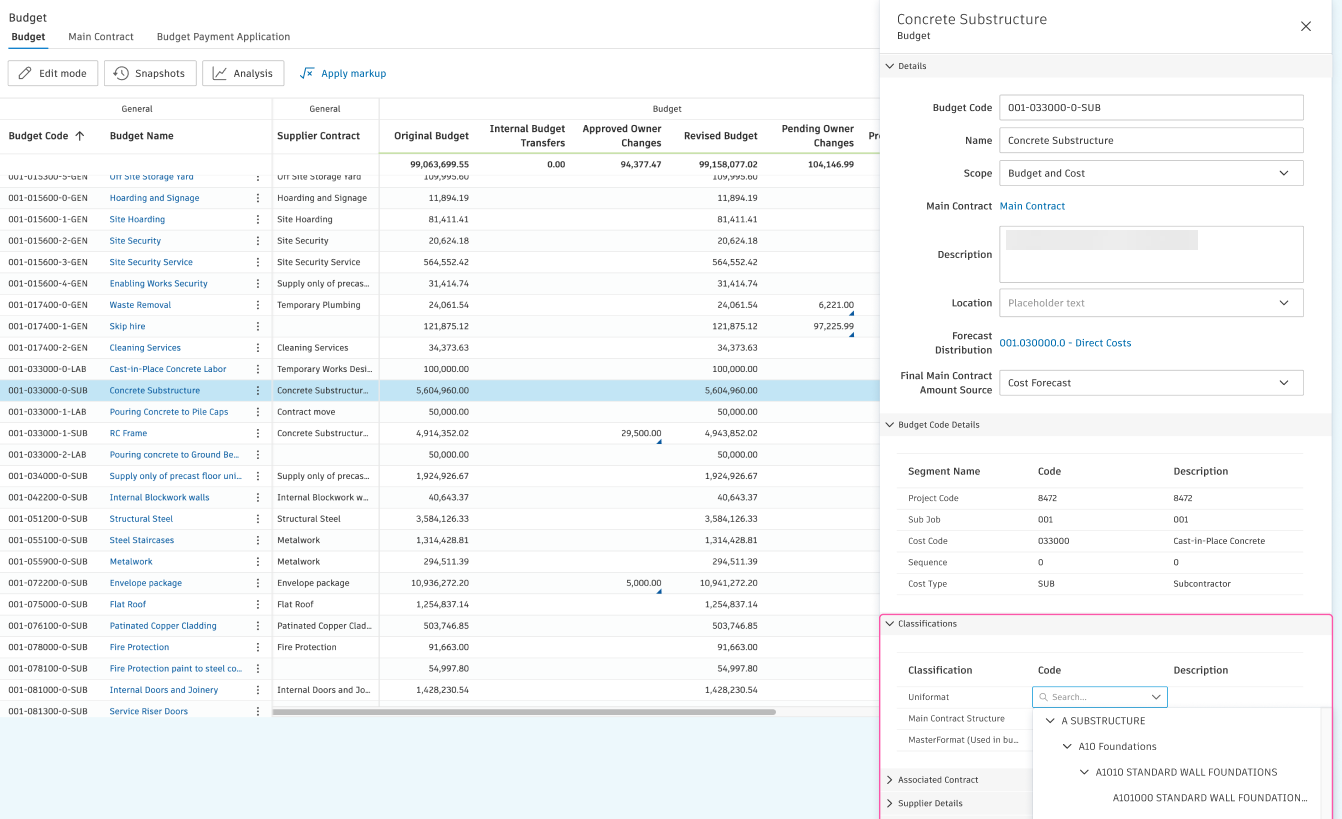
Each assigned structure appears as its own row. A budget line item can have at most one code per structure.
Batch Edit Budget Fields
Instead of updating budget items one at a time, you can select multiple items and edit their fields in one action. This is useful when you need to apply the same unit, scope, location, or custom attribute value across several budget line items. You can also batch edit classification codes when structures are assigned to the project.
To batch edit budget fields:
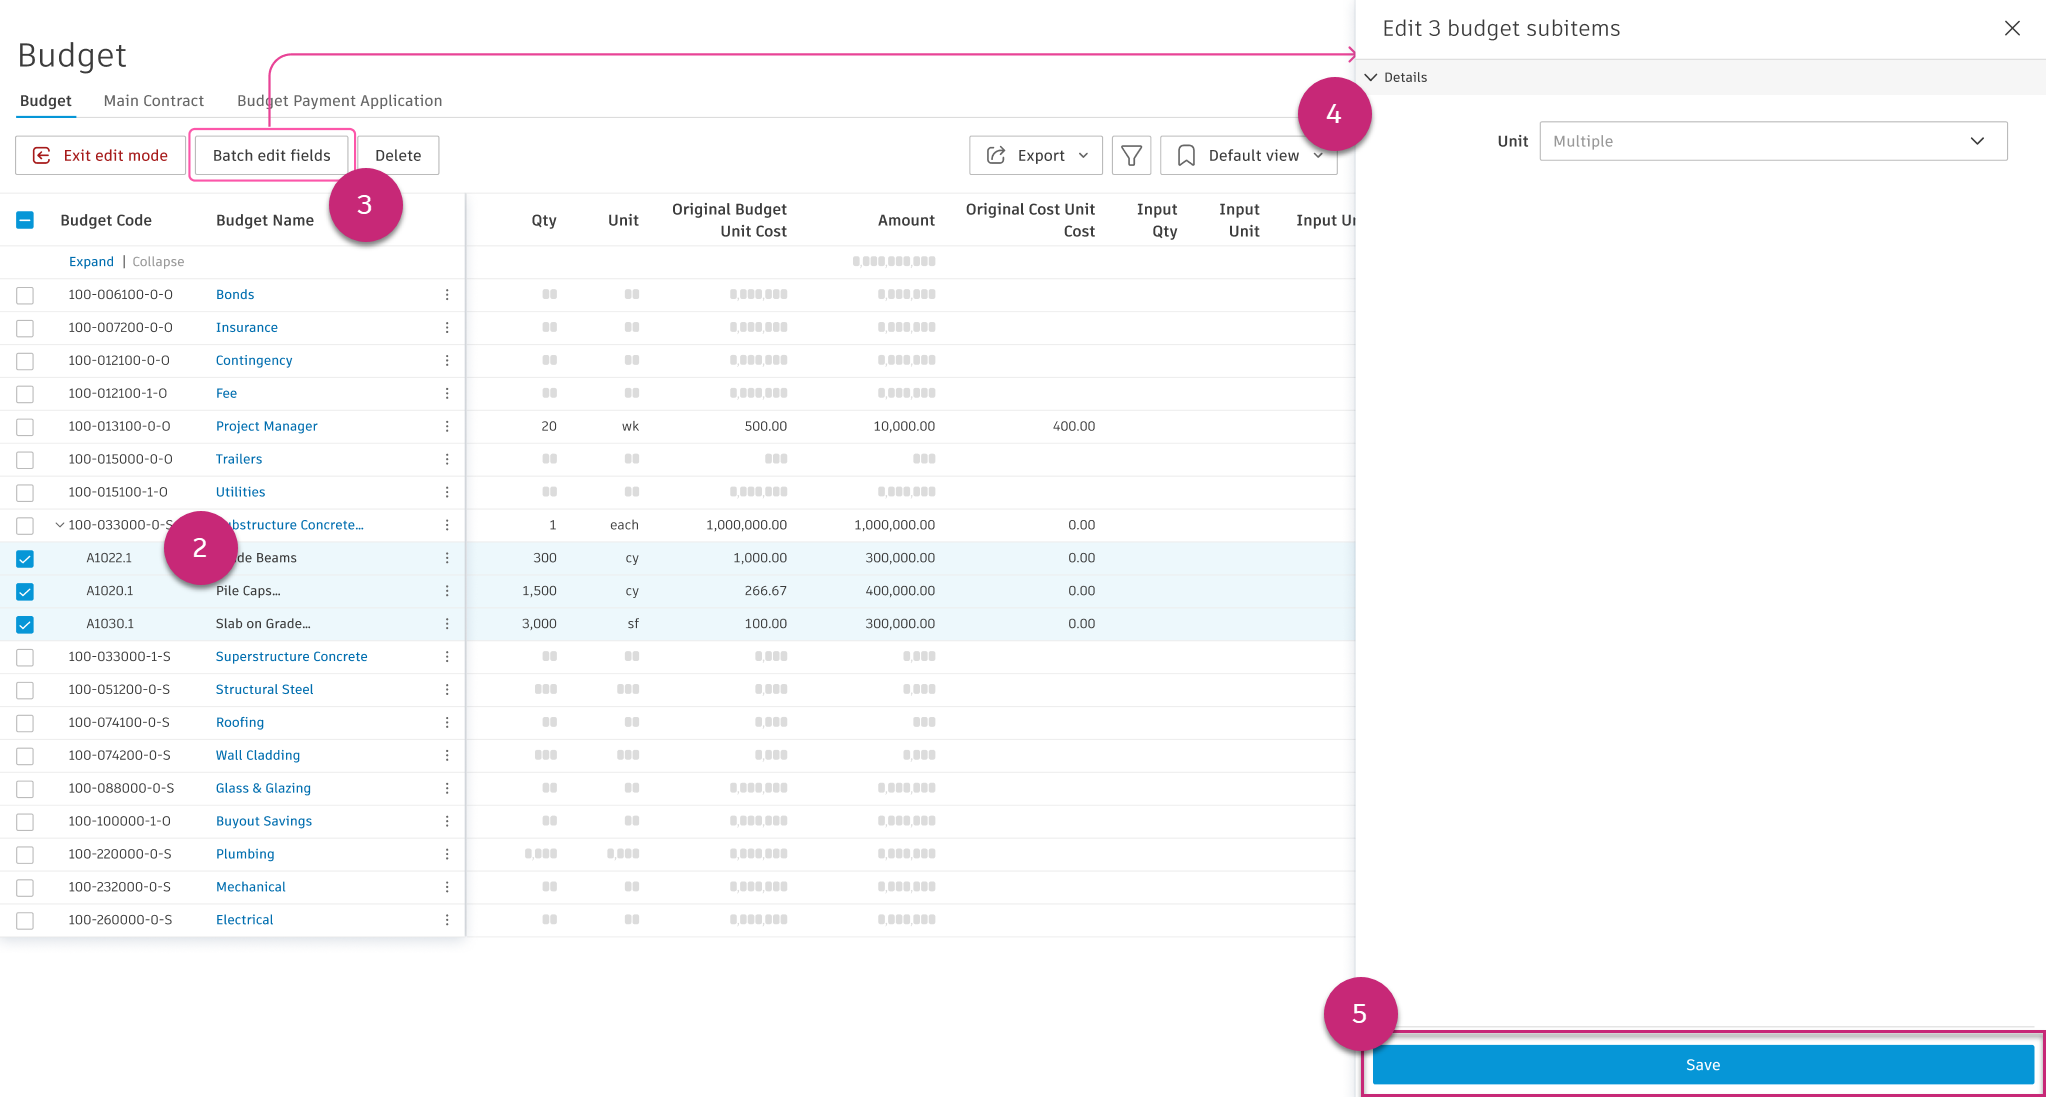
Click the Edit icon
to open the budget in Edit mode.Select the checkbox next to each budget item you want to update.
Click Batch Edit Fields in the toolbar.
In the flyout panel, update the fields you want to change. Available fields for budget items include Unit, Scope, Final Main Contract Amount Source, Description, Location, and custom attributes. When classification structures are assigned to the project, Classifications also appears in the panel. For budget subitems, Unit is available.
Tip: When selected items share the same value on a field, that value is displayed. When they have different values, the field shows "Multiple." Editing a field applies the new value to all selected items.Click Save to apply the changes to all selected items.
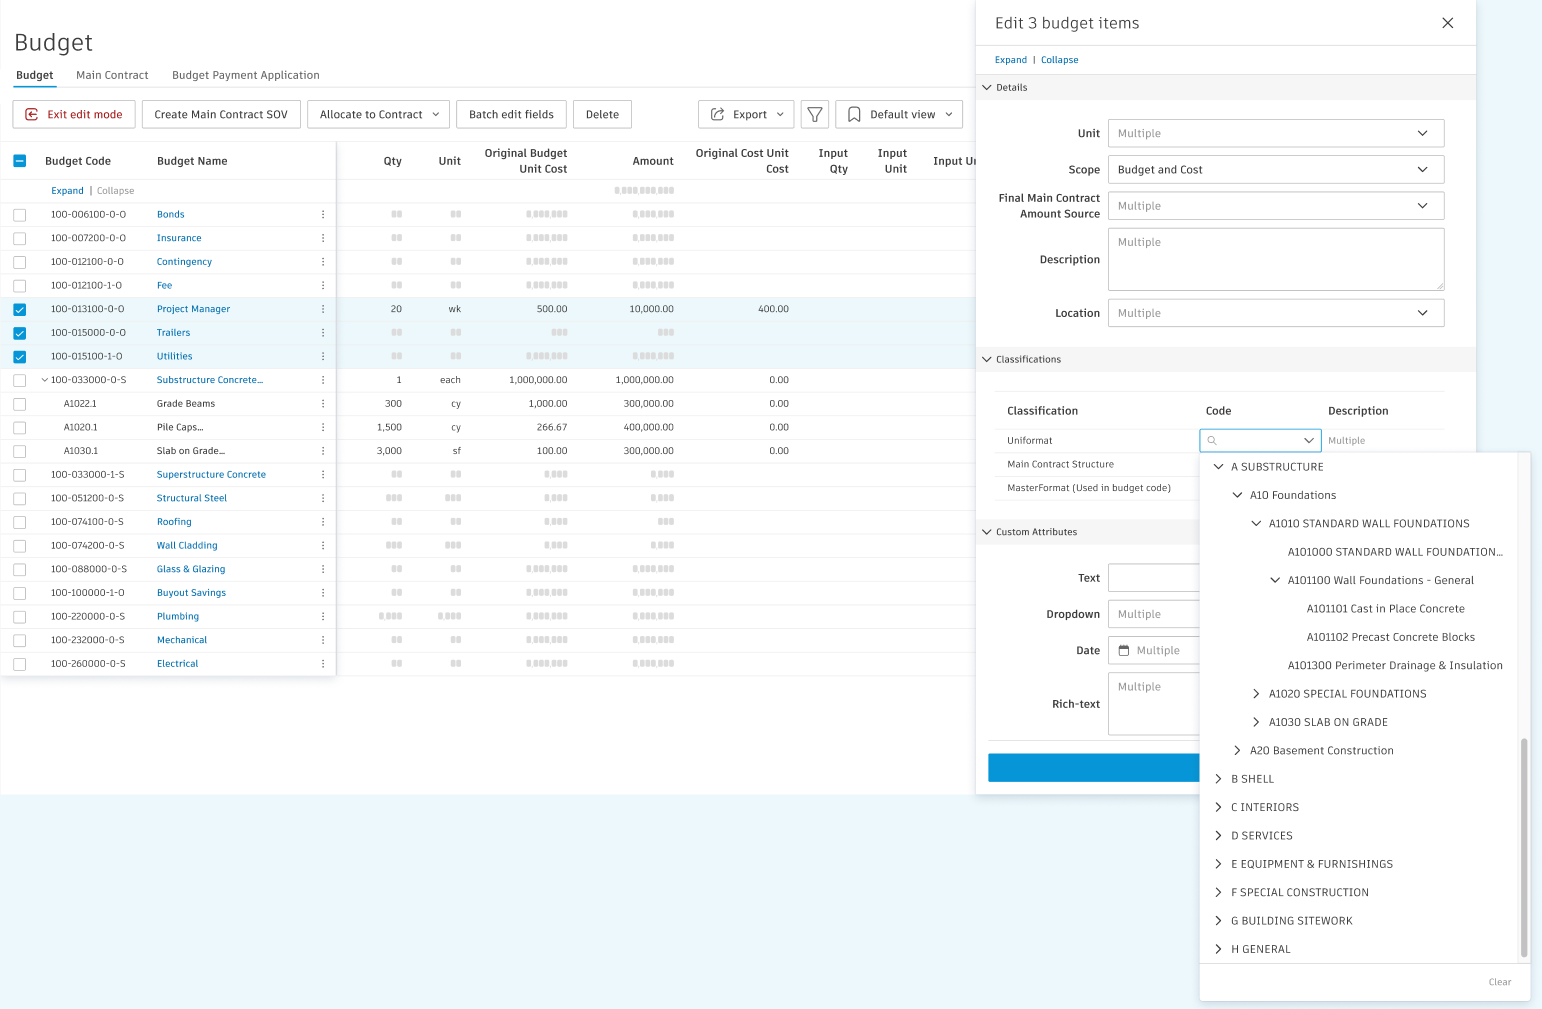
When classification structures are assigned to the project, the Batch edit fields panel includes a Classifications section. Update the Code or Description for a structure to apply the same classification to all selected items.
Transfer a Budget Item
If you need to transfer a budget item to a different budget, follow these steps:
Click the Edit icon
to open the budget in Edit mode.Locate the parent budget item and click the More
menu.Tip: You can also right-click the budget item to access the More menu. Or, if you want to transfer more budget items, check box next to each one and then click Budget Transfer.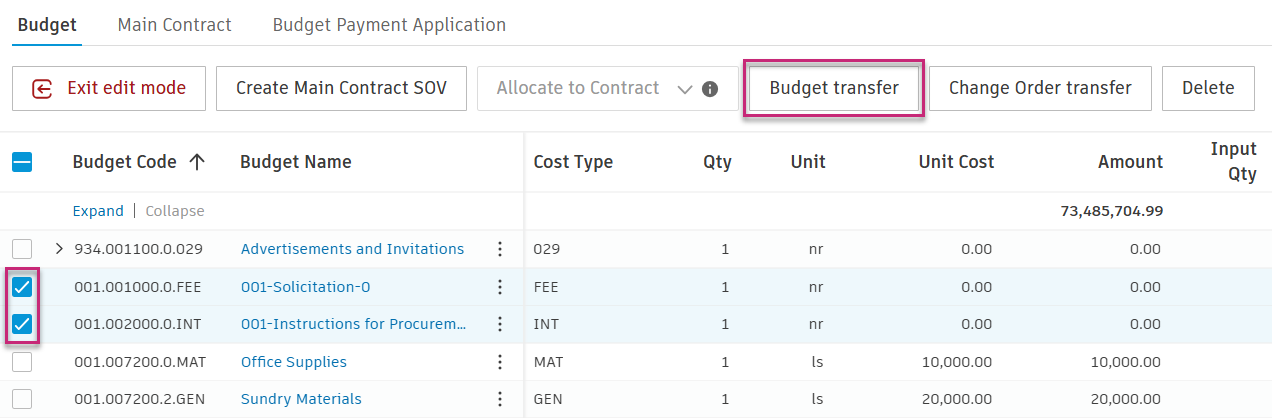
Select the Budget Transfer option.

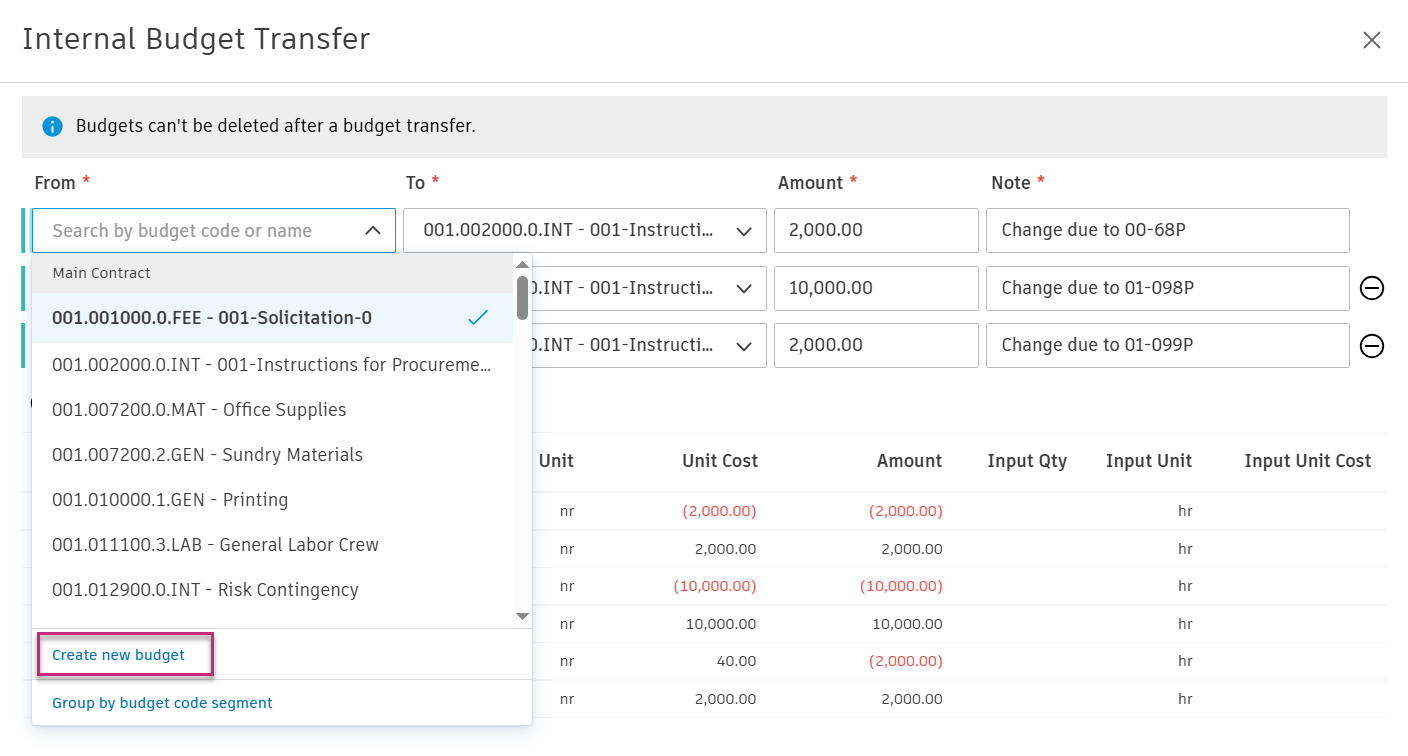
In the From drop-down list, select the budget you want to transfer from.
In the To drop-down list, select the budget you want to transfer to.
Enter the amount to transfer.
Add a note.
To add extra rows, click the Add icon
 .
.To delete a row, click the Delete icon
 .
.Click Save to complete the transfer.
Tips for budget transfers:
You can create a budget during this process by selecting Create new budget from the drop-down list.
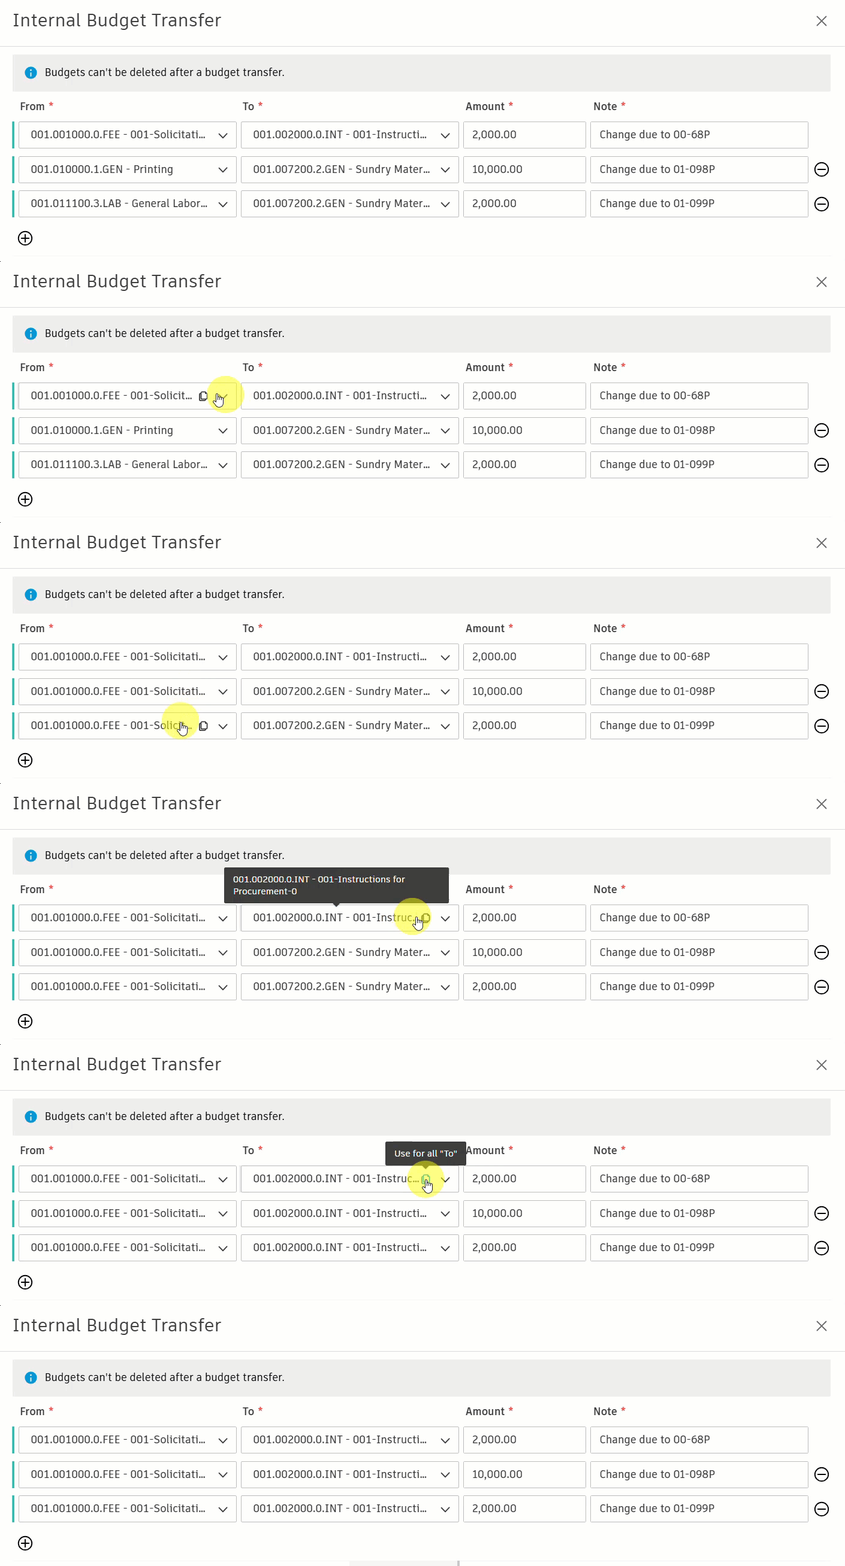
If transferring multiple budget items, you can use the same budget for multiple transfers. Click the Copy icon next to the budget item to duplicate it across all subsequent transfers. Similarly, you can use the Copy button to apply the same budget in the To column.
Important notes:
The transfer updates the Internal Budget Transfers column for each budget.
The original amount of the Budget Payment Application is based on the main contract SOV, not the budget overview. The timing of the internal budget transfer affects the main contract SOV amount:
- If the transfer occurs before the budget is linked to the main contract SOV, the main contract SOV amount will include the transfer.
- If the transfer occurs after the budget is linked to the main contract SOV, you must manually adjust the main contract SOV amount to reflect the revised budget.
Transferring may not be available if a hub administrator has locked this option with integration. For more details, see Lock Fields and Actions with an Integrated ERP System.
Transfer a Budget Item from Forecast Adjustment
If you work with forecast adjustments and budget forecast was set by the project administrator, you may want to create a budget transfer to request additional budget. To do so, the setting for internal budget transfer must be set on, and then:
- Open the Budget tool in Cost Management.
- Click the blue triangle in the Budget Forecast Adjustments column in the Budget Forecast section of the table. Those are visible if revenue forecast is on. The bottom flyout opens.
- Click the More menu next to the forecast adjustment.
- Choose Transfer budget.
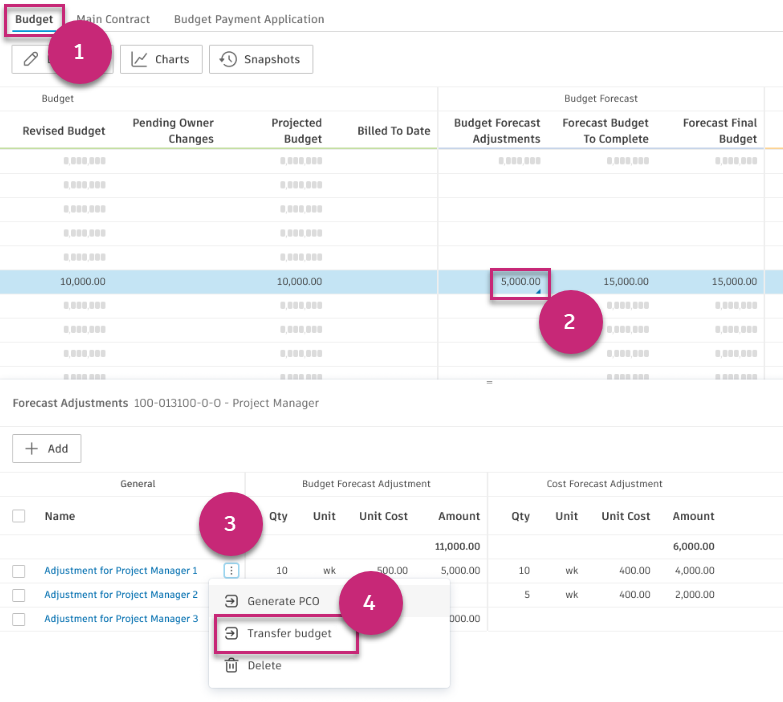
The typical Internal budget transfer window opens. You can check the details of this step in the Transfer a Budget Item section. After budget transfer is created, you'll see the changes in the Internal Budget Transfer column. Budget forecast adjustment Qty is set to 0. As a result, Amount is also set to 0. Unit Cost is unchanged and there will be three activity logs after this procedure.
Troubleshooting
| Issue | Solution |
|---|---|
| Transfer budget doesn't appear in the More menu | Turn on internal budget transfer and budget forecast in Settings. |
See also:
Visualize Budget Data
By default, the budget data visualizations are hidden. When visible, you can see:
- A bar chart showing the budget trend by comparing the original, revised, and projected budgets.
- A bar chart showing the cost trend by comparing the original and forecast costs.
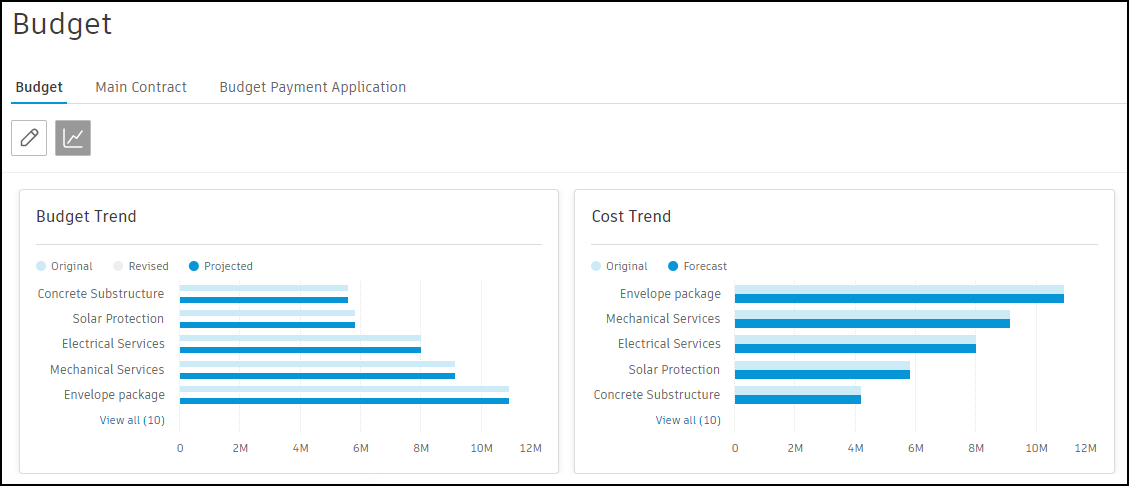
To turn on the visualizations:
- Click the chart icon
 on the Budget tab to display the visualizations.
 - Hover your cursor over the visualizations to display more details.
- Click the chart icon again to hide the visualizations.
View Connected Change Orders
A bottom flyout in the Budget overview displays related change order numbers with direct links for quick access. This lets you view all change orders connected to a specific budget line without leaving the Budget tab.
To view connected change orders:
- In the Budget tab, locate the change order columns such as Approved Change Orders or Pending Change Orders.
- Click the blue triangle in the change order column for a budget row to expand the bottom flyout.
- The flyout displays the change order details including Number, Cost Item Name, and related values across PCO, RFQ, COR, OCO, and SCO columns.
- Click a change order number to navigate directly to that change order.
Create Contracts from the Budget Tab
You can create contracts from one or more budget items. To do so:
Click
in the Budget tool to open the budget in Edit mode.Select the checkbox next to the desired budgets.
Click Create Contract.
Use the radio button to:
- Create a contract from each selected budget, making multiple contracts.
- Create a single contract from the selected budgets.
Select the budget code segments that you want to generate contract codes from.
Click Create.
Create Change Order Transfers
You can transfer money internally and create a PCO. To do so:
- Click in the Budget tool to open the budget in Edit mode.
- Select the checkbox next to the budgets that you want to transfer money from.
- Click Change Order Transfer.
- Use the drop-down list to select the budget you intend to transfer the money to.
- Enter the amount.
- Click to add any other required transfers.
- Click Create PCO.
A Budget Transfer PCO appears with the estimated amount from your entry and subitems for each budget impacted.
Check Actual Cost in the Budget Summary
Approved and paid expenses are automatically included in the budget summary view. This allows you to see a detailed breakdown of actual costs and make accurate forecast adjustments. Members with Full Control or View All permissions for expenses can use custom attributes or budget codes on expense subitems, enabling flexible arrangement and grouping — similar to how cost items are managed in the change orders view.
To view actual costs:
- Select the Budget tool from the left navigation.
- In the Budget tab, click the blue icon in the Actual Cost column in the budget row to expand the bottom flyout, which displays all details about expenses, their subitems, and cost payment applications.
- Expense subitems are shown in a flat list by default, but you can filter and group them by their own attributes or custom attributes.
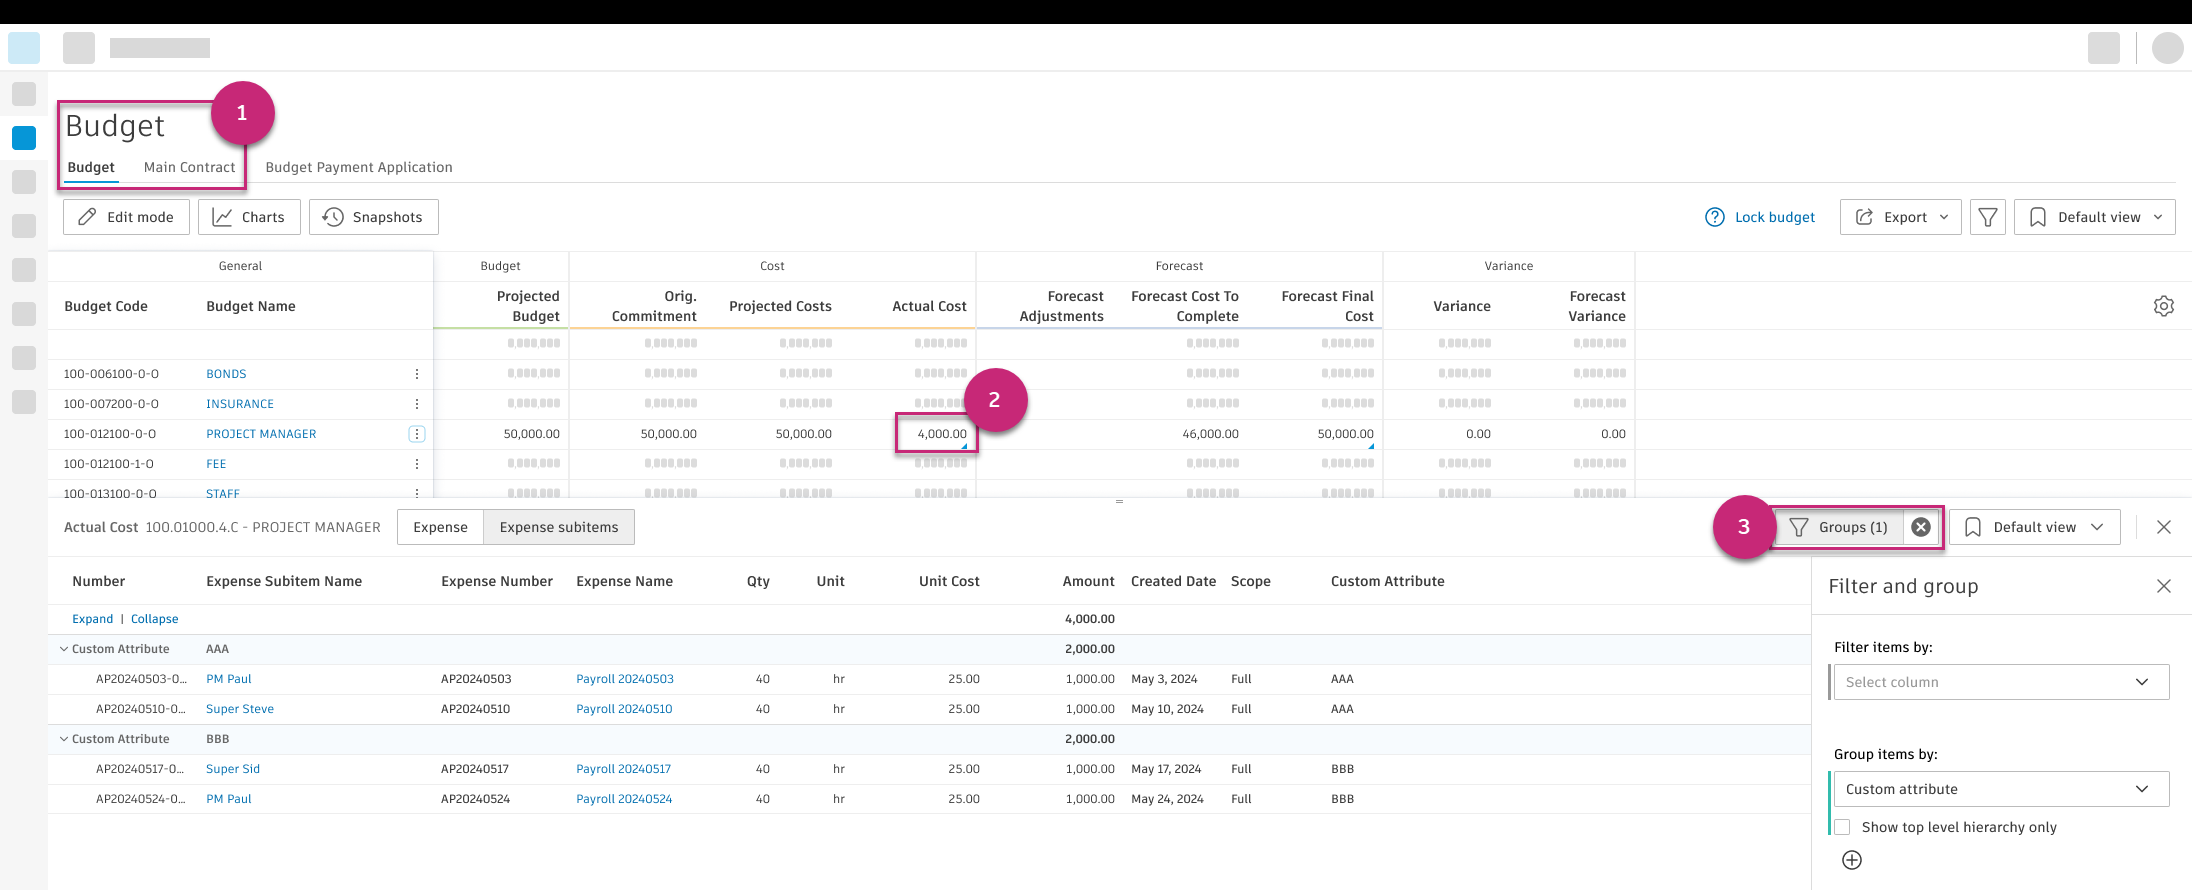
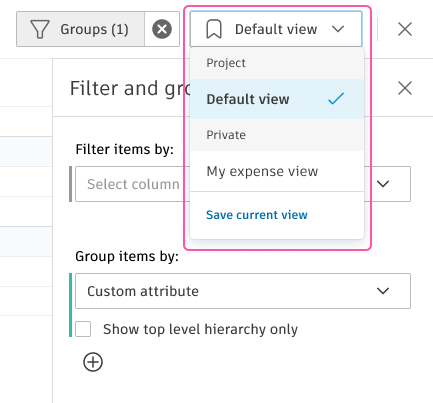
The expense table and expense subitem table each have their own saved views, independent from the budget saved view. The following properties are saved for each: filter, group, and column width, position, and visibility.
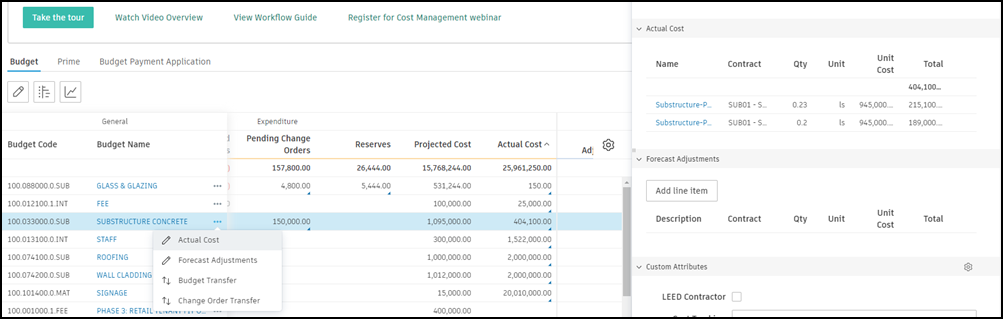
You can also see actual cost details by clicking the More menu and choosing View actual cost or by opening the details panel - to do so, click the budget name.
Disable Cost Side on Selected Budget Lines
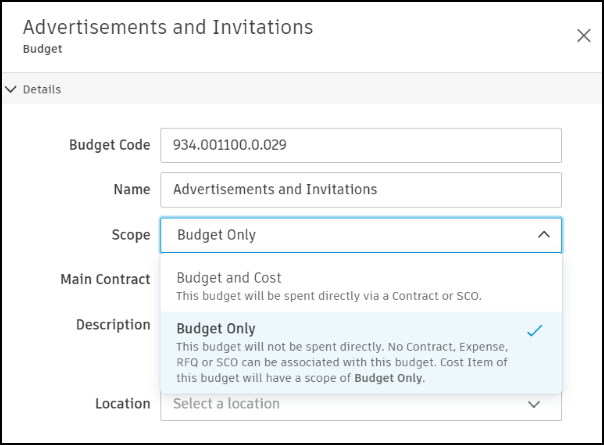
You can permanently disable the cost side for budget lines like contingencies, allowances, and fees that won't have associated costs or direct spending. To achieve this, set the scope field for the relevant budget line items to "Budget Only". Follow these steps:
Select the budget item in the Budget tab to open the flyout section.
Under the Details section, select the Scope drop-down menu.
Choose Budget Only.
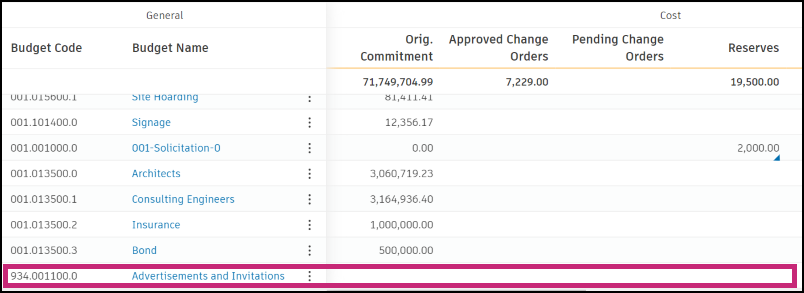
The cost side of the budget overview will show as empty. No contract, actual cost, or cost change will then be able to be associated with it. The variance column shows the budget value without requiring any forecast adjustment to be made.
View Currency Gains and Losses within Budget Overview
Set up a foreign currency to see how system automatically pulls all cost activities into the budget overview and converts foreign currencies back to the project’s base currency. So, as actual expenses start rolling in, teams gain instant visibility into currency gain or loss on actual (realized) and projected (unrealized) costs.
Add Realized and Unrealized Currency Columns
You can add new columns in the Budget table to assess risk and create forecast adjustments:
Go to the Settings tool, switch to the Budget tab.
Select Budget overview columns and click Manage.
Click Add new.
Click Project value in the Click to add formula item section.
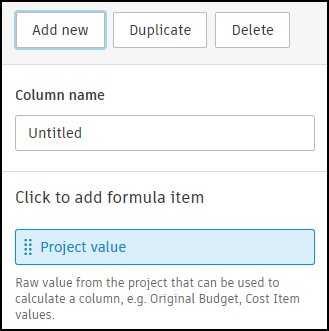
On the right side, select a project value by scrolling down to the Currency Gain and Loss category.
Select one of the new custom columns:
- Realized Currency Gain or Loss: Direct Input Actual Cost
- Realized Currency Gain or Loss: Expense
- Realized Currency Gain or Loss: Cost Payment Application
- Unrealized Currency Gain or Loss
- Forecast Exchange Rate
Once added, return back to the Budget table and click the
icon.Scroll down to the Cost category.
Select new columns to be visible in the table.
Now, you'll see realized and unrealized currency gains and losses based on the selected exchange rate. Hover over the columns' names to see the details of the equations.
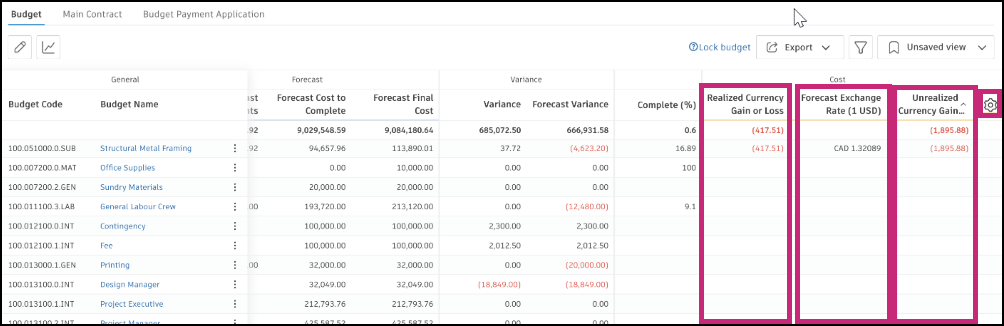
The value in the Unrealized Currency Gain or Loss column will be recalculated when the following values are changed:
- Contract SOV value
- Contract Exchange Rate
- SCO Cost Item value
- SCO Cost Item Exchange Rate
- Paid Cost Payment Application value
- Cost Payment Application Exchange Rate
- Paid Expense value
- Expense Exchange Rate
- Forecast Exchange Rate
When the cost payment application or expense is approved, the Actual Cost column's value will be recalculated as well.
Recalculate or Edit the Exchange Rate
Recalculating or editing exchange rates is done within the Forecast Exchange Rate column that you’ve turned on with the gear icon.
To edit the rate:
Hover over the field and click Edit.

In Edit Forecast Exchange Rates, click into the field to directly edit it. Or select Fetch from settings to use the rate within Settings.
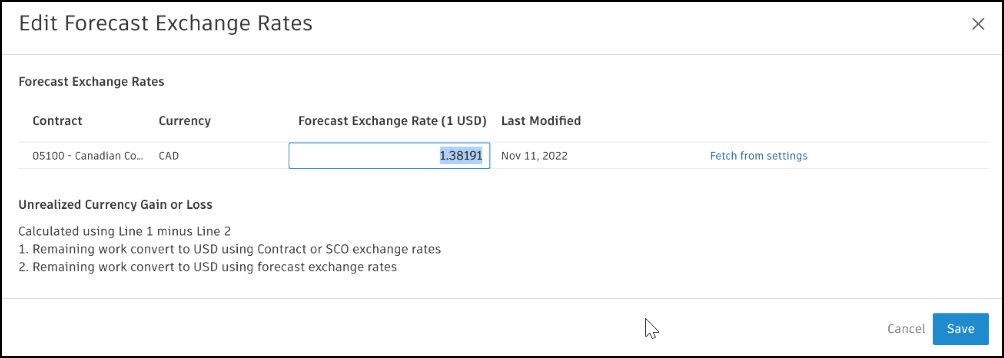
Click Save.
Create Forecast Adjustments
With all cost management activities automatically pulled into the overall budget summary, teams have clear visibility into cost impacts. With a few clicks, you can easily make necessary forecast adjustments to your budget and the changes are visible in the cost forecasting columns in the budget table. See Budget and Contract Tables to learn more about columns in the Budget tool.
If project administrator allows budget forecasting, you'll see additional columns related to this functionality in the Budget Forecast section of the budget table and split view in the Forecast Adjustments section of the details panel.
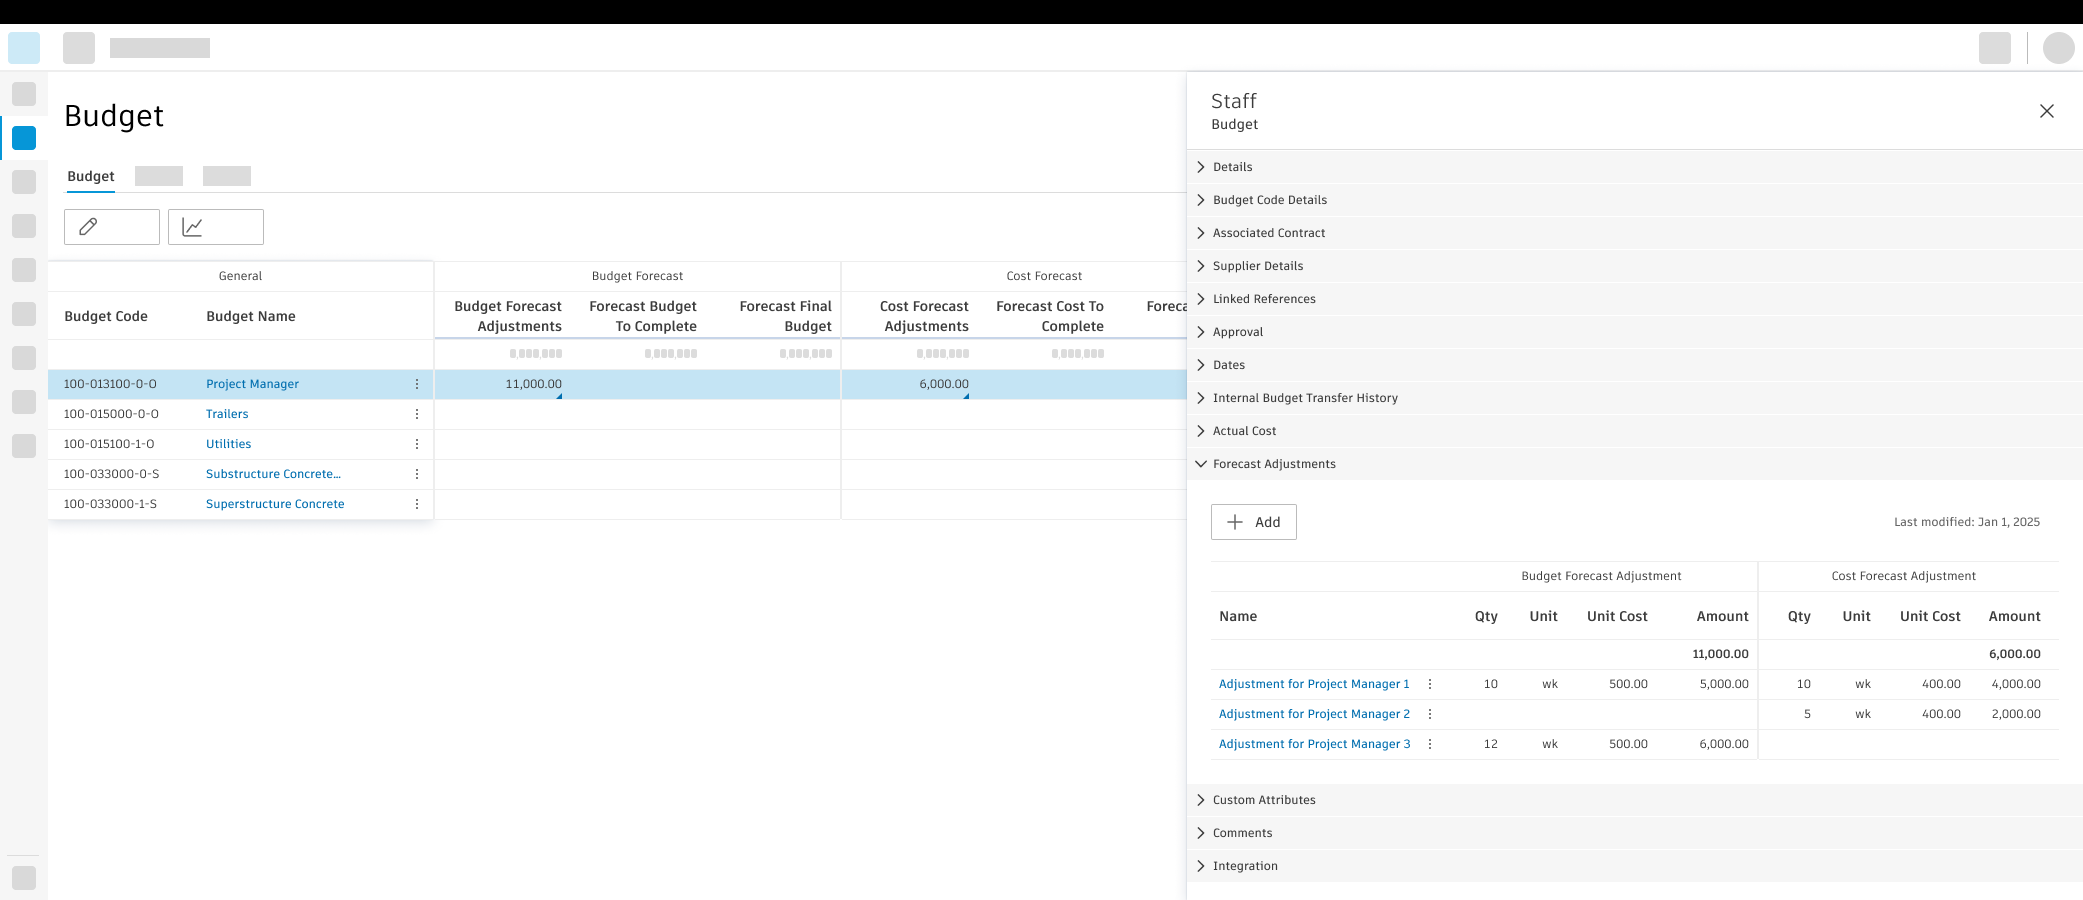
Budget forecast allows you to forecast both revenue and costs, providing visibility into projected fees by calculating the difference between forecasted budget revenue and forecasted costs. This enables general contractors to manage scenarios where time-related resources may change (such as increased hours) without exceeding the Guaranteed Maximum Price (GMP), requiring either change order transfers or internal budget transfers. See Budget Forecast to learn how to set the setting as project administrator.
To make a forecast adjustment to a budget:
- Go to the Budget tab in Cost Management.
- Click the More menu next to a budget item.
- Select Edit forecast adjustments. The bottom flyout opens.
- Click Add in the flyout budget panel.
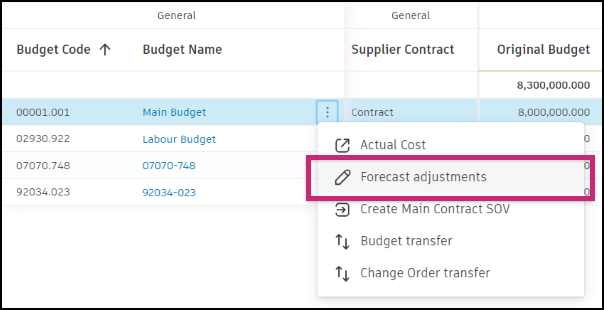
The total adjustments appear in the Cost Forecast Adjustments or Budget Forecast Adjustments (depending on the type of created forecast) and Forecast Variance columns. The Forecast Cost to Complete (or Forecast Budget to Complete) and Forecast Final Cost now reflect the change.
Related articles:
- Budget Forecast
- Budget and Contract Tables
- Cash Flow Forecasting
- Create a PCO from Forecast Adjustment
Make Forecast Adjustments Based on Currency
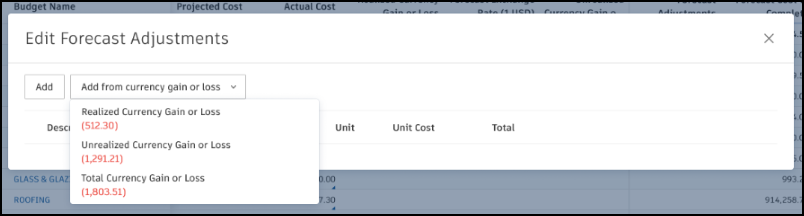
To make a forecast adjustment based on currency gain or loss, click the More menu next to the budget item and select Forecast adjustment. Now, you can add an adjustment from:
- Realized Currency Gain or Loss
- Unrealized Currency Gain or Loss
- Total Currency Gain or Loss
Edit Forecast Final Budget and Cost
You can edit Forecast Final Cost and Forecast Final Budget directly on a budget row using the Forecast basis drop-down (Manual adjustment, Output complete, or Date range). See Edit Forecast Final Budget and Cost in the Forecast group for the full workflow.
Lock and Unlock the Budget
After your budget is completed, a project administrator can lock the original budget to avoid accidental changes in the future. See the Budget Settings article for details.
Export a Budget Report
To create a formatted report of a budget:
Select the Budget tool from the left navigation.
Switch to the Budget tab.
Click
 .
.Enter the report title and choose file format: PDF or Excel.
Select whether you want a Cover page.
Choose the currency in the Report Currency field. You'll see the editable field of the exchange rate. A default exchange rate will be used from project settings and will be based on the date when the Report Currency field was modified.
Choose the report template:
Tip: When exporting a PDF or Excel budget report in Edit mode, the system will only export currently visible columns.- System Default View - includes system default columns in all groups.
- Budget Report - includes only columns in the General and Budget section in the table view.
Include optional details that should be visible in your report, such as internal budget transfers, forecast adjustments, or change orders.
Click Run report.
You'll receive an email notification when your report is ready to download. You can also download it from the Report tool. To learn more about reports and available actions, see the About Reports article. See the Cost Reports article to review all available reports for Cost Management.
Generate Budget Report in Foreign Currency
Since the foreign currency setting is on, you can export reports of the Budget tables. Choose the currency in the Report Currency field. You'll see the editable field of the exchange rate. A default exchange rate will be used from project settings and will be based on the date when the Report Currency field was modified.
In the report cover, you'll see the Report Currency and Exchange Rate fields.
Related Articles
Core Budget Tasks
Forecast and Cash Flow
- Cash Flow Adjustments: Create Forecast Adjustments in Cash Flow
- Settings: Budget Forecast Configuration
- Distribution Curves: Forecast Settings
- Budget Payment Application
- Forecast
Fee Analysis
- About Fee Analysis — Compare original and forecasted fees in the Budget view's Analysis panel.
- Apply Markup Formula on Budget Columns — Apply Budget Financial Markup Formulas to the Final Main Contract Amount column.
- Fee Analysis Snapshot — Capture and compare fee values across budget snapshots.
More Resources
Check the Learning Center video course about the Budget tool.