Work with Contracts
Contracts in Cost Management are essential for tracking and managing agreements with suppliers.
With the Contract tab, you can streamline your contract management processes and keep your project on track. The tab contains the same information as the Budget tab but presents it in the form of contract codes and contract names as opposed to budget codes and budget names. This allows contracts to consist of multiple budget codes and be viewed in two different ways. See Budget and Contract Tables to learn more.
You can create contracts, monitor expenses against the agreed-upon terms, and generate reports to gain valuable insights into your contract's impact on the overall project budget. You can also use contracts to stay on top of compliance requirements and other key dates to avoid costly penalties or legal disputes.
In this article:
- Contract Tab Overview
- Contract Edit Mode
- Contract Statuses
- Create or Generate a Contract
- Add a Contract Document
- Send a Contract to a Supplier or Request Supplier Input
- Edit Contract in the Flyout Panel
- View Contract in Full Page
- Copy Supplier SOV Subitems to Main Contract
- Import and Export Contract SOV
- Assign Contracts to Non-Members
- Assign a Budget to a Contract
- Award the Contract in Foreign Currency
- Delete a Contract
- Export a Contract Report
- Related Articles
- More Resources
Contract Tab Overview
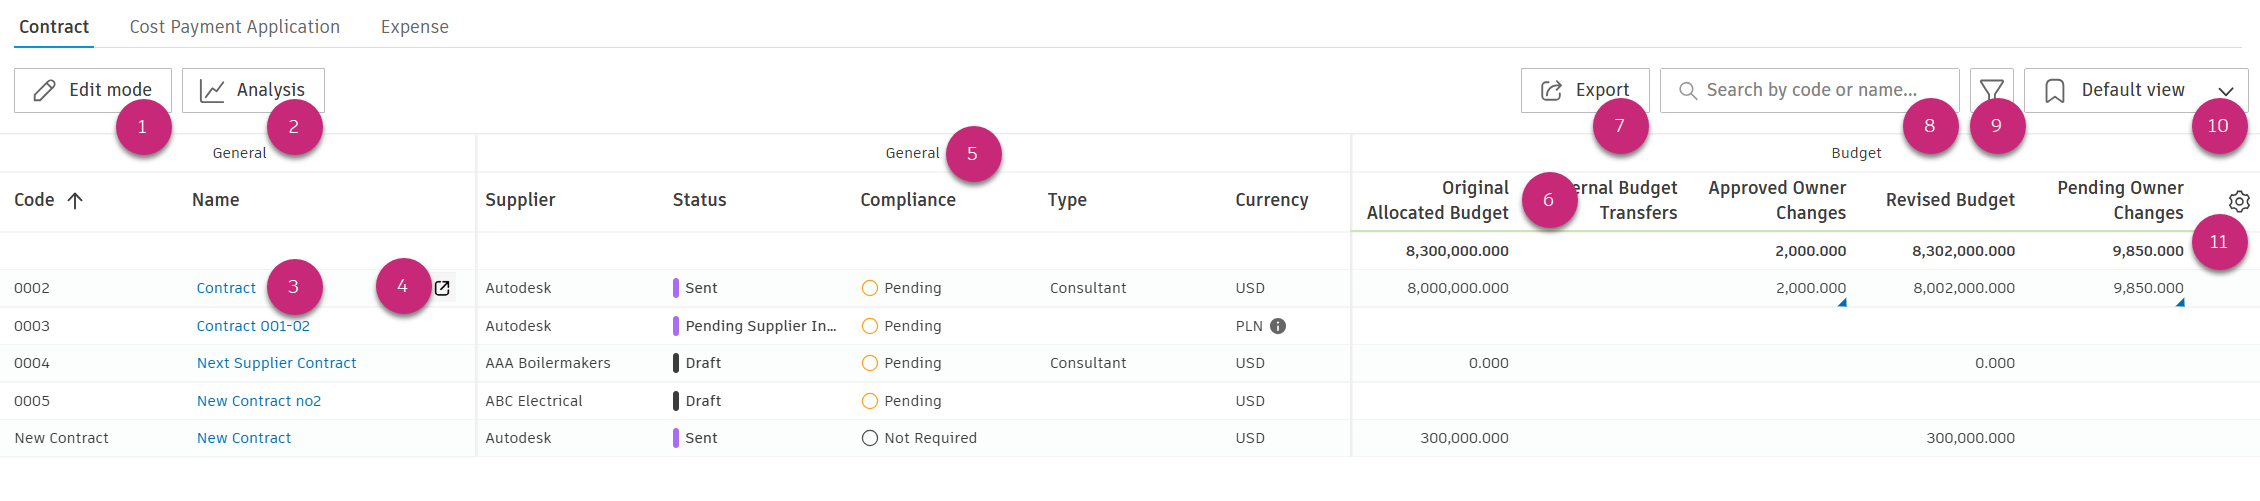
Click the
 icon to add a contract or delete one.
See the charts for budget and cost trends.
Click the contract name to open the flyout panel. In the flyout panel, you can edit contract details, add a scope of work, manage billing periods, attach documents, and more.
Click the icon to open the contract's full page to see the detailed overview with schedule of values and change order items listed.
Learn more about the five main sections of the Budget and Contract tables.
Hover over the column's name to understand the logic behind them. Some of the values are also described in the Budget and Contract Tables article.
Export a PDF or Excel report of your contracts.
Tip: The Filter and Group tool may be helpful to create a more formatted report.Search through the contract table by code or name. Available for members with Collaborate, View All, or Full Control permissions.
The Filter and Group tool helps to arrange efficient views of your data and create clear and legible reports.
See your saved views or create ones for quick access to budget data.
Control column order and visibility with the
 icon.
icon.
Contract Edit Mode
Members with the Full Control permission for contracts can perform some functionalities only with the Contract tab in edit mode:
- Select Add to manually enter new contract items.
- Click Import to download a contract import template with helpful tips. Once downloaded and filled out, you can click this button again to import a finished contract Excel file.
- Within individual contract items, select the pencil icon to edit the contract name.
- Click within the Type, Budget Code, and other editable columns to add or change information. Project administrators create the list of contract types within the Cost Management settings in Settings.
- Select the checkbox next to a contract or the More menu
 to delete it.

Contract Statuses
Typical contract status workflow:
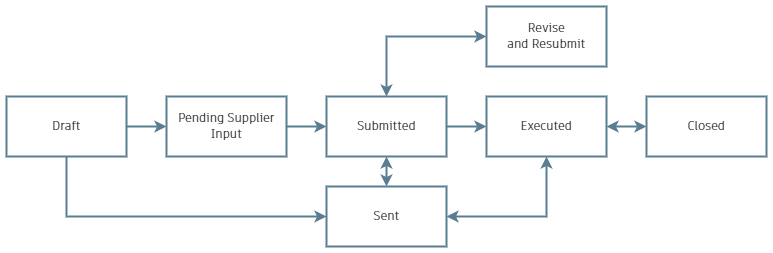
Contracts have the following statuses:
- Draft: During the creation state of the contract. The flyout panel of the contract is fully editable. You can request a supplier's input, for example, to ask them to create their schedule of values breakdown for use in payment applications. You can also set the contract as Pending Supplier Input or send an information email to a supplier.
- Pending Supplier Input: A notification email has been sent to a supplier, and the contract awaits their submission. If the compliance requirements workflow is set, attaching compliance documents becomes mandatory for submitting the contract.
- Submitted: The contract was reviewed and submitted. You can request revision again or send an email to a supplier.
- In Review: An active approval workflow was triggered. Designated reviewers can decide to proceed or request a revision.
- Revise and Resubmit: One from the party hasn't accepted the change order and requested revision. Check what is required and submit the revised contract.
- Sent: A notification email has been sent to a supplier. The email is for informational purposes only. You can set the contract to Executed status or revert it to Submitted status.
- Executed: The contract is executed by the project administrator. It can be reverted to the Sent status or set as closed. Some of the fields are locked when the contract is in the Executed status. Go to the Lock Fields and Actions ERP Integrated ERP System article to see more details.
- Closed: The contract is set as closed by the project administrator.
Create or Generate a Contract
There are a few ways to create your contracts. In this section, you can learn how to generate a contract from the Contract tab:
- Select the Cost tool.
- Switch to the Contract tab.
- Click the icon to enter edit mode.
- Click +Add.
- Provide the contract’s code and name.
- Click anywhere outside the table or press the Enter key on your keyboard.
The draft contract is ready. Close the edit mode by clicking the button again.
Other ways to create a contract:
- Generate contracts from budgets, cost items, or PCOs.
- Import contracts from another software by importing a spreadsheet. Click
 in edit mode.
Add a Contract Document
After you create a contract in the Contract tab, you may need to add a contract in a document form, which can be sent to suppliers. To do so:
In the Contract tab, click the name of the contract. The flyout panel opens.
If desired, add a scope of work for the contract.
In the Supplier Details section, select a member from the recipient drop-down list. You may add individual recipients or companies to the recipient field.
Note: The recipient field is populated automatically when a contract has already been awarded.Tip: The company dropdown initially displays approximately 50 companies for performance reasons. To find a specific company, start typing in the search field to filter the list. When you select "Search in hub company directory," your filter criteria will carry over, allowing you to locate companies from the full hub directory.Scroll down to the Documents section and click Add document.
Click Generate from document template to locate the contract document template or click Recently generated to choose from recently used documents.
Note: Before you can generate a contract document, a project administrator must create the contract document template in the Project Admin module. See Document Templates in Cost Management to learn more.
The document is added to the Document Package. Click the More menu to rename the document, open it, download, move, or delete.
Send a Contract to a Supplier or Request Supplier Input
Now, you can send a contract for a supplier's review:
In the flyout panel, click Send or Request Supplier Input. If there is an approval workflow set, there may be more than one approval needed.
A message for a supplier can be prepared once the supplier contact is specified on the contract. This can be configured in the contract's flyout panel within the Supplier Details section.
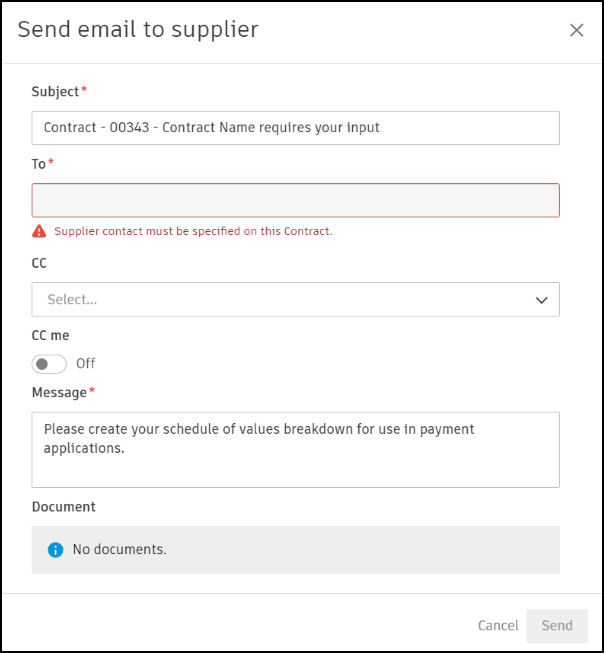
Click Send once ready.
A supplier will be notified of the contract for review by email when they have a collaborative permission for contracts.

As a supplier:
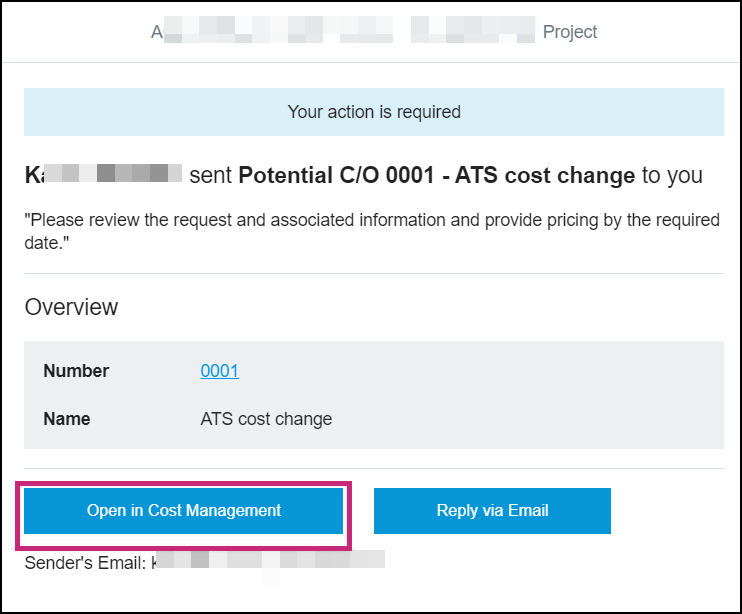
Open the email and select Open in Cost Management. When Cost Management opens, only the information pertaining to a supplier will be visible.
Select the contract name to open the flyout panel.
Scroll to review details, then select Respond in the workflow bar.

In the Schedule of Values (SOV) section, manually add or import the SOV items from Excel. If importing from Excel, select Download template to download an Excel template.
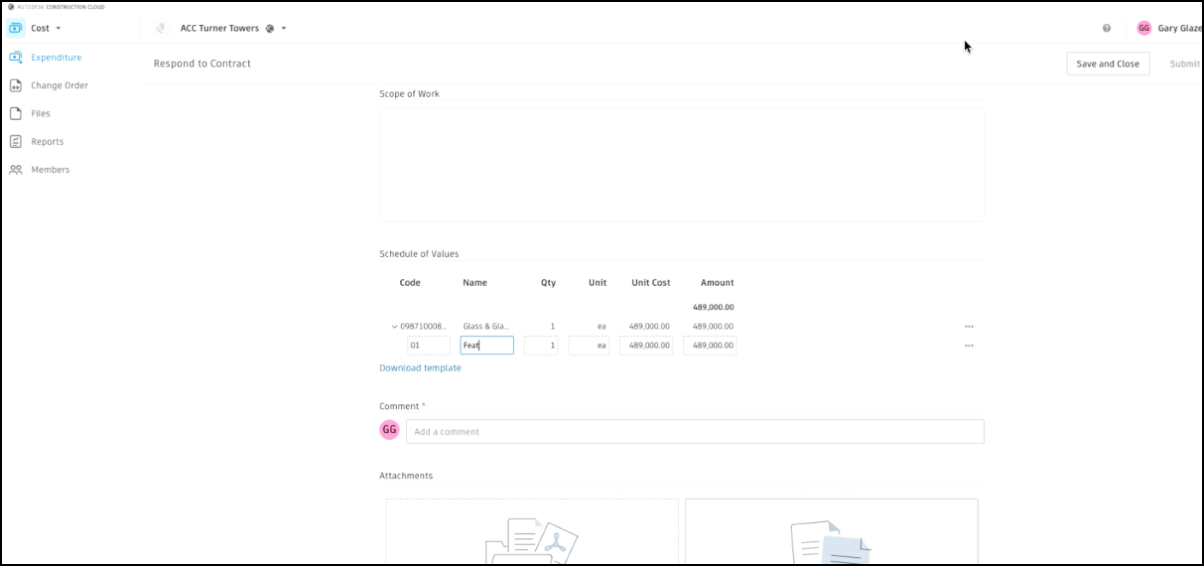
Select the More menu
to add, import, or delete subitems.Once the SOV information is complete, add comments for further context and select Submit.
Once submitted, the system will notify a general contractor by email. They can review and request revisions with comments.
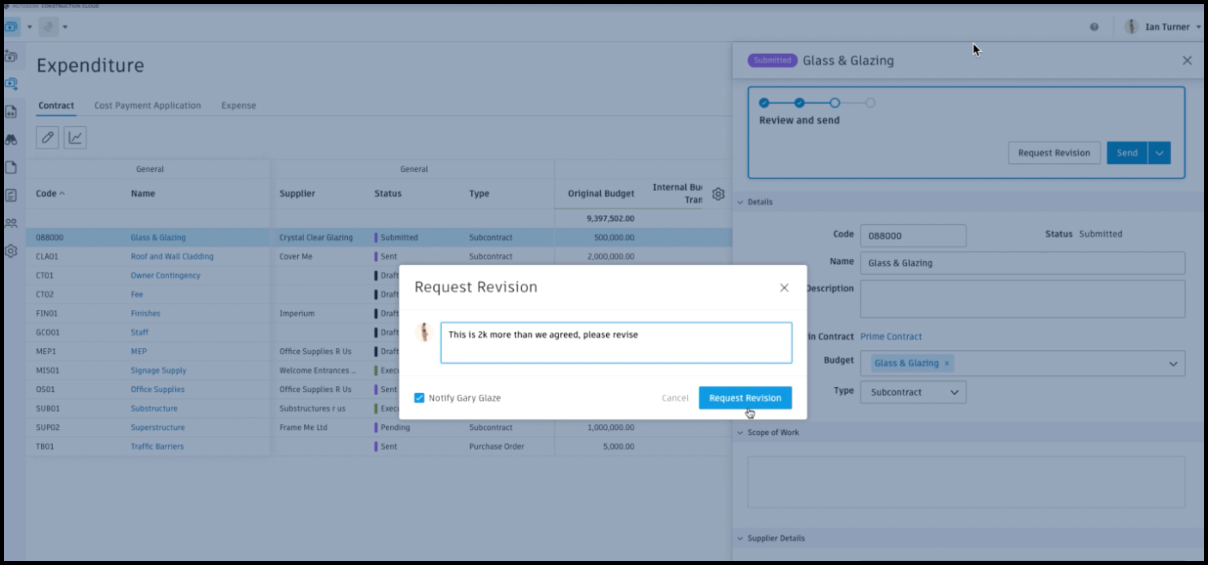
If a revision is required, the process will continue as outlined earlier once it is submitted back to a supplier. Once approved, a general contractor can compile the contract document package.
Edit Contract in the Flyout Panel
To edit extra information pertaining to a specific contract, select the contract name to open the details flyout panel. Key items:
Budget Code – Provides a list of all unallocated budget items. Create the connection between contract and budget item by assigning from this list. Learn more about Budget Codes.
Associated Budget – Displays all budgets linked to the contract. The table includes Budget Name, Budget Code, Orig. Allocated, and Unallocated columns. The Budget Code column helps identify budgets when there are multiple with similar descriptions.
Supplier Details – extra contacts option allows members to specify contacts for the following:
- SOV Contact: contract recipient upon input request.
- Signatory: contract recipient upon sending.
- RFQ Recipients.
- SCO Signatory: SCO recipient upon sending.
- Cost Payment Application Contact.
Note: If the above contacts are not specified, the system will automatically use the general contact.SOV (Schedule of Values) – When a budget is linked to a root SOV line, the SOV can inherit budget item build-ups from that budget. They can be removed by right-clicking when the member wants to create a different list of items. They can also be appended or edited, and the values overwritten to create the correct award value for the contract. On supplier contracts, you can also create root SOV lines without a budget link and assign budgets later. See Edit Contract Schedule of Values.
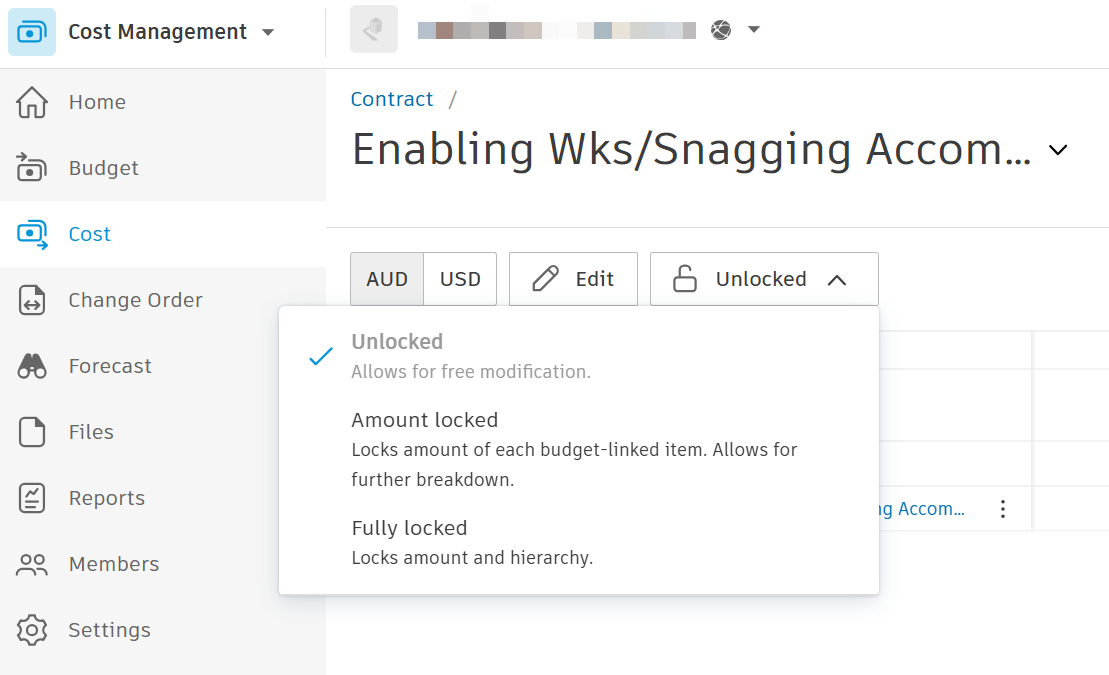
You can lock the Schedule of Values to prevent changes to both the amount and hierarchy, or choose to lock only the amount while keeping the hierarchy editable.
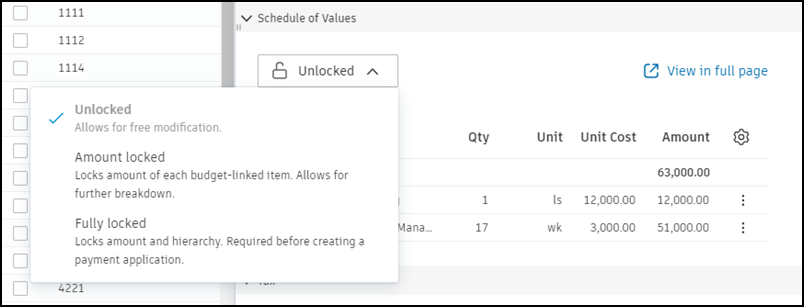
For more information, refer to Lock and Unlock Contract SOV.
Documents – Automatically generate the contract, package the contract with associated documents, and email from the system. See Manage Documents in Cost Management to learn more.
Retention – Enter retention rates. See Retention for more information.
Note: This setting overrides the default retention rate for this contract before any payment applications are made. After the first payment application, future applications will inherit the rate from the previous application, not from this setting.Billing Periods – Create and manage billing periods for payment applications. See Billing Periods for more information.
Custom Attributes – Project Admins can customize the type of information that needs to be captured for contracts. See Create Custom Attributes for more information.
View Contract in Full Page
When the contract SOV root nodes exceed hundreds of items, having the full-screen view makes it easier to visualize the data. With the contract's full page view, you can access more advanced options.
There are two ways to expand the SOV section of a specific contract to full screen:
- Hover over the contract row and select View in full page represented by
 .
. - Open the contract flyout and select View in full page button within the Schedule of Values section.

Once in full page view, select the filter icon to group by budget code segment. Also, custom views can be saved for later for quick referencing within this view. See Filter and Group for more information.
View SOV Evolution
Within the contract full page view:
Click the More menu
and choose to view change orders as a column.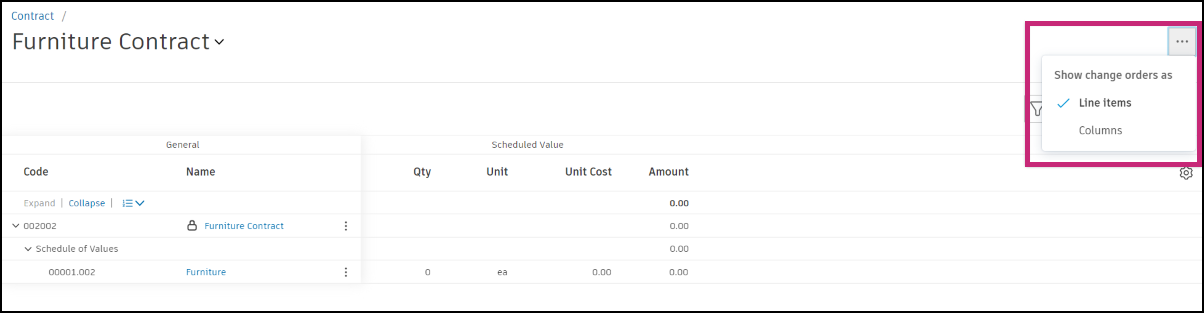
Using the gear
icon on the right, turn on the designed columns under Revised Values. This view auto aligns Original Budget, Scheduled Value (SOV), Change Orders, and Revised Values. 
Alignment between original and changes is defined by having identical item code and name. This will be done automatically when a change in the order cost item hierarchy has been generated from the contract SOV. It can also be done with manual entry.
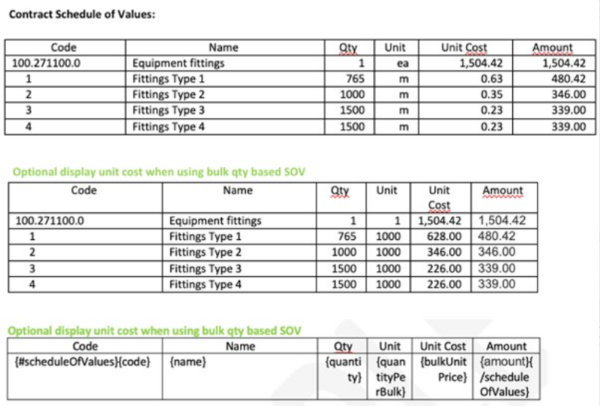
Imagine a scenario in which you purchase material in bulk and need to reflect this pricing accordingly in the contract purchase order SOV. You can turn on new columns: Qty Per Bulk, Bulk, and Bulk Unit Cost using the gear icon on the right:
- In the QTY column, members can enter the total number of fittings.
- In the Qty Per Bulk column, members can enter the qty of fittings per box.
- In the Bulk Unit Cost column, members can enter unit cost of each bulk.
- The Bulk column calculates the bulk units required.
The sample contract template also includes an option to use the bulk columns and use the bulk unit cost instead of per fitting. See Document Templates in Cost Management to learn how to download and edit contract templates.
Lock and Unlock Contract SOV
You can lock the Schedule of Values, which will disable modifications of both the amount and the hierarchy. Alternatively, you can choose to lock only the amount.
Edit Contract Schedule of Values
Edit Contract Schedule of Values brings all editing actions into one consolidated interface. It provides enhanced flexibility for managing the hierarchy and assigning budgets at any level.
There are two ways to access the contract SOV edit modal:
- From the contract details page, click Edit.
- From the contract flyout panel, in the Schedule of Values section, click Edit.
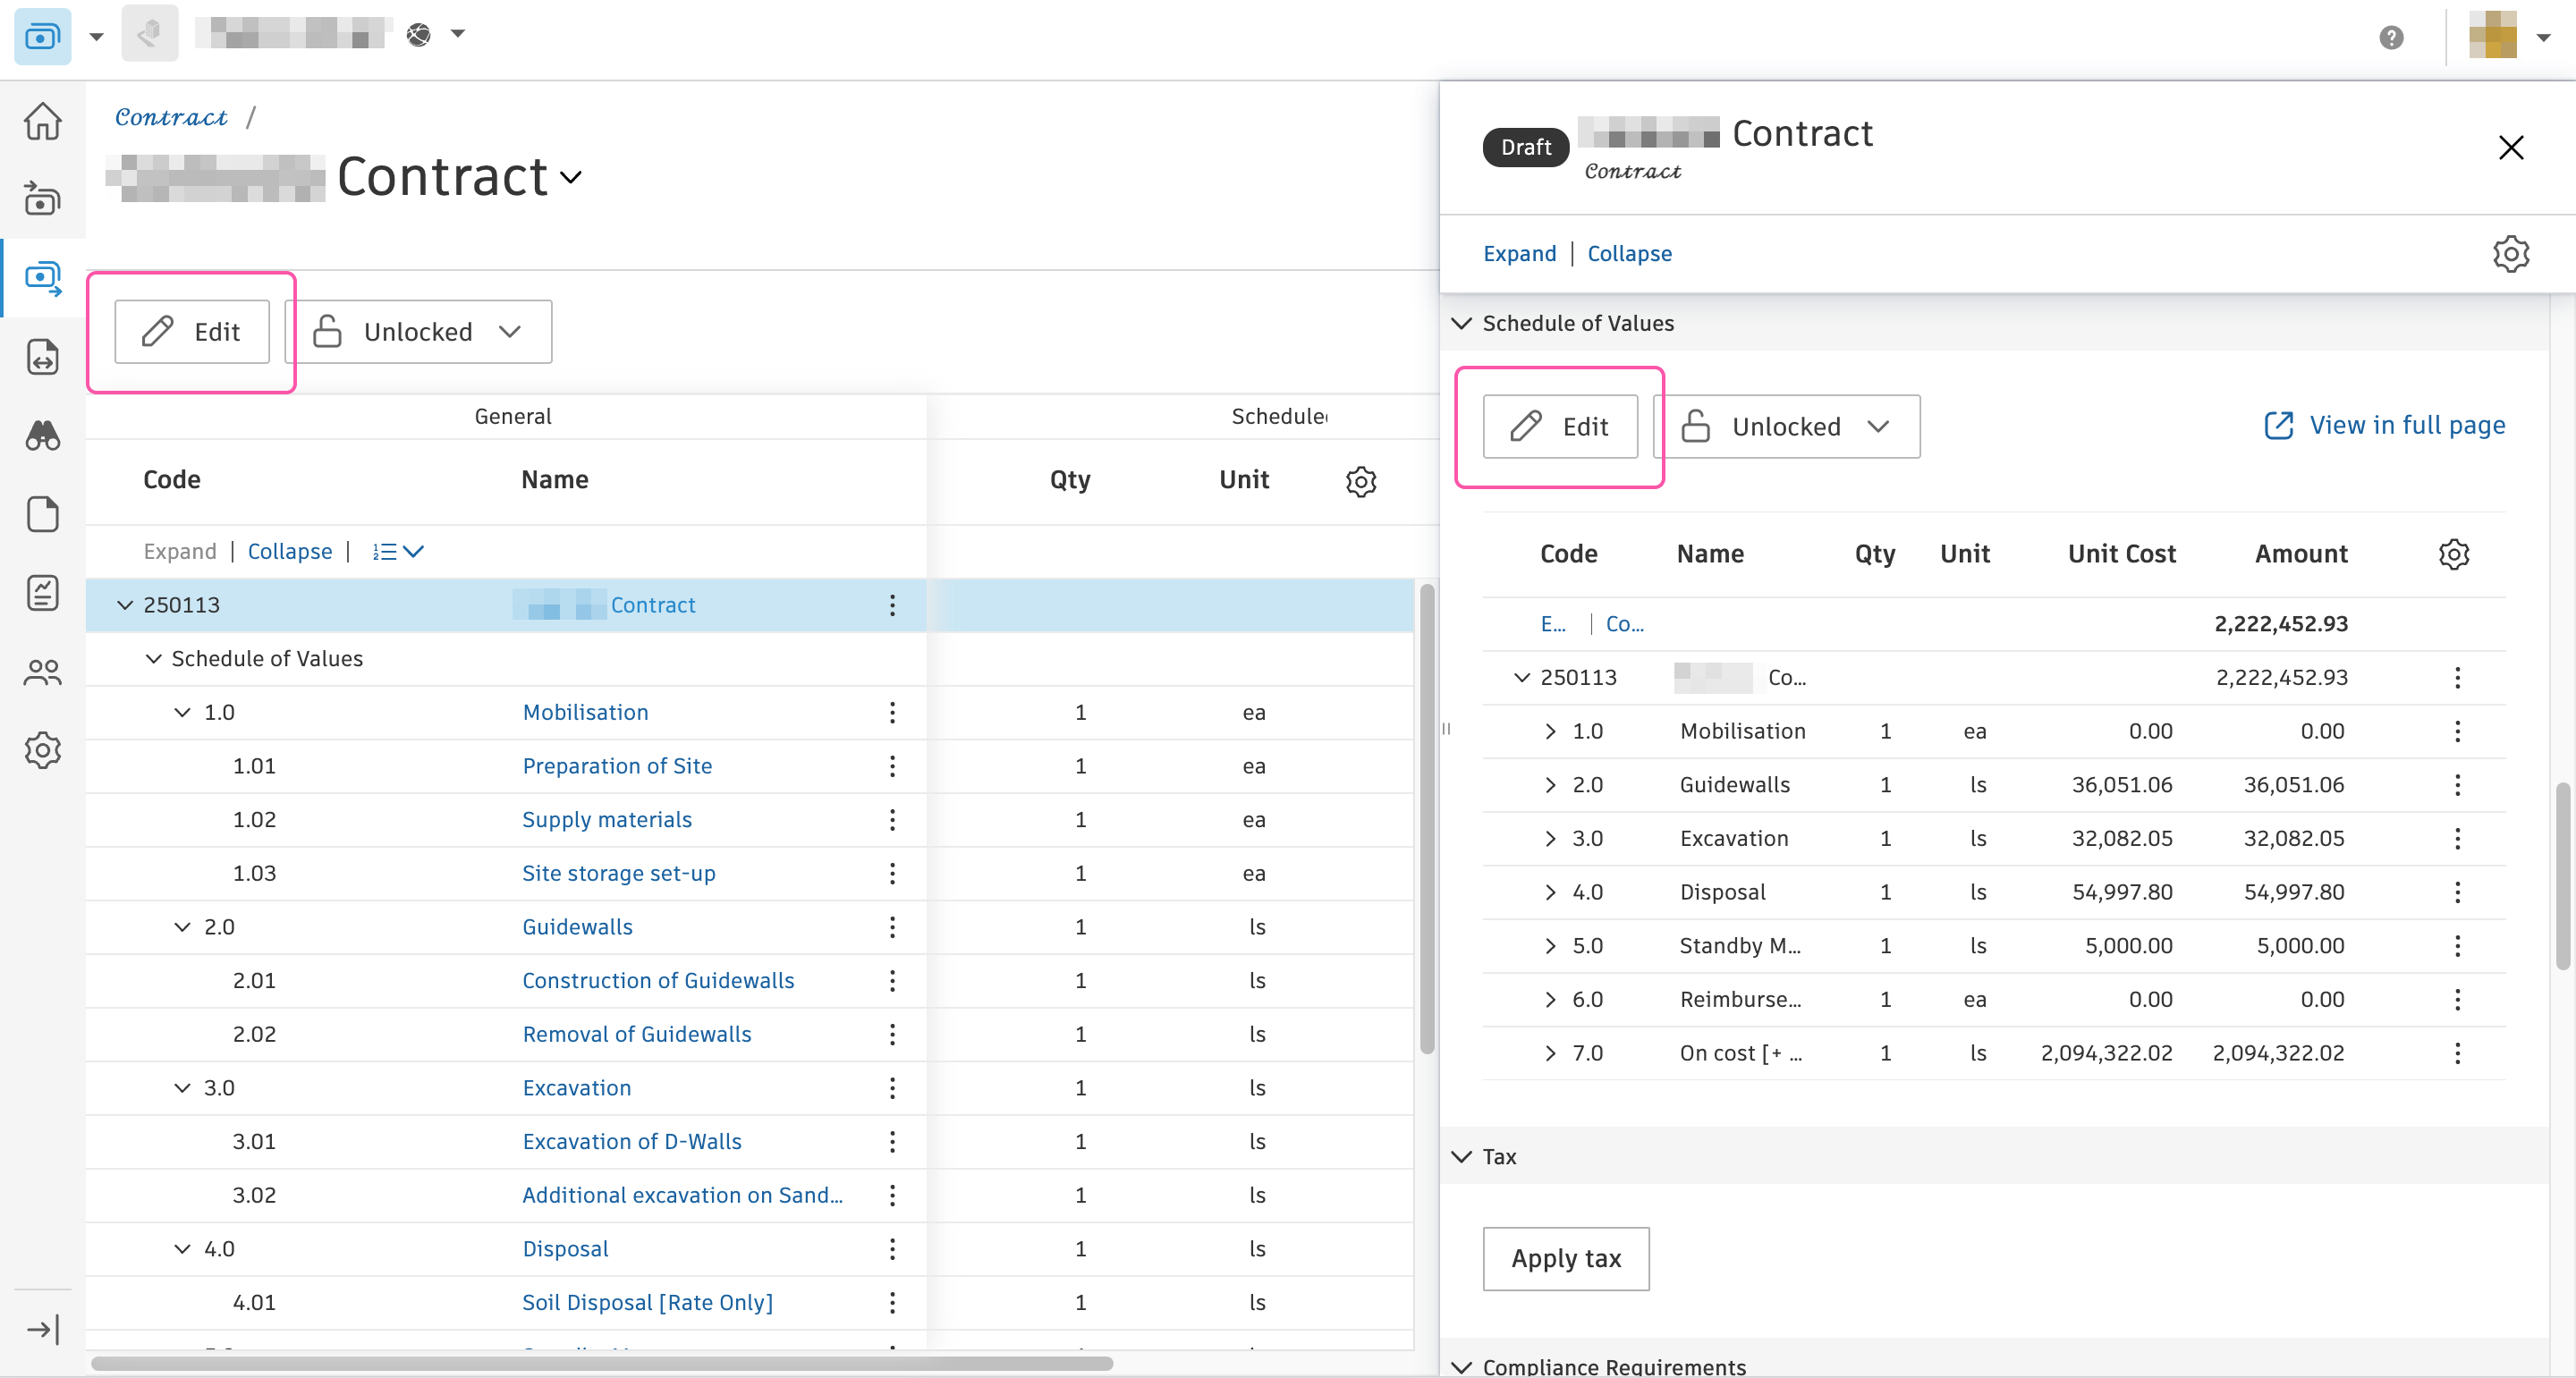
In the Edit Contract Schedule of Values modal, you can add or delete SOV lines, change the hierarchy, and edit fields such as code, name, quantity, unit cost, and amount. Use the budget column to link budgets to SOV lines or change an existing link. You can also import SOV subitems from Excel and export the current structure for bulk updates.
Work with supplier contract SOVs without a budget link
On supplier contracts, you can define the contract structure before budgets are finalized. This workflow matches the flexibility available on main contract SOVs.
You can:
- Add root SOV lines without assigning a budget.
- Edit root and subitem fields, including amount, quantity, and description.
- Add subitems under a root SOV line that doesn't have a budget link.
- Import or export SOV data in the modal, including new root lines in an Excel file.
When budgets are ready, link them to SOV lines using the rules in Budget and contract SOV relationships. See also Assign a Budget to a Contract.
Budget and contract SOV relationships
Budgets can link to contract SOV items in different ways. In every case, one rule applies: from a root SOV item to each leaf node, only one budget can be linked in that chain.
Three supported linking patterns are listed below. Your project uses one of these; they are not combined:
- Scenario 1 — Budgets at the root SOV level — Link each budget to one root SOV item only. The entire branch under that root shares the same budget.
- Scenario 2 — Budgets at any SOV level (one budget per SOV item) — Link a budget to a root or non-root SOV item. Each budget links to only one SOV item.
- Scenario 3 — Budgets at any SOV level (one budget on multiple SOV items) — Link one budget to multiple SOV items at any level, including non-root items.
Before you create cost payment applications, link budgets to SOV items using one of the patterns above. From each root SOV item to every leaf in that branch, only one budget can be linked in the chain.
Copy Supplier SOV Subitems to Main Contract
Some owners require that their payment applications reflect the exact schedule of value breakdown a general contractor gets from their subcontractors. However, the general contractor may not have some of their subcontractor SOVs established until later. Follow these steps to learn how to copy supplier contract SOV subitems to the main contract so the owner’s payment applications include the required information:
- Open a supplier's contract within the Contract tab in the Cost tool.
- Scroll to the Schedule of Values section in the flyout panel and select the More menu . There you can manually add subitems or import an Excel list. Note, subitem amounts must equal the existing SOV amount.

Then:
- Go to the Main Contract tab within the Budget tool and expand all.
- Navigate to the contract and open its flyout panel.
- Select the More menu to copy subitems to the main contract.
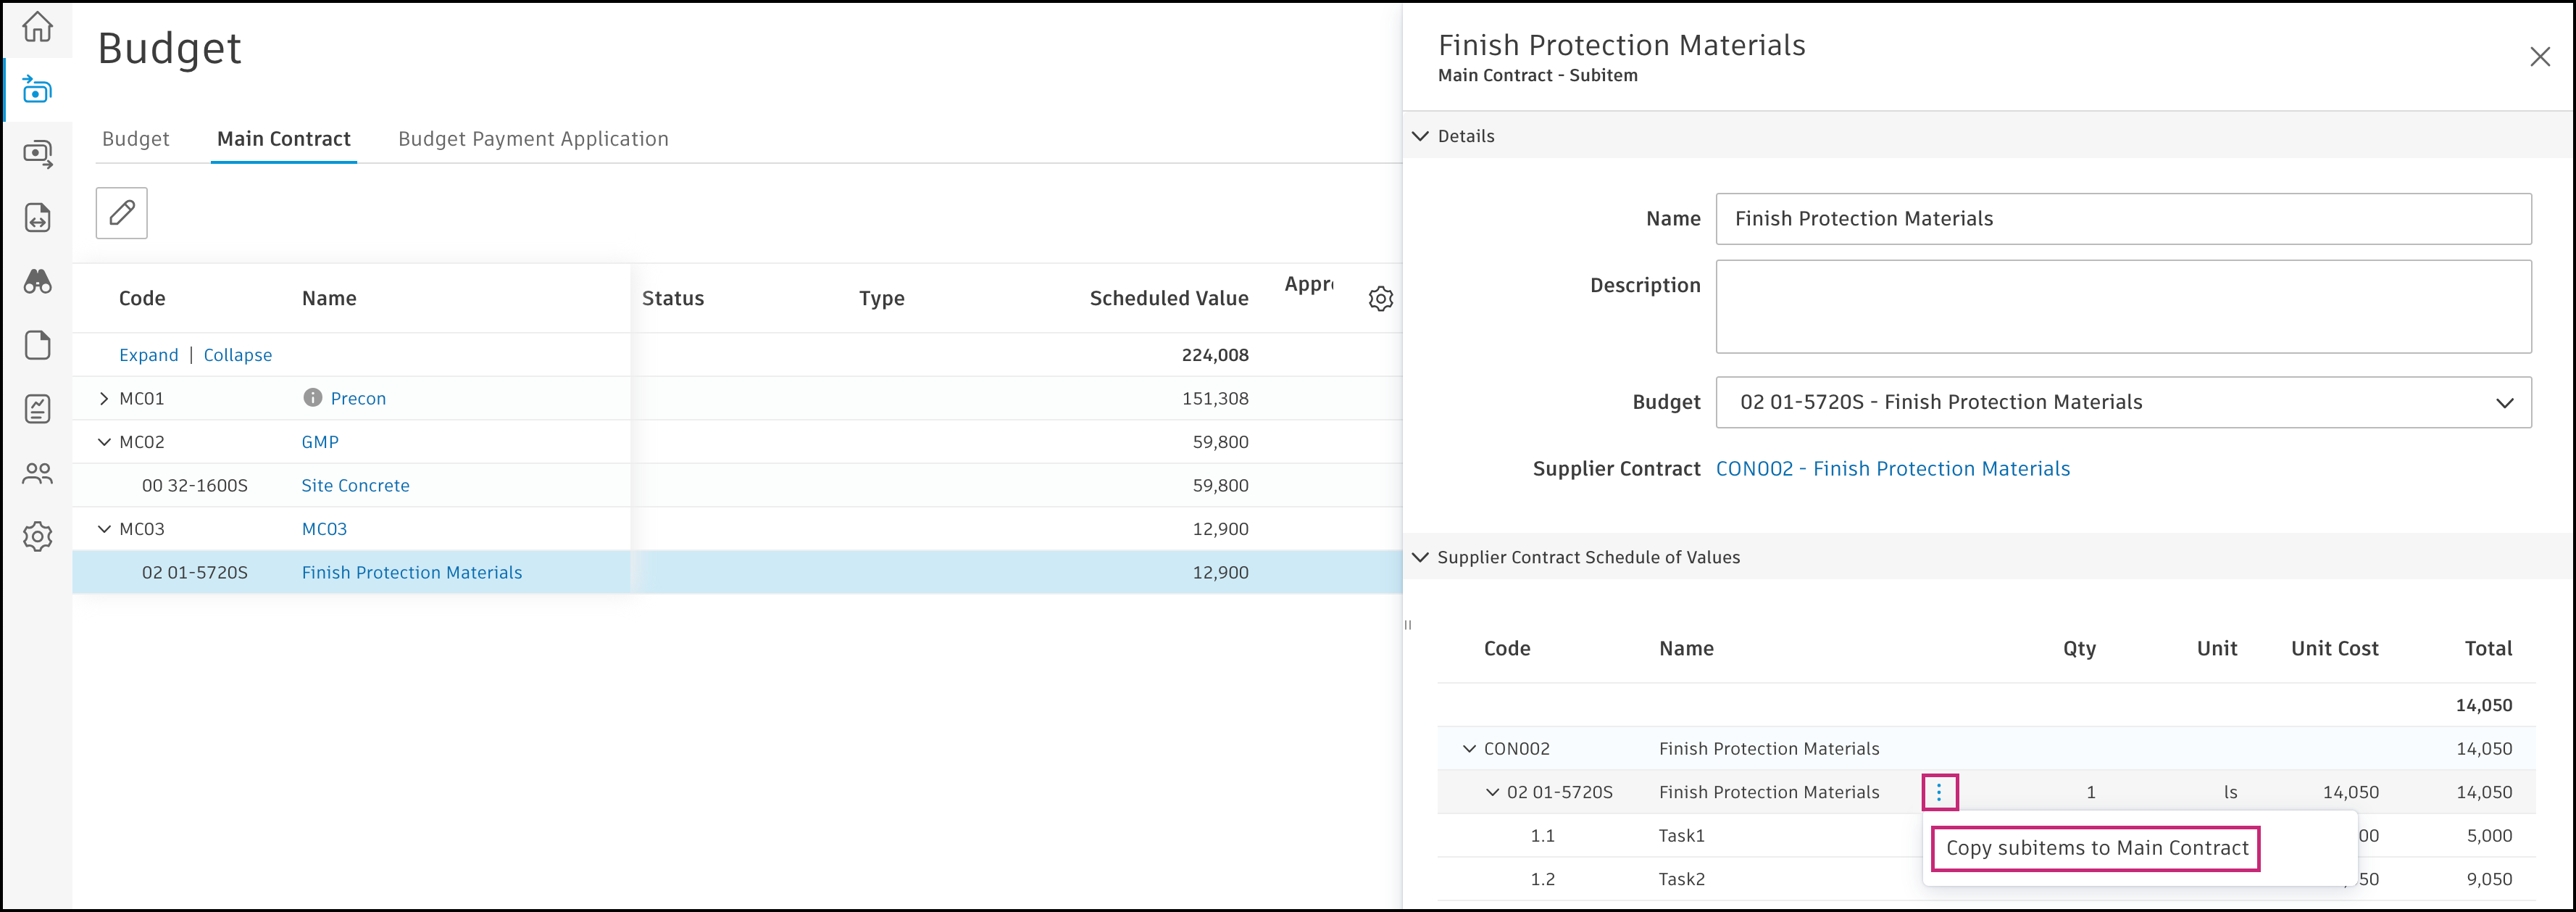
The new SOV subitems will now be displayed on the next owner payment application.
Import and Export Contract SOV
You can import and export contract SOVs using an Excel spreadsheet to reduce manual effort when managing large numbers of SOV items.
There are two ways to access the Import subitems option in Cost Management:
From the contract details page:
- Click Edit.
- Within the Edit Contract Schedule of Values modal, click the More menu next to an item and choose Import subitems.
From the contract flyout panel:
- In the Schedule of Values section, click the More menu and choose Import schedule of values.
- In the Schedule of Values section, click the More menu
To import SOV items, click Import Excel file to upload a previously created file containing SOV details. You can also download SOV template, fill it with data, and then import.
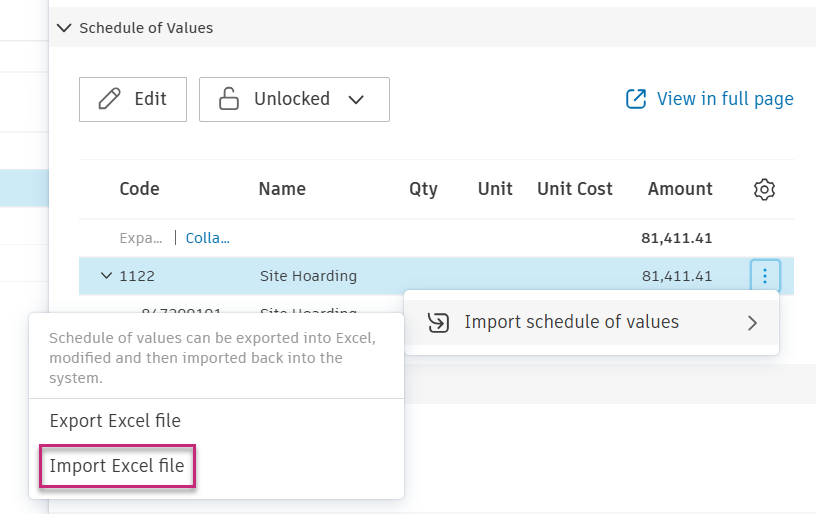
To export SOV items:
- Click Export Excel file to download the current SOV structure as an Excel file.
- Modify the exported file as needed and reimport it into the system.
Notes and Limitations:
- The import function does not support the deletion of existing SOVs. However, you can modify fields such as SOV number, name, quantity, unit cost, and amount.
- If new subitems are added to the spreadsheet, they will be included in the import.
- On supplier contracts, an import can add new root SOV lines without a budget link. Link budgets using Budget and contract SOV relationships before you change the contract status beyond Draft or Pending Supplier Input or create cost payment applications.
- After creating cost payment applications, you can revert Full Locked SOVs to an Unlocked status. This allows you to export all tree structures, update the Schedule of Rate (SOR), and reimport them.
- For spreadsheet imports, SOV items or subitems cannot be added or deleted if a payment application exists. However, fields such as SOV number, name, quantity, unit cost, and amount can still be modified.
- For manual operations on the web page, you can delete SOV subitems if there is no Work Completed Amount or Material Stored Amount in the cost payment application.
Download SOV Template
To download a predesigned contract SOV Excel template:
Click Download template on the subitems level.
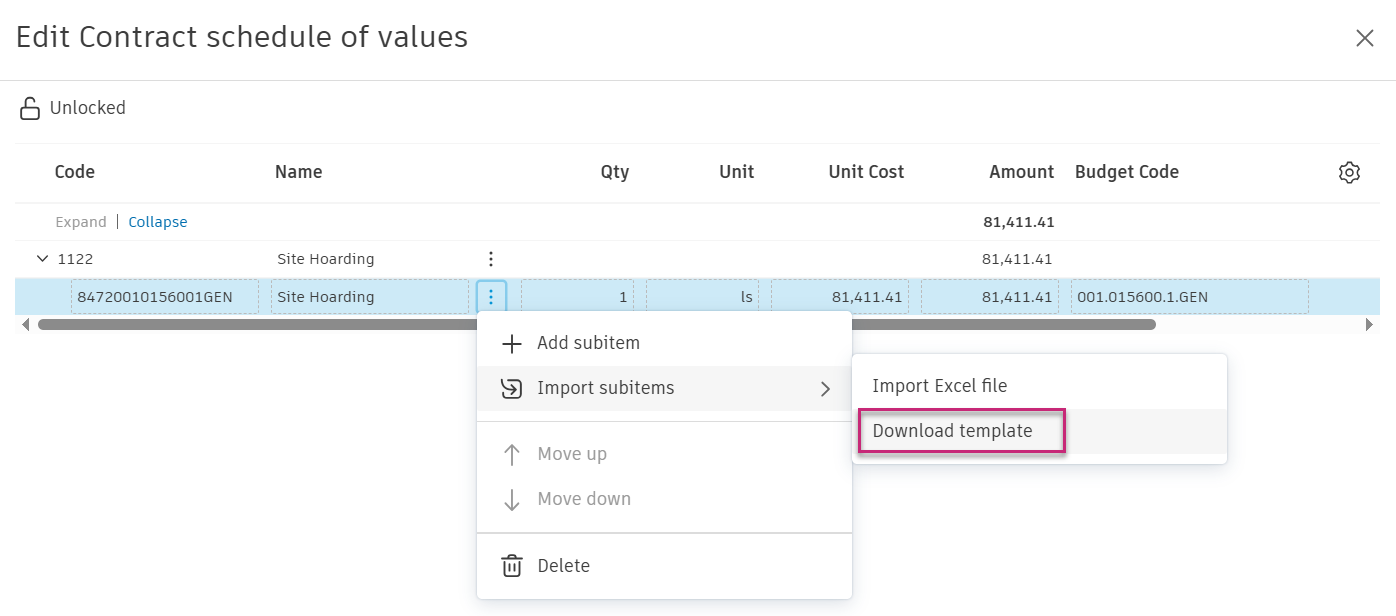
Fill in the necessary data, such as SOV number, name, quantity, unit cost, and amount.
Save your changes to the Excel file.
Return to Cost Management, select Import Excel file, and upload the edited file. The system will maintain the sequence of the SOV items as they appear in your spreadsheet.
Assign Contracts to Non-Members
To assign a supplier to a contract without using a seat requires a special workflow. There may be a delay of up to five minutes from the time that the contact is created and the contact can be assigned to a contract. The same method can be used to give an owner access to work with OCOs.
A hub administrator must add the company to your hub. Learn how to add a company.
Add Company to Cost Management
- Go to the Settings tool.
- Select the General tab.
- In the Company Setup section, select the company using a drop-down list.
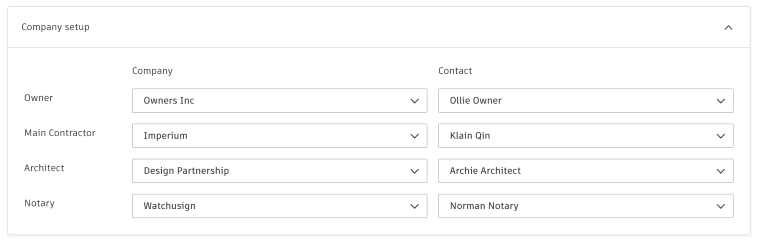
Add a Contact
The project administrator can then add the contact:
- Select the Contact drop-down list.
- Select Add contact.
- Enter the contact's name and email address of the individual to be assigned to the contract.
- Click Save.
Assign the Contract
Administration permissions are no longer required to assign contracts to members.
- Select the Cost tool.
- Switch to the Contract tab.
- Select the desired contract.
- Add the company and contact to the contract.
You can now generate documents with that contact with that supplier's information. In the Members tool in Project Admin, the contact appears as pending — no invitation has been sent, so no seat is assigned to them.
Once you have assigned a supplier to a contract, you can change their permission settings to collaborate on the financial items they need to work with. For example, owners may need to work with budget payment applications and OCOs, while suppliers may need access to RFQs and cost payment applications.
Assign a Budget to a Contract
Assigning a budget to a contract allows you to track and control costs associated with the contract throughout its duration. By setting a budget, you can monitor expenses and make sure that they stay within the allocated funds. Also, having a budget in place can help with forecasting and decision-making regarding future projects and contracts.
If you created supplier contract SOV lines without a budget link, link budgets when they are ready. In the contract flyout panel, use the budget drop-down list in the Details section to associate budgets with the contract. In Edit Contract Schedule of Values, link budgets to SOV lines following Budget and contract SOV relationships. When SOV lines are linked to budgets as required, you can move the contract beyond Draft or Pending Supplier Input, create SCOs, and create cost payment applications.
To assign a budget to a contract:
Select the Cost tool.
Switch to the Contract tab.
Click the contract’s name. The details panel opens.
Use the budget drop-down list to select all the applicable budgets in the Details section of the flyout panel.

Add Zero-Amount Budget into an Executed Contract
Adding a zero-amount budget to an executed contract can help with cost tracking and historical reporting. It allows you to accurately reflect the actual costs incurred during the contract period, even if no additional funds were allocated.
To add a zero-amount budget into an executed contract:
Click the executed contract's name. The flyout panel opens.
Click Add Budgets in the Details section.
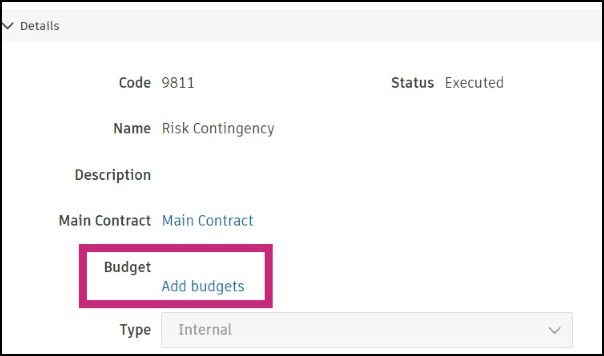
Choose one (or more) of the available zero-amount budgets.
Click Add.
Award the Contract in Foreign Currency
Once the foreign currency is set up, you'll see changes in the contract's flyout panel. The currency drop-down and exchange rate field are visible in the Details section.

To award the contract in foreign currency, choose it from the drop-down list:

Toggle between currencies in the Schedule of Values section to see the exchanged values in the Unit Cost, Amount, and Bulk Unit Cost columns. When a foreign currency is selected on a contract, the value can only be edited in the foreign currency. The currency name is shown as an indicator when editing:
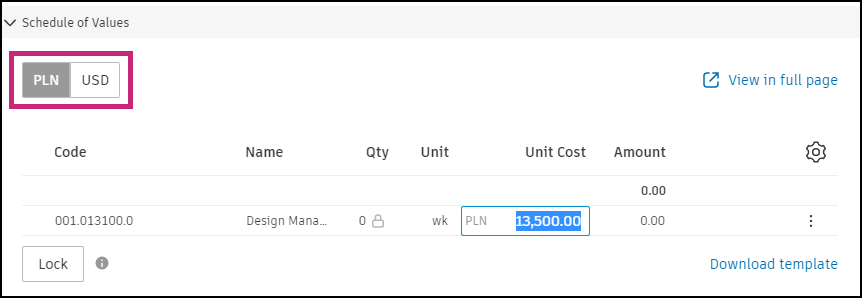
The default exchange rate is applied based on the date the Currency field is updated. You can adjust the exchange rate in the Settings tool or directly within the contract's flyout panel, except for:
- At the Executed status
- Contract SOV is at the Integrated and Locked status. See the Lock Fields and Actions with an Integrated ERP System article to learn more.
Delete a Contract
To delete an existing contract:
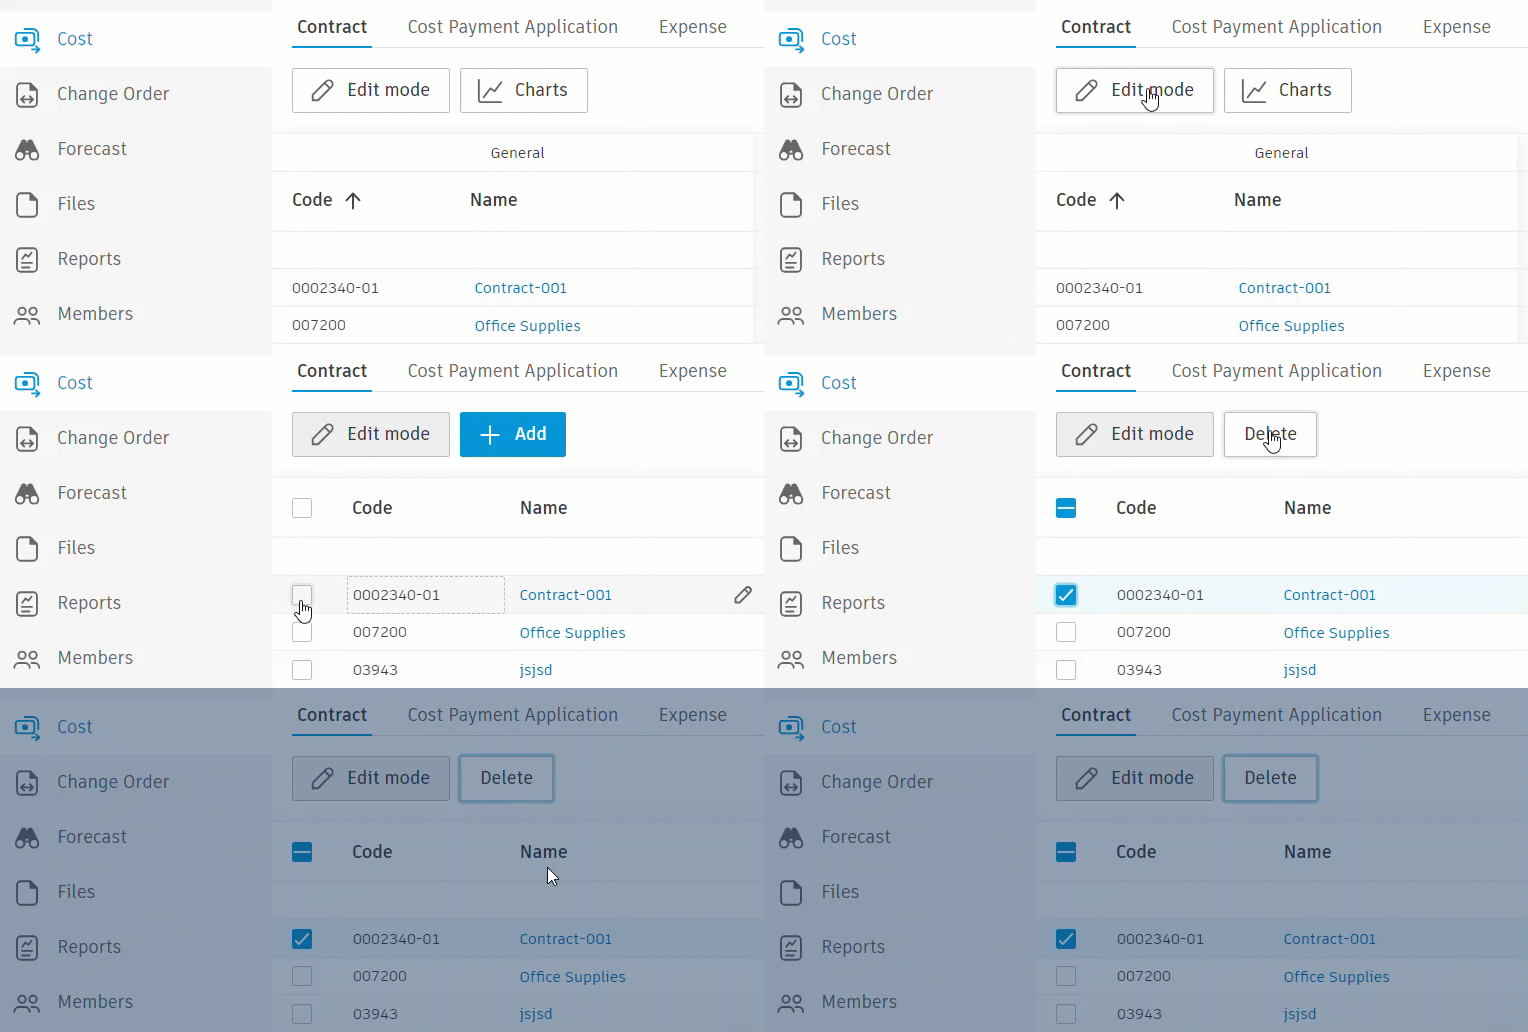
- Go to the Contract tab within the Cost tool in Cost Management.
- Click Edit Mode and then check the contract (or contracts) you want to delete.
- Click Delete.
- Confirm that you want to delete chosen contracts.
Export a Contract Report
You can create a formatted report of contract tables. First, you can filter and group contracts to get the information you need. Then, follow these steps:
Select the Cost tool from the left navigation.
Switch to the Contract tab.
Click
 .
.Enter the report title and choose between PDF Report and Excel Report.
Decide whether you need a title page and choose the report template:
Tip: When exporting a PDF or Excel budget report in Edit mode, the system will only export currently visible columns.- System Default View - includes system default columns in all groups.
- Budget Report - includes only columns in the General and Budget section in the table view.
- Current View - includes all currently visible columns. Use this one to create a report for filtered contract table views or previously saved current views.
Click Run report.
You'll receive an email notification when your report is ready to download. You can also download it from the Report tool.
Related Articles
- Main Contract
- Compliance Requirements
- Cost Settings
- Budget and Contract Tables
- Cost Payment Application
- Set Up Approval Workflows
More Resources
Check the Learning Center video course about the Cost tool.