Document Packages in Cost Management
Adding documents helps you share information with suppliers and owners. You can attach various files in the Documents section in the details panel of:
- Contracts
- Budget payment application
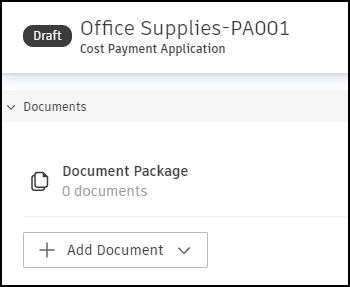
- Cost payment application
- Any change order
The Documents section contains two areas:
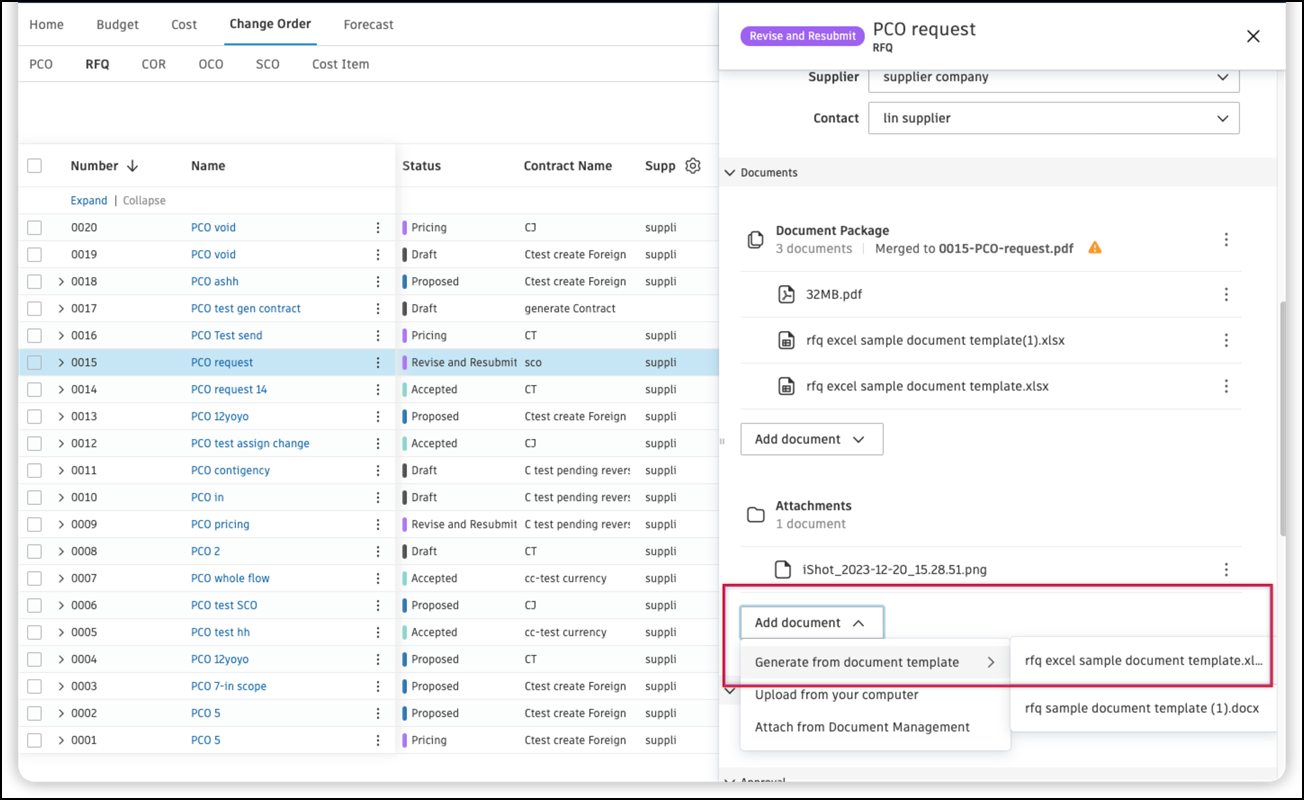
- Document Package: The primary collection of documents that are merged into a single PDF for distribution. Documents here are included when you send emails to owners or suppliers.
- Attachments: Supplementary documents stored separately from the main package. Use attachments for supporting files that don't need to be part of the merged PDF.
In this article:
- Add Document to the Document Package
- Add Documents as Attachments
- Manage Documents in the Documents Section
- Add Markups to a Document
Add Document to the Document Package
To add a document:
Select the Budget, Cost, or Change Order tool.
Switch to the relevant tab:
- In the Budget tool: Main Contract or Budget Payment Application
- In the Cost tool: Contract or Cost Payment Application
- In the Change Order tool: any change order tab
Select the item name in the General section of the table. A details panel opens.
Click Add Document in the Documents section.
Import files to be attached with a contract, change order, or payment. You can choose from:
From existing work:
- Recently Generated: The newest documents generated, if any.
- Add From Cost Payment Application: For budget payment applications. Transfer documents from the linked cost payment application.
- Add From Expense: For budget payment applications. Add documents from the linked expenses.
From other project processes:
- Add From PCO: For any change order. Add documents from a potential change order, which is the starting point of the change order workflow.
- Add From RFQ: For change order requests (COR) and supplier change orders (SCO). Use when you want to include request for quote documentation.
- Add From COR: For owner change orders (OCO). Use when creating owner-initiated change orders.
- Add From Cost Item: For any change order. Use when you want to create change orders from cost items.
- Add From Linked References: For any change order. Include detailed reports from linked references such as RFIs, issues, submittals, assets, forms, and files.
Create new documents:
- Generate From Document Template: Create a document from existing templates. The default template shows as the first on the list. Project administrators can create document templates in the Settings tool.
From external sources:
- Upload From Your Computer: Attach documents from your computer.
- Attach From Autodesk Docs: Select a document from the Files tool. You can make this option available in the Documents and Attachments in Cost Management section in the Settings tool.
Note: If the template includes a cost item subtable, the OCO name is attached to the cost item name.Click Generate.
Important notes about document generation:
- PDF conversion: The system automatically converts uploaded documents into PDF format and merges multiple files into a single PDF file with bookmarks for easier navigation.
- Supported file types: .docx, .doc, .pdf, .png, and .jpg. If unsupported file types are included, the system will generate a zip package instead.
- Font rendering: If you experience font rendering issues when documents are converted to PDF (such as fonts appearing differently or being substituted), embed the fonts in your original document before uploading. This is especially important for proprietary fonts like Calibri Bold, which may not be supported by the conversion system by default.
After adding documents, you can continue with your workflows or manage existing files.
Add Documents as Attachments
Administrators have the ability to add documents as attachments. These documents can be generated from templates.
Attached documents can be downloaded and sent by email.
Learn more about how to create document templates.
Manage Documents in the Documents Section
Once you add documents to the Document Package, you can manage them in several ways before sending an email to the owner or supplier.
Document Package Actions
Package-level actions (apply to all documents in the package):
- Open a document package in the Files tool for comprehensive file management.
- Open in browser for quick preview of PDF files in the Document Package and Attachments section, and merged PDF files.
- Download all documents from a package as a single file for offline access.
- Send by email for reviewing all associated scope and documentation. The document package will be sent as an attachment. If it exceeds 20MB, a download link will be provided instead.
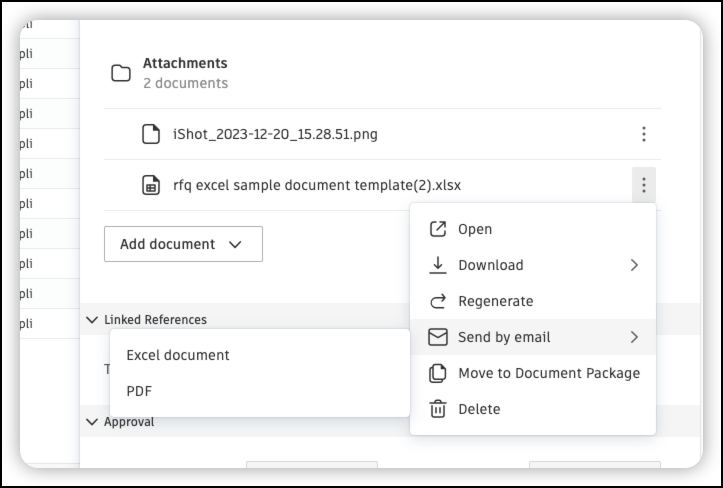
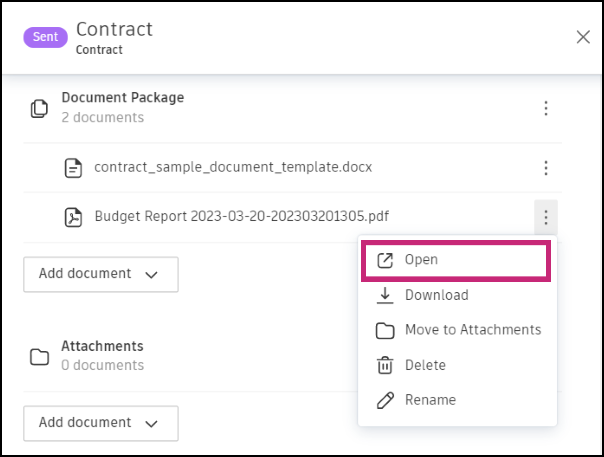
Individual Document Actions
Single document actions (apply to specific documents):
Open a document in BIM Viewer for advanced viewing and editing capabilities, such as adding markups to PDFs.
Download a Word or PDF document to your computer for offline viewing or editing.
Regenerate documents to update them with the latest data, or detach a generated document from a document package and move it to attachments.
Move to Attachments to reorganize your documents. This procedure is reversible, so you can move documents back to the package if needed.
Delete a document from a package permanently.
Rename a document to better reflect its content or purpose.
Delete a Document Package
Document packages cannot be deleted directly from the package-level actions. To remove an entire document package:
Delete each document individually using the Delete option in the document's More menu.
Once all documents are removed, the package is automatically deleted.
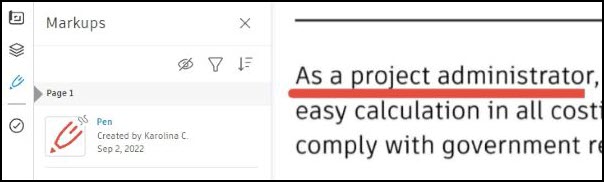
Add Markups to a Document
You can add markups to a PDF document. It may be helpful, for example, during the approval workflow review process.
To enable adding markups to a PDF document, the project administrator has to:
Select the Autodesk Docs option in the General settings.

Grant reviewers the Create permission for the folder that stores the generated PDF document.

Then, when reviewers open a PDF document from the Cost Management document section, the BIM Viewer will automatically enable the Markup panel.
To add markups to a Cost Management document, follow these steps:
Navigate to the Documents section in the flyout panel of the contract, payment application, or any change order that you want to markup.
Find the PDF document that you want to markup, and click the More menu
 icon next to the PDF document.
Select Open. The PDF document will open in the BIM Viewer.
Once the document is open, you can start adding markups to it. Refer to the Markups article to learn more about the different markup tools and actions that are available.
By following these steps, you can easily add markups to your Cost Management documents, helping you to collaborate more effectively with your team and subcontractors.