Configure and Use GCPay Integration
The GCPay integration streamlines your subcontractor payment workflow by connecting Cost Management with the GCPay's payment application platform. This digital workflow offers several key benefits:
- Streamlined payment processing: Subcontractors create and submit payment applications directly in GCPay, which automatically sync to Cost Management.
- Enhanced compliance management: Track lien waivers, compliance documents, and approval requirements in one centralized system.
- Improved Schedule of Values management: Subcontractors break down their Schedule of Values at the budget code level in GCPay for detailed tracking.
- Real-time visibility: General contractors can review and approve payment applications in GCPay, with approved applications automatically appearing in Cost Management.
- Reduced administrative overhead: Eliminate duplicate data entry and manual synchronization between systems while maintaining accurate financial records.
Check out the overview video:
Learn the GCPay integration workflow:
In this article:
- Enable GCPay Integration in Project Settings
- Configure the Downstream Payment System
- General Contractor: Manage Subcontracts
- General Contractor: Link Project and Contracts in GCPay
- Subcontractor: Break Down Schedule of Values
- General Contractor: Review Submitted Schedule of Values
- Subcontractor: Create and Submit Payment Applications
- General Contractor: Review and Approve Payment Applications
- General Contractor: Push Approved Payment Applications to Cost Management
- Troubleshoot GCPay Integration
Enable GCPay Integration in Project Settings
Project administrators enable downstream payment options in Project Process settings. On the Downstream payment step, you can turn on Cost Payment Application, GCPay, and Expense independently. GCPay manages the Schedule of Values and payment applications for contracts that use GCPay as the downstream payment system. Configure the default downstream system for each contract type in Contract Types settings.
To enable GCPay:
Select the Settings tool from the left navigation.
Switch to the General tab.
Scroll down to Project Process.
Click Edit.
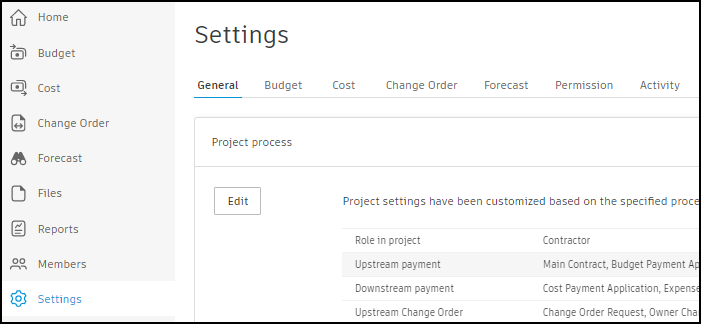
Click Next until you reach the Downstream Payment section.
On the Downstream payment step, enable the options you need:
Cost Payment Application — members create and manage cost payment applications in Cost Management for contracts configured to use this system.
GCPay — GCPay manages the Schedule of Values and payment applications when set as the downstream payment system. Configure the default system in contract type settings.
Expense — members track and reconcile cost liabilities such as purchase invoices and internal costs. See Expenses to learn more.

Click Next until you can click Save.
After you save, configure which contracts use each system. See Configure the downstream payment system.
Configure the Downstream Payment System
For each contract, Cost Management uses Cost Payment Application, GCPay, or None as the downstream payment system. This setting controls where subcontractors submit payment applications and where the Schedule of Values is managed.
Set defaults at the contract type level, then override individual contracts when needed.
Set the Default by Contract Type
Select the Settings tool from the left navigation.
Switch to the Cost tab.
Open the Contract types section.
In the Downstream payment system column, select Cost Payment Application, GCPay, or None for each contract type.
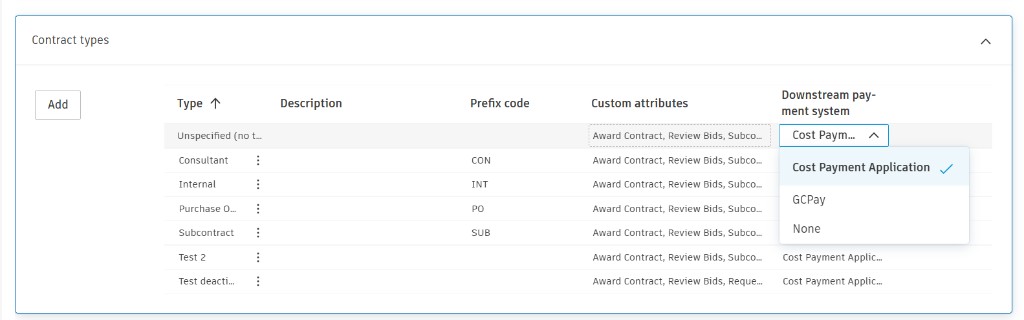
Click outside the dropdown for changes to be saved.
- If Cost Payment Application is turned off in project process settings, Cost Payment Application isn't available in this drop-down list. If GCPay is turned off in project process settings, GCPay isn't available in this drop-down list.
- You can't change the downstream payment system for a contract type if cost payment applications or GCPay payment applications already exist for contracts of that type.
Typical setup: set Subcontract to GCPay and leave other contract types as Cost Payment Application or None.
Override on an Individual Contract
Select the Cost tool from the left navigation.
Switch to the Contract tab.
Open a contract's flyout panel.
In Details, set Downstream payment system. By default, the contract inherits the value from its contract type.
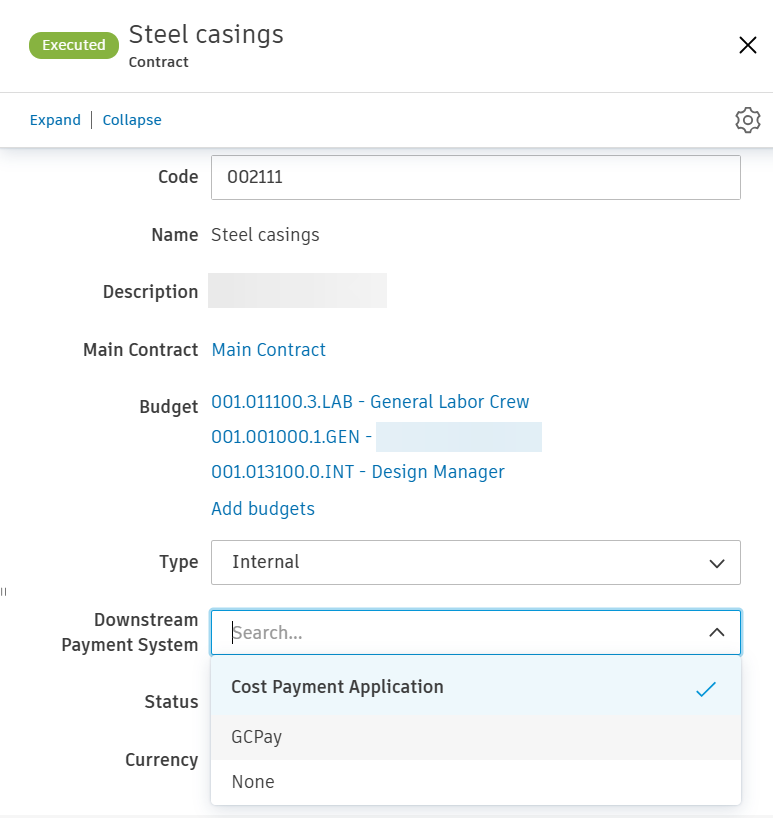
The value is stored only when you select it explicitly. Until then, the contract follows changes to its contract type default. After a payment application is imported from GCPay, the field is set to GCPay and can't be edited.
How Each Setting Affects Behavior
| Downstream payment system | In Cost Management | In GCPay |
|---|---|---|
| Cost Payment Application | Create, view, edit, and delete cost payment applications for the contract. Manage the contract Schedule of Values. | Can't link the contract. |
| GCPay | View payment summary for applications imported from GCPay. Can't create or edit cost payment applications for the contract. The Schedule of Values is locked after linking. | Link the contract. Create, view, edit, and delete payment applications. Manage the contract Schedule of Values. |
| None | Can't create or view cost payment applications for the contract. Manage the contract Schedule of Values. | Can't link the contract. |
When you create a cost payment application in Cost Management, contracts that use GCPay or None aren't available for selection.
General Contractor: Manage Subcontracts
For contracts that use GCPay as the downstream payment system, Schedule of Values management is split between Cost Management and GCPay. General contractors need to understand where each component is managed to maintain accurate financial records.
In Cost Management, the Schedule of Values (SOV) for linked contracts becomes locked and can't be edited. The general contractor sets up and locks the SOV before linking the contract to GCPay.

Learn more about SOV in Cost Management.
In GCPay, subcontractors can access the Schedule of Values to break it down to the budget code level. This detailed breakdown lets subcontractors create accurate payment applications. Learn more about the SOV view for subcontractors.
Billing periods for linked contracts are managed in GCPay rather than Cost Management. GCPay creates and manages the billing schedule for payment applications.
General Contractor: Link Project and Contracts in GCPay
After enabling the GCPay integration in Cost Management, general contractors need to link the project and specific contracts in GCPay. This connection lets subcontractors access their contracts and create payment applications in GCPay.
Link Project in GCPay
To link your Autodesk Forma project to GCPay:
Sign in to GCPay.
In Quick Links, click Start a New Project.
Click Yes, when asked to link with integration.
Select your Autodesk Forma hub from the Company drop-down list.
Select your project from the Project drop-down list. You can search by project's name or number.
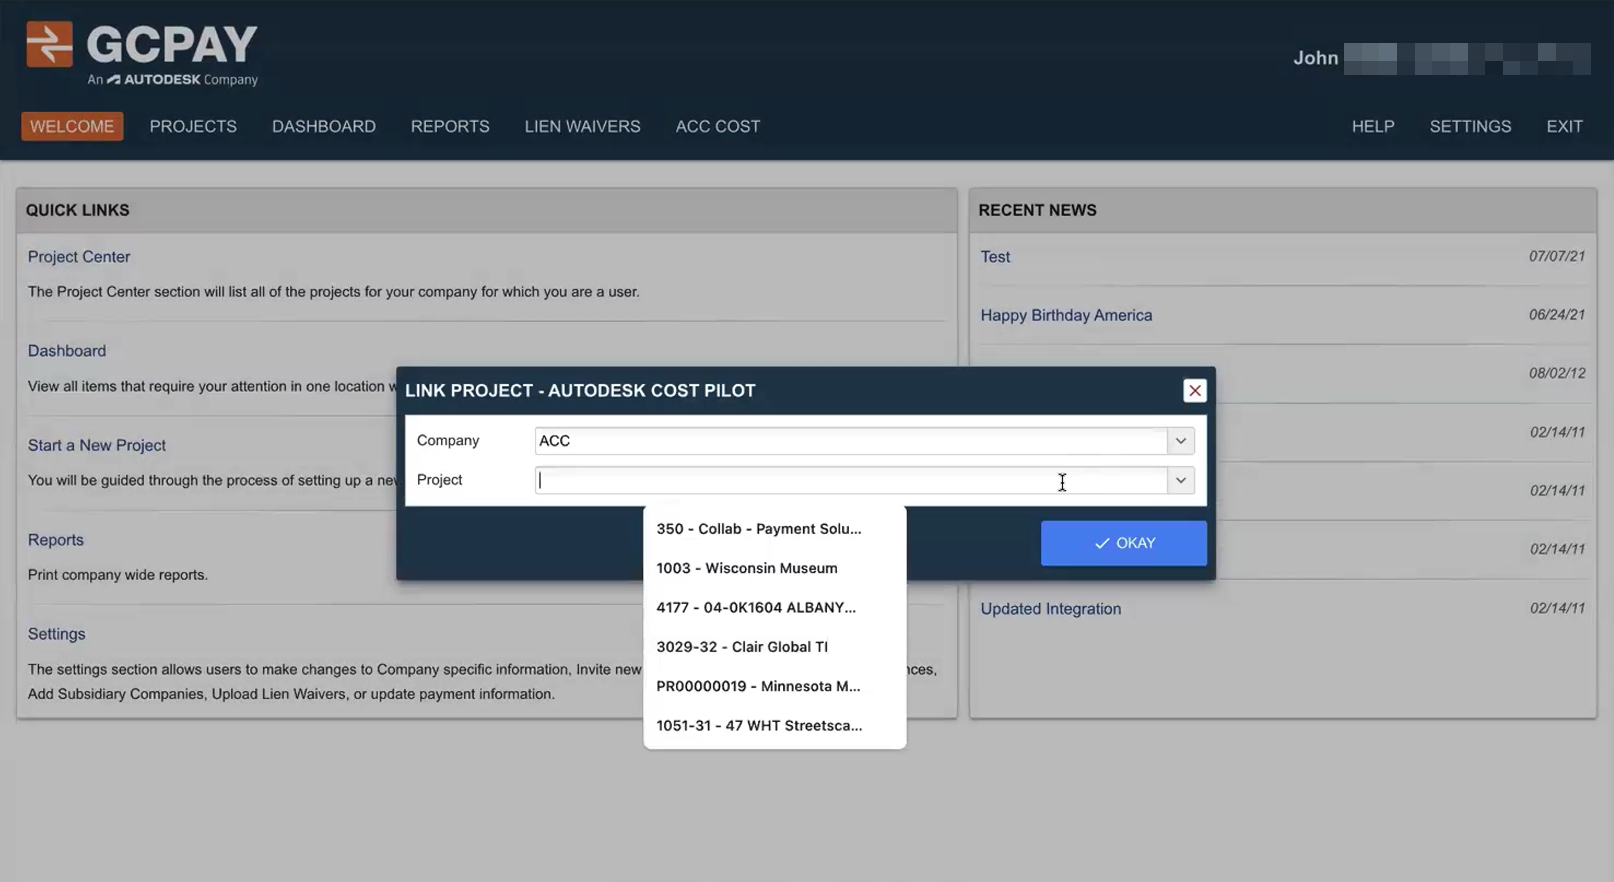
Click Okay.
The project is now linked. You can work with project settings to customize. After that, you can link companies and individual contracts from Cost Management to GCPay.
Link Companies in GCpay
If no additional companies (like subcontractor's company) are associated with this project, you will be asked to Add Company.

After choosing one, click Done. You may add many companies. If the company can't be found in the list, you can send an invite to start a collaboration in GCPay.
Link Contracts in GCPay
To link contracts from Cost Management to GCPay:
In GCPay, open the linked project.
Go to the Integration tab of the project.
Click Link Contract.

The Pick Contracts dialog shows all available contracts from Cost Management.
Note: Only contracts with the following criteria appear in the list:- Downstream payment system is set to GCPay
- Contract status is Executed
- Schedule of Values is Fully locked
Select the checkbox next to each contract that you want to link. You can select multiple contracts at once.
For each contract, map the GCPay Company to the Contract Vendor using the drop-down lists.
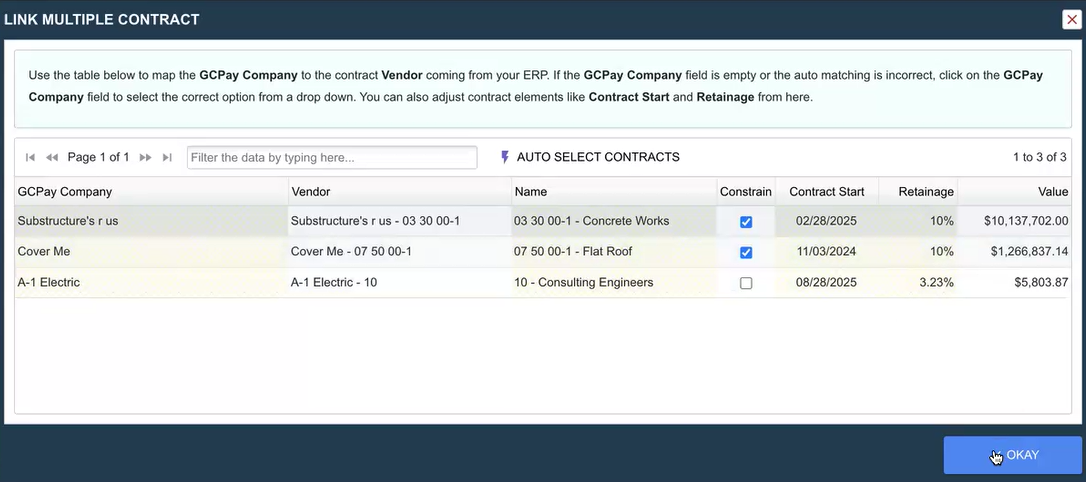
Click Okay.
The selected contracts are now linked and available for subcontractors to access in GCPay.
Subcontractor: Break Down Schedule of Values
Subcontractors need to break down the Schedule of Values from Cost Management into detailed line items at the budget code level in GCPay. This breakdown is required before creating payment applications.
To break down the Schedule of Values in GCPay:
Sign in to GCPay and access your linked contract.
Navigate to the Schedule of Values section of the project and click Edit to enter details.
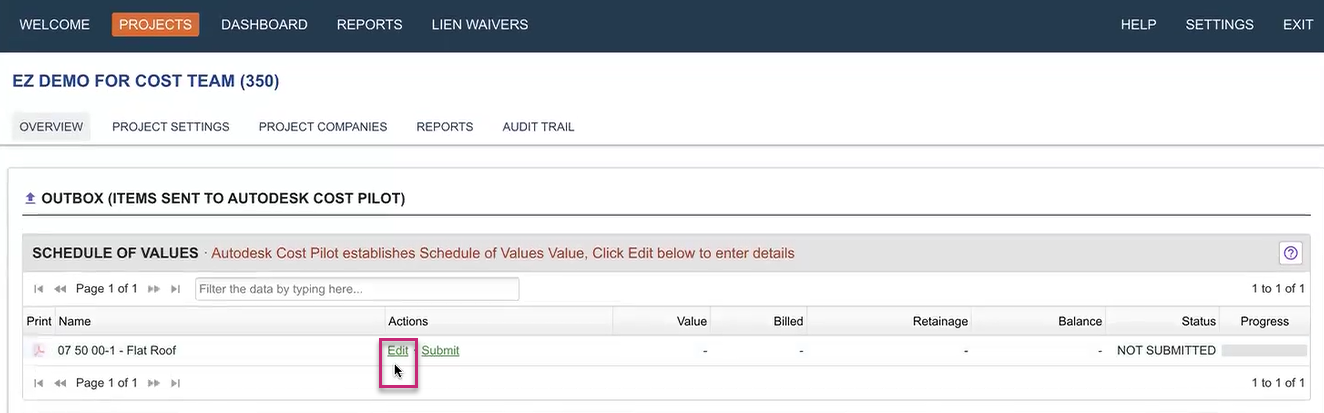
Click Add in the Line Items section for manual addition or click Upload, if you've already prepared a SOV. You can download a template to work with.

For each Schedule of Values item, click to expand and add detailed line items.
Enter the Description, Item Number, and Value for each line item.
Make sure the sum of your line item values matches the original Schedule of Values amount from Cost Management.
Click Next and then Submit.
Resolve Discrepancies
If there are discrepancies between your line item totals and the original Schedule of Values amounts, GCPay displays an Action Required warning.

To resolve discrepancies:
Review each Schedule of Values item with a warning.
Adjust your line item values to match the total amount.
Make sure that all budget codes are properly mapped.
Once all line items are entered and values match, you can submit the breakdown for the general contractor's review. Click Next and then Submit.
General Contractor: Review Submitted Schedule of Values
To review the submitted SOV, navigate to the project. In the Overview tab, you'll see the Contractor(s) Schedule of Values section and items to be reviewed. Click Review for each of them.
After reviewing, click Approve or Reject.
Subcontractor: Create and Submit Payment Applications
After your Schedule of Values breakdown is approved, you can create payment applications in GCPay for each billing period. These applications track work completed, materials stored, and retainage.
To create a payment application in GCPay:
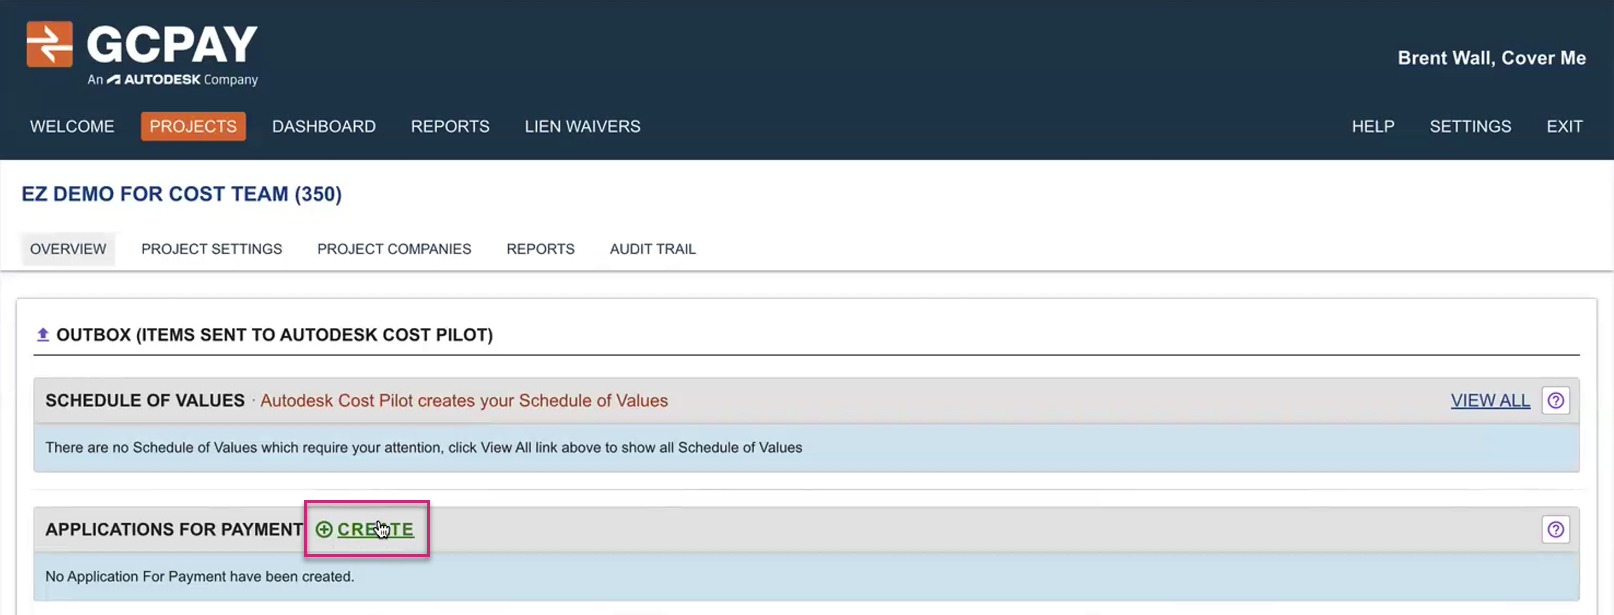
In GCPay, navigate to the Applications for Payment section of Overview.
Click Create.
For each line item, enter the following:
- Work Completed: The value of work completed during this period
- Materials Stored: The value of materials delivered but not yet installed
Review the automatically calculated retainage amounts based on your contract terms.
Complete any required compliance documents or billing requirements specified by the general contractor.
Review the payment application summary which is located below Next and Cancel to make sure all values are correct.
Click Next.
Click Submit to send the payment application to the general contractor for review.
After submission, the general contractor receives notification to review and approve your payment application.
General Contractor: Review and Approve Payment Applications
As a general contractor, you review and approve subcontractor payment applications in GCPay. This process lets you verify work completed, check compliance requirements, and approve payments before they sync to Cost Management.
To review and approve payment applications in GCPay:
Sign in to GCPay and navigate to the project.
In the Contractor(s) Applications for Payment section of the Overview, click Review next to a payment application that you want to review.

Review the following:
- Work completed values
- Materials stored amounts
- Retainage calculations
- Compliance documents
- Line item details
Click Review to start the process of reviewing.
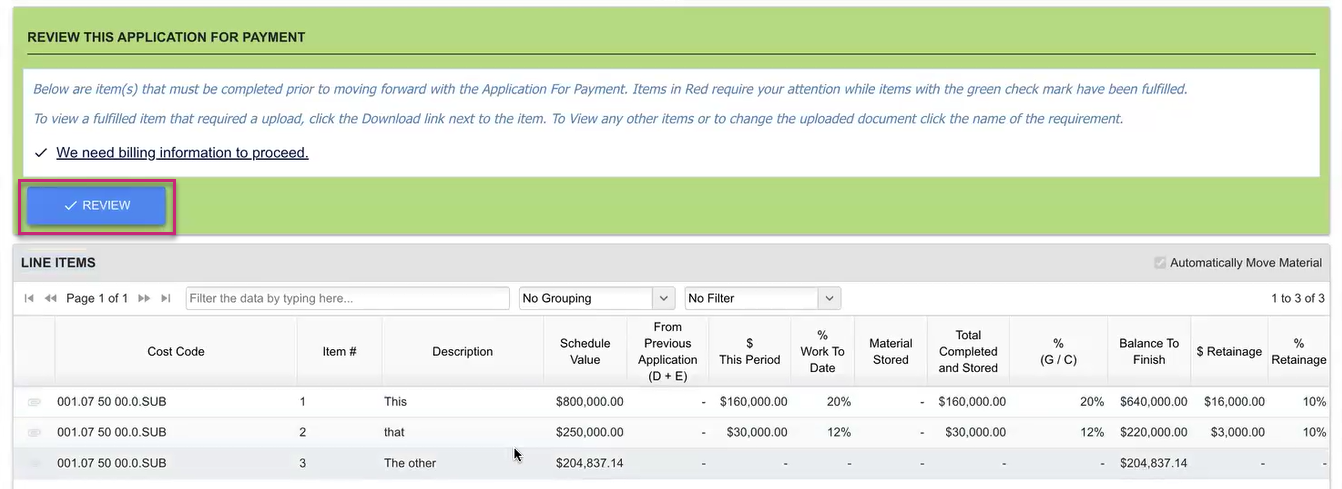
If the application needs changes, click Reject and provide comments explaining what needs to be corrected.
If the application is accurate and complete, click Approve.
Once you approve a payment application, GCPay sends email notifications to all designated approvers and the application is ready to export to Cost Management.
General Contractor: Push Approved Payment Applications to Cost Management
After approving payment applications in GCPay, you need to export them to Cost Management. This process automatically creates cost payment applications in Cost Management with the approved values.
To export approved payment applications to Cost Management:
In GCPay, navigate to Exportable Applications for Payment in the Integration tab.
Select the approved payment applications that you want to export.
Click Export.

The approved payment applications automatically appear in Cost Management.
View Payment Applications in Cost Management
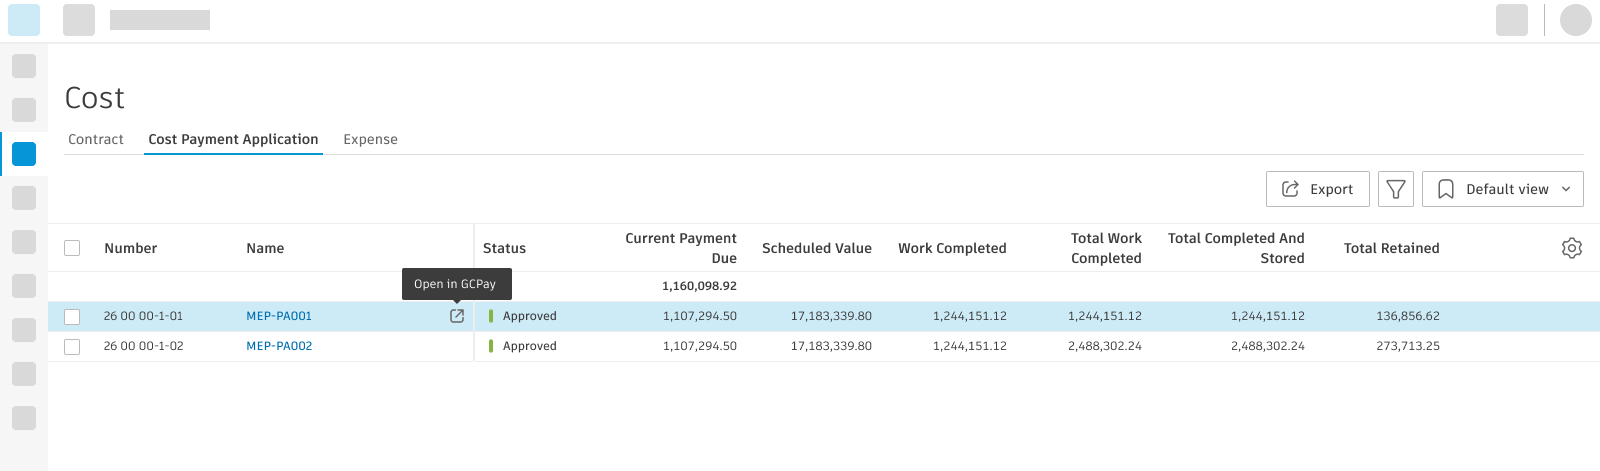
To view the synced payment applications in Cost Management:
Select the Cost tool from the left navigation.
Switch to the Cost Payment Application tab.
Click Open in GCPay to view the full application details in GCPay.
Contracts that use Cost Payment Application as the downstream payment system continue to use the standard cost payment application workflow in Cost Management. See Create Cost Payment Applications to learn more.
Add Cost Payment Applications to Budget Payment Applications
Once cost payment applications are in Cost Management, you can add them to budget payment applications as associated costs.
To add GCPay applications to budget payment applications:
Go to the Budget tool and select the Budget Payment Application tab.
Open a budget payment application.
In the Associated Costs section, select the cost payment applications from GCPay.

The budget payment application now includes the approved subcontractor costs from GCPay.
Understand Data Flow from GCPay to Cost Management
GCPay sends specific values to Cost Management to prevent double counting in payment applications. Understanding this data flow helps you reconcile values between systems.
The calculation works as follows:
- This Period Work Completed = Current Total Completed and Stored - Previous Total Completed and Stored
- Materials stored in previous periods are already included in the previous total
- Only net new work and materials are sent to Cost Management
Troubleshoot GCPay Integration
This section provides solutions to common issues that you might encounter when using the GCPay integration with Cost Management.
Unable to Link Project in GCPay
If you can't link your project in GCPay, verify the following:
- You have the correct permissions in both GCPay and Cost Management
- The project exists in Autodesk Forma
- The GCPay integration is enabled in the project's process settings
- You're using the correct Autodesk Forma hub credentials
Contact your project administrator if you need permission adjustments.
Contracts Not Appearing in GCPay
If contracts don't appear in the Pick Contracts dialog in GCPay, check that:
- Downstream payment system is set to GCPay on the contract (in contract type settings or the contract flyout)
- The contract status is Executed
- The Schedule of Values is Fully locked
- The contract has budget items assigned
Make sure that all these criteria are met before a contract can be linked to GCPay.
Schedule of Values Discrepancies
If you see discrepancies between your line item breakdown and the original Schedule of Values:
- Review each Schedule of Values item with an action required warning.
- Check that your line item values sum to the exact Schedule of Values amount.
- Make sure that all line items are mapped to valid budget codes.
- Contact the general contractor if the original SOV amounts need adjustment.
Payment Applications Not Syncing to Cost Management
If approved payment applications aren't appearing in Cost Management:
- Verify that the applications have been fully approved by all required approvers in GCPay
- Check that you clicked Export in the Exportable Applications for Payment section
- Make sure that the GCPay integration is still enabled in Cost Management
- Review the integration status in both systems to confirm the connection is active
Contact GCPay support if payment applications continue to fail syncing after verifying these items.